
鱼皮星球用户中心笔记
1.初始化项目(前端项目)
# 使用 npm
npm i @ant-design/pro-cli -g
pro create MyCenterApp
#依赖安装的目录(推荐第一种)
cd MyCenterApp && yarn
// 或
cd MyCenterApp && npm install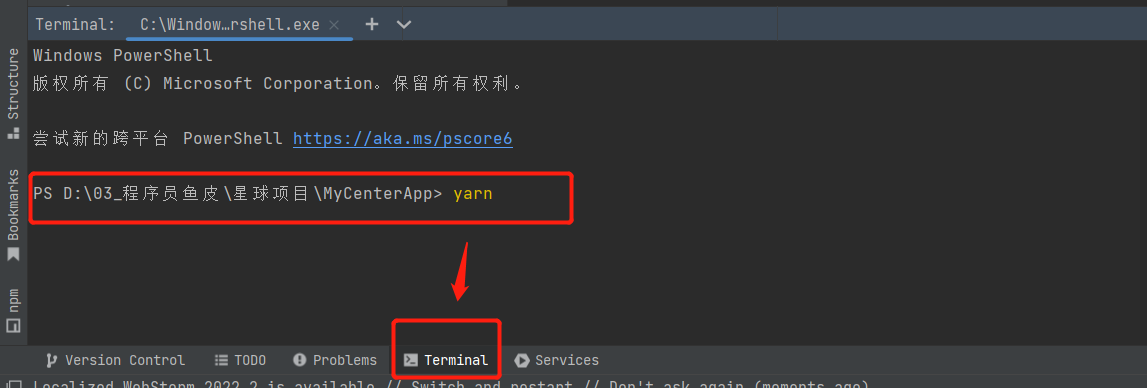
小米饭插件的构建,这里请运行下面的命令,且保证是在umi@3项目中 (重要的事情说三遍文件夹MyCenterApp)
yarn add @umijs/preset-ui -D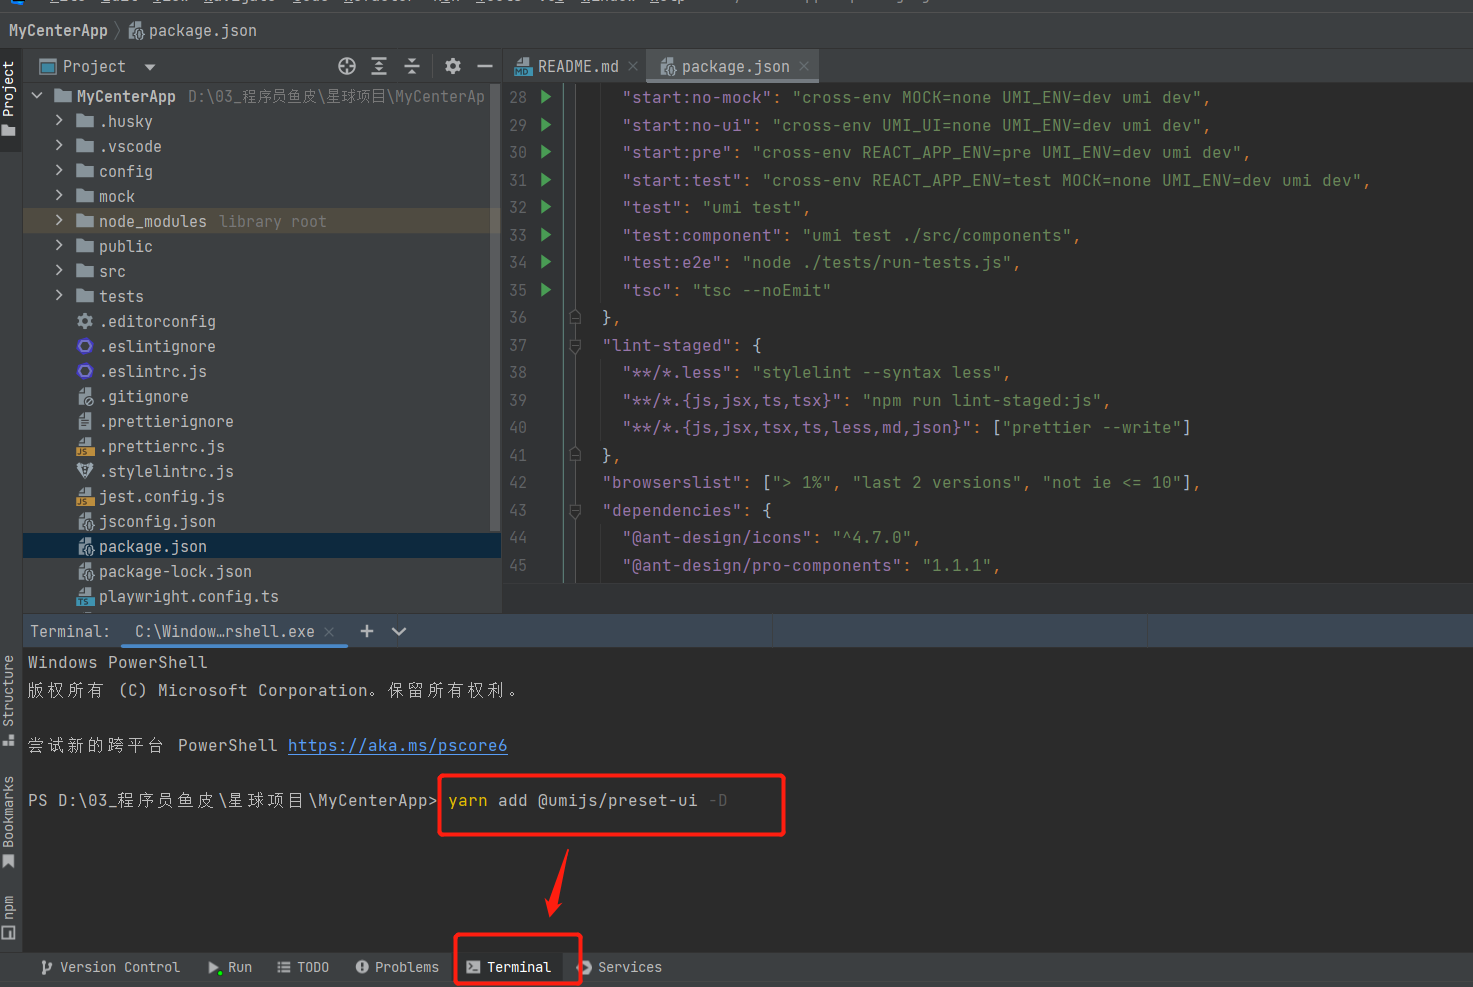
运行项目
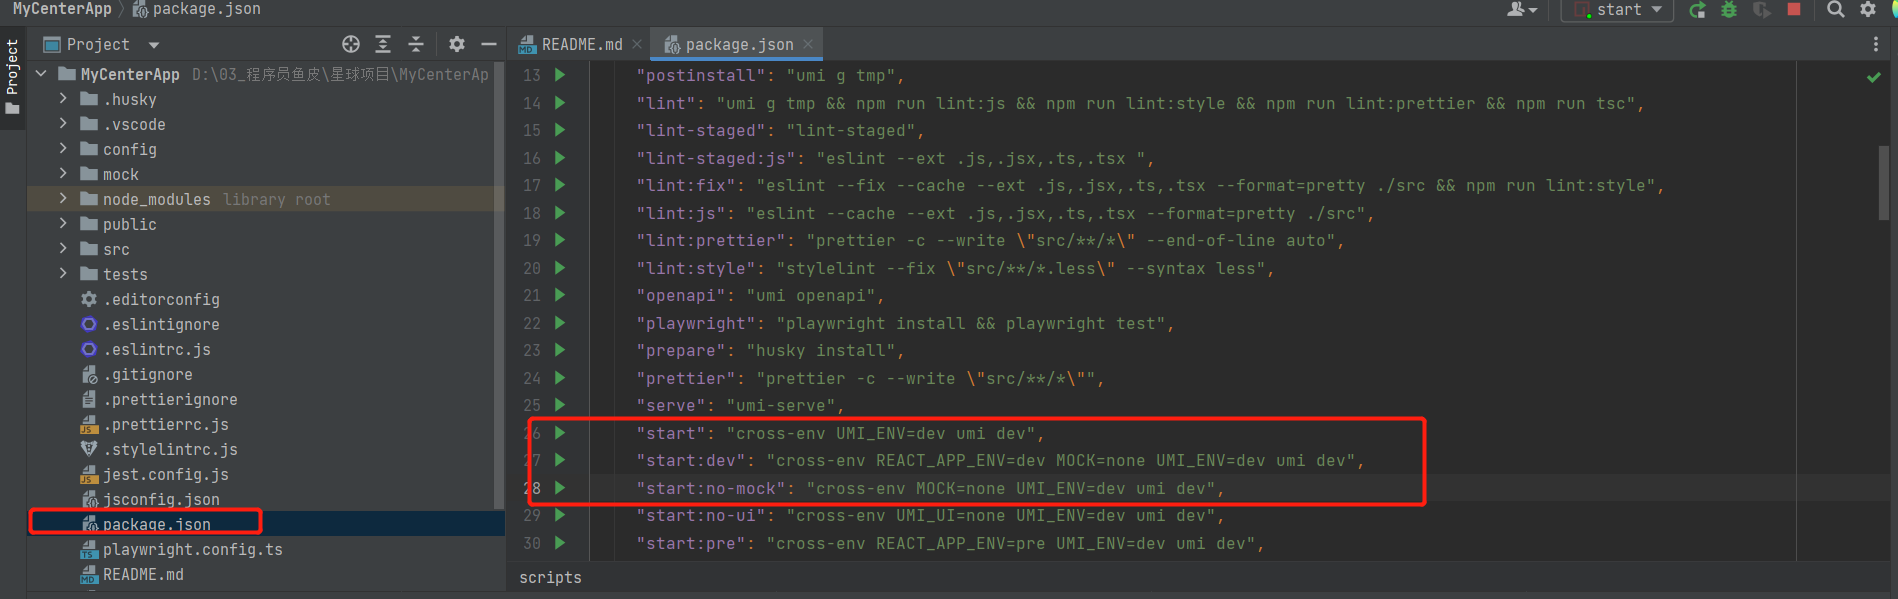
因为我们没有写后端,所有的数据全部是假的,是MOCK模拟出来的,当MOCK:none就登录不进去了
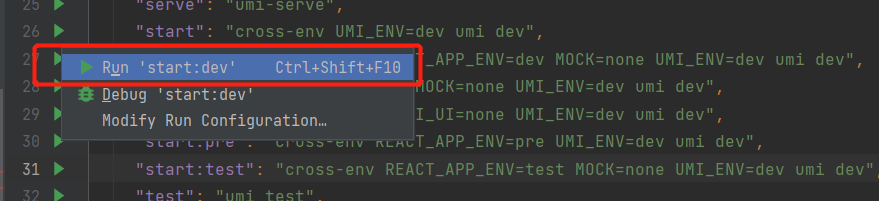
start和start:dev的区别在于前者有造好的假数据,包括写死的的用户名和密码。
开启umi UI帮助我们自动生成代码,在terminal执行yarn add @umijs/preset-ui -D ,就是下面图片中的米饭插件
2.项目瘦身
1. 删除国际化

  执行 i18n-remove 脚本

  删除项目路径下 src/locales 文件夹

2. 删除项目路径下 src/e2e 文件夹

  e2e 文件夹里面定义的是一系列测试流程

3. 若前面有使用 umi ui 添加页面,可把该页面删除
   注意:需要在路径为 config/routes.ts 的文件夹下,删除对应的路由规则

4.  删除项目路径下 src/services/swagger 文件夹
  swagger 文件夹里面定义了一系列后台接口程序

5. 删除项目路径下 config/oneapi.json 文件
  oneapi.json 定义了整个项目用到的一些接口

6. 删除项目根路径下 tests 文件夹
  tests 文件夹主要是和测试相关的

7. 删除项目根路径下 jest.config.js 文件
  jest.config.js 测试相关的配置文件

8. 删除项目根路径下 playwright.config.ts 文件
  playwright.config.ts -> 自动化测试工具,帮你在火狐或谷歌自动测试,不用真实地打开浏览 器就能测试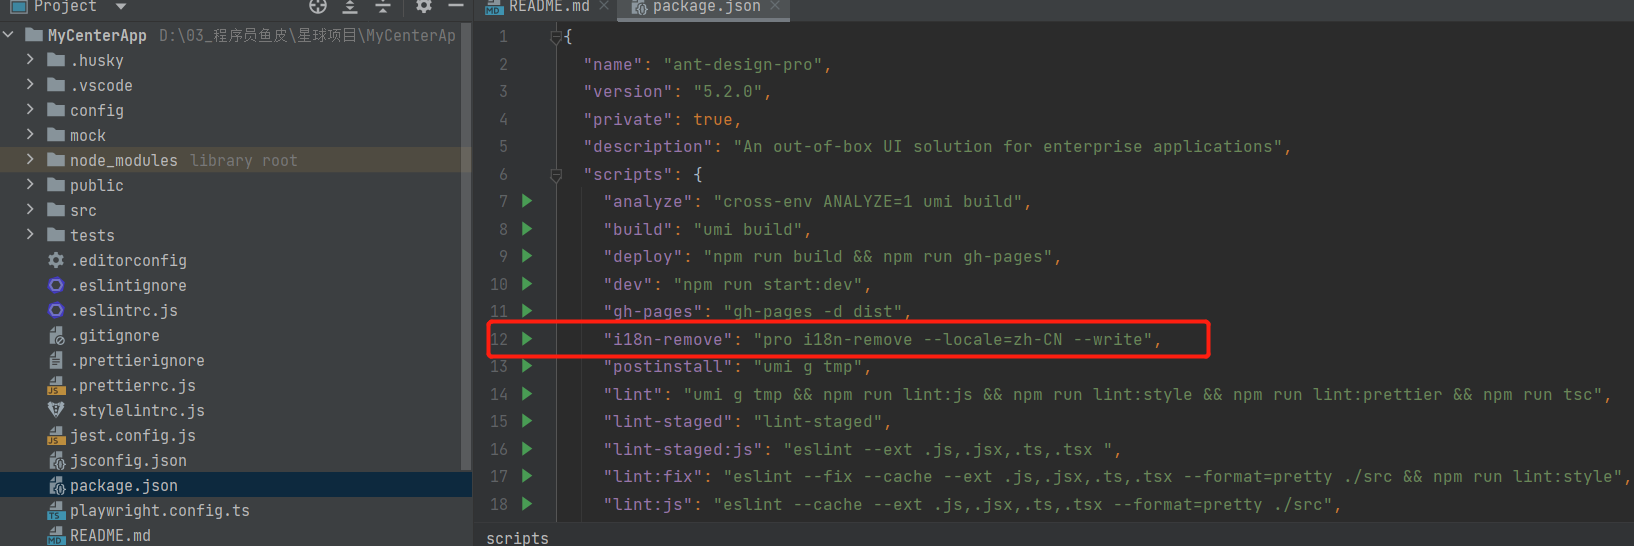
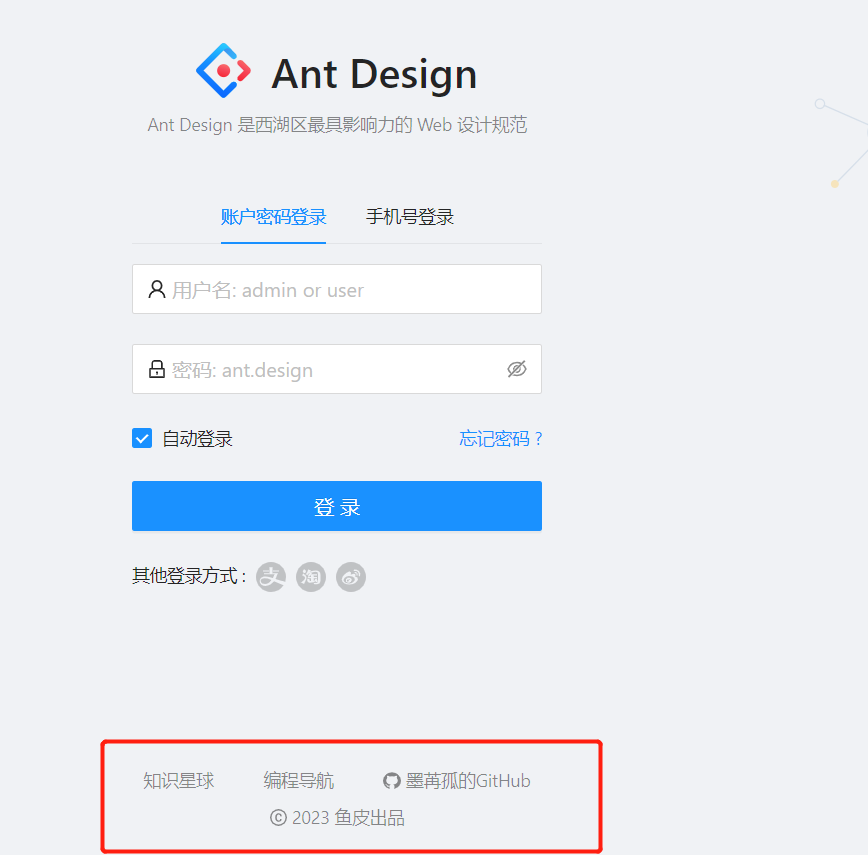
3.登录页面
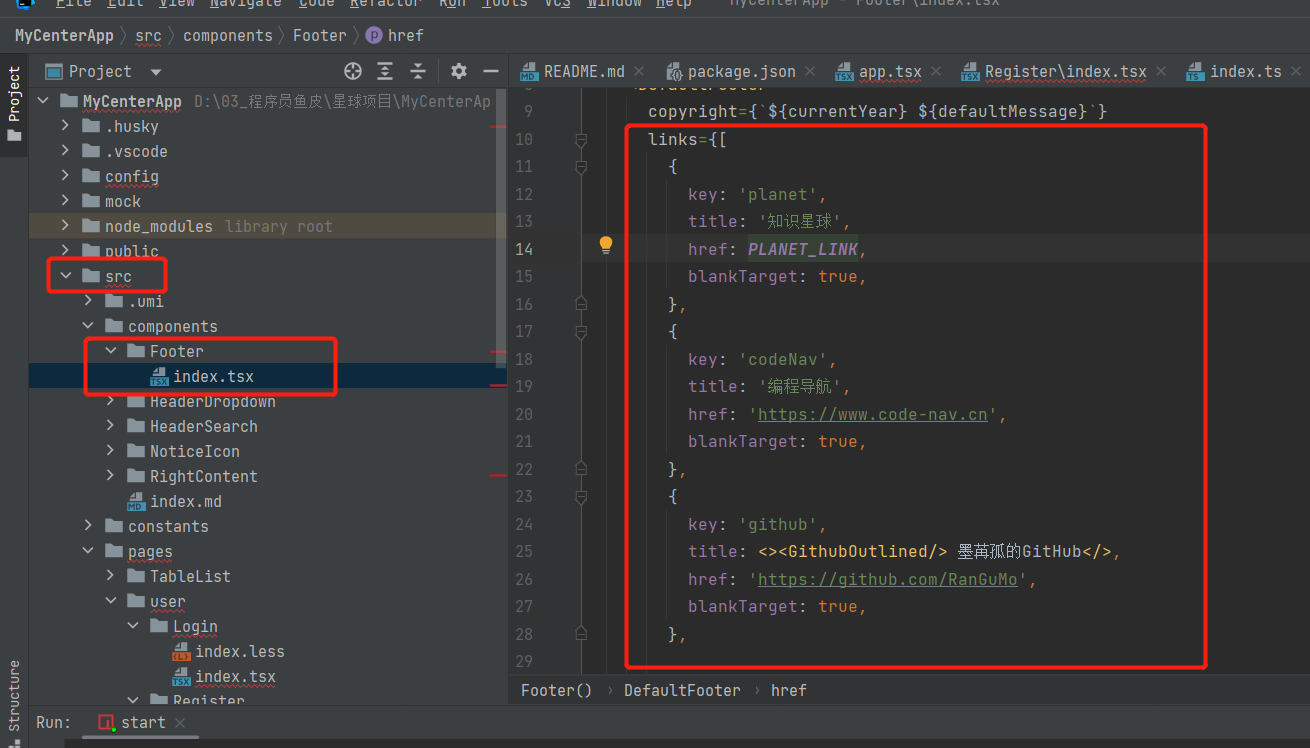
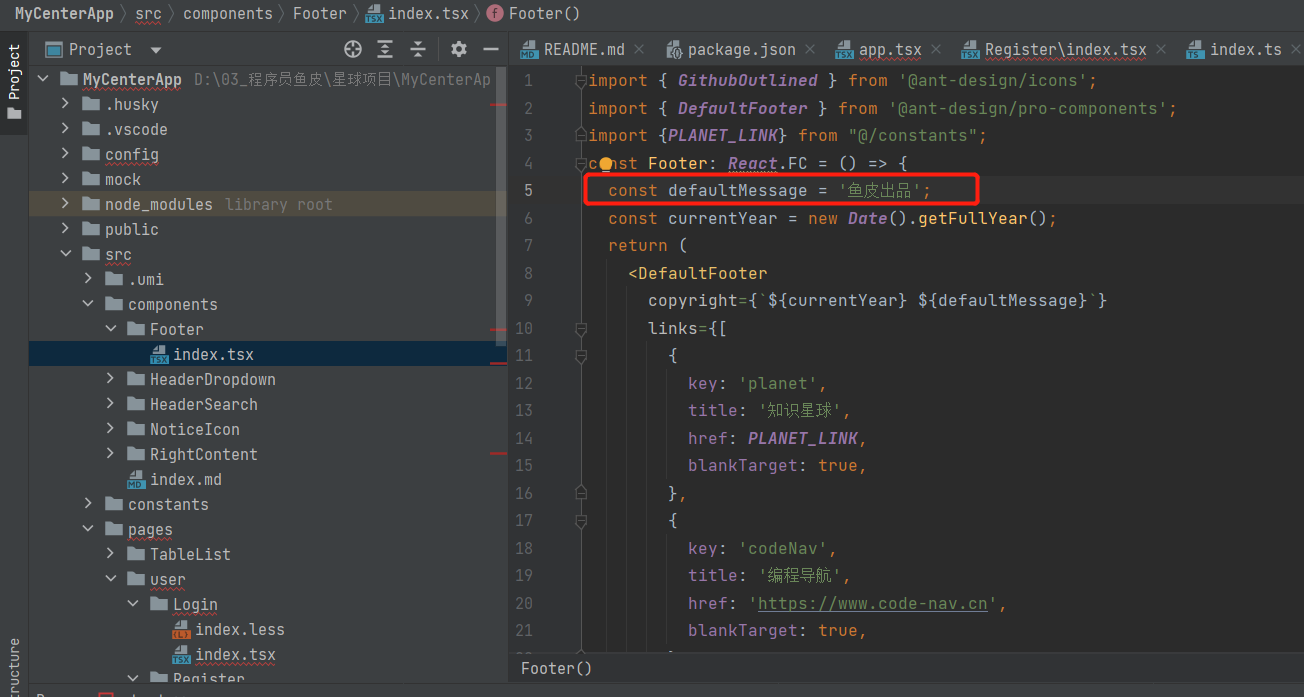
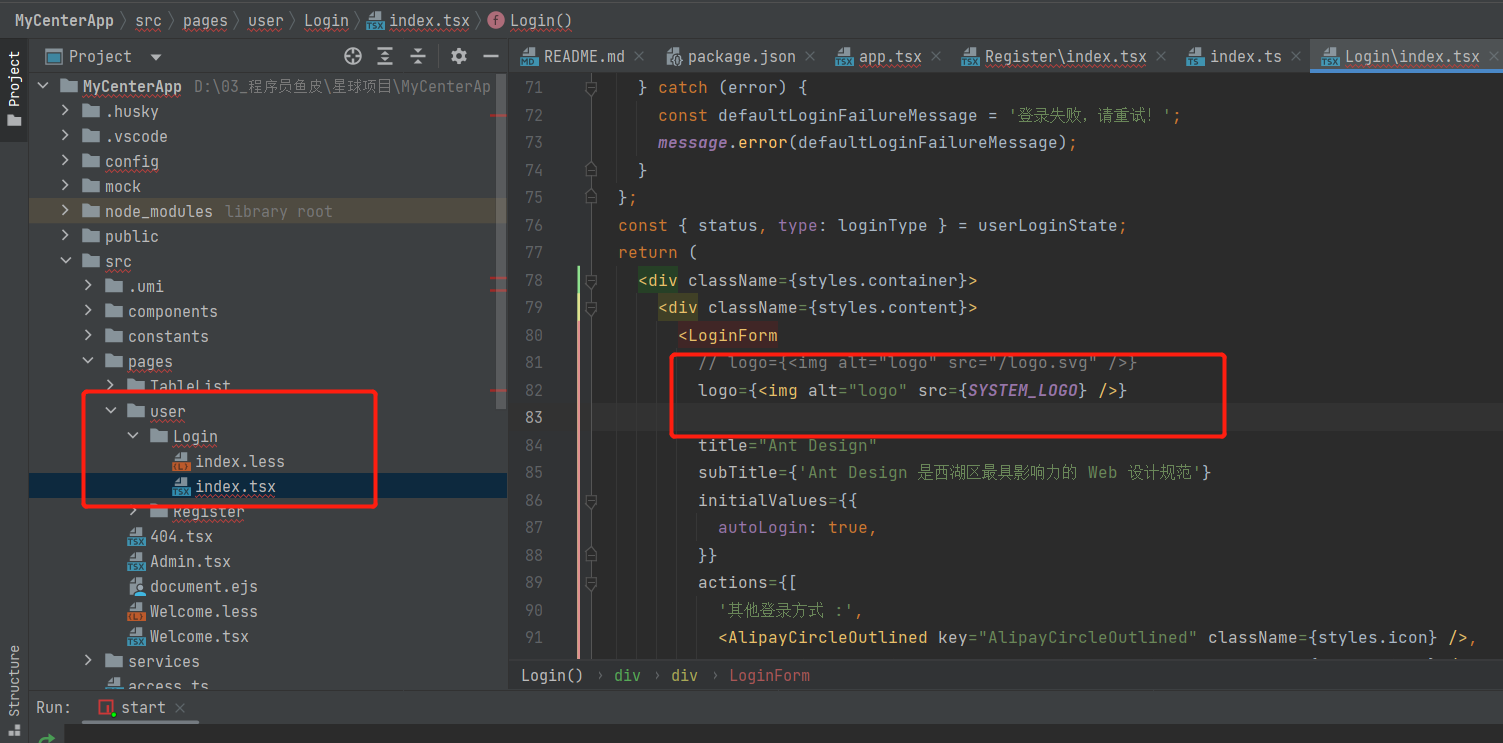
修改底部版权信息
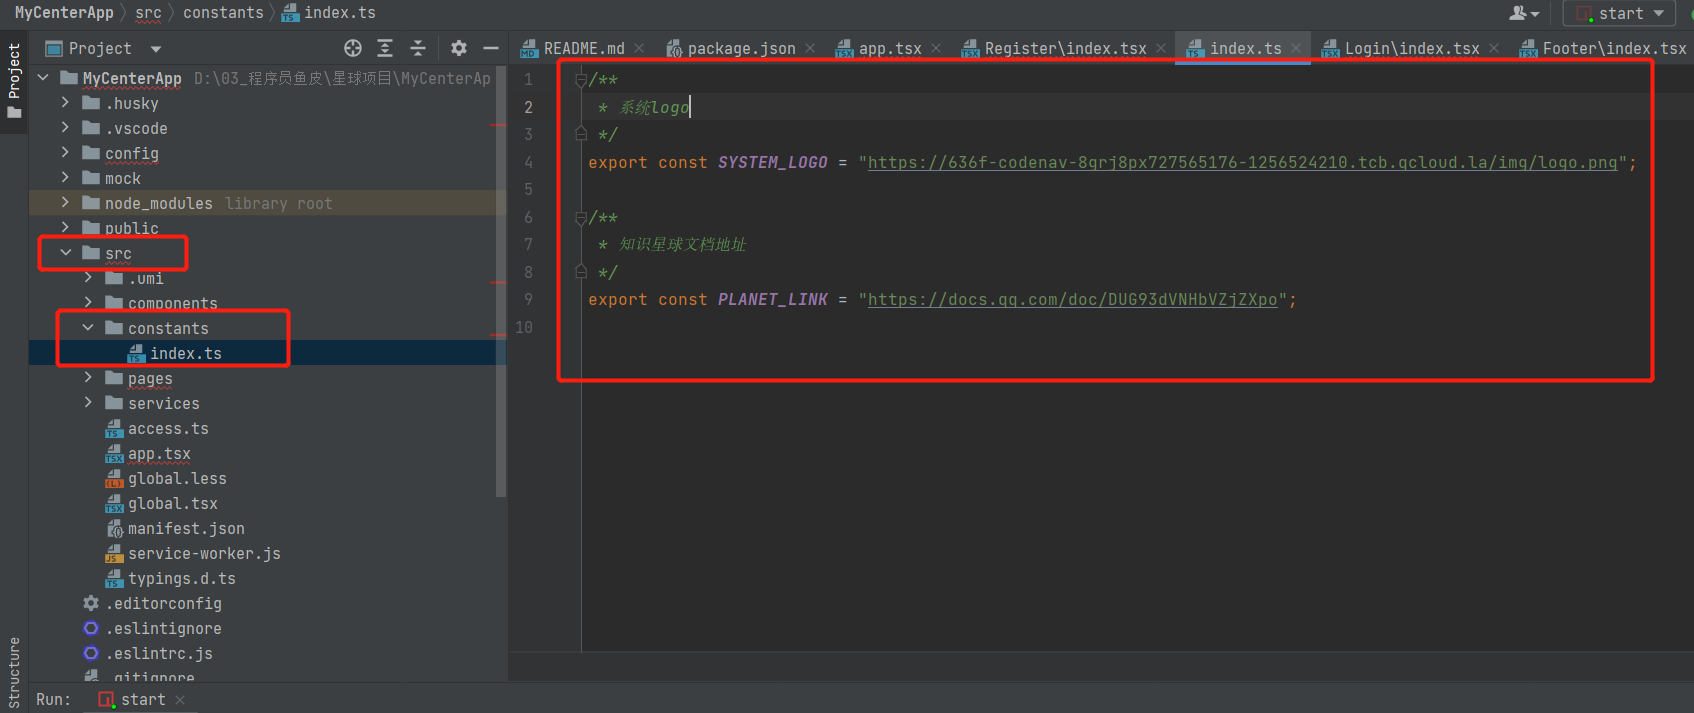
把 “/logo.svg” 改为 {SYSTEM_LOGO},这⾥要导⼊⼀下,根据提示或使⽤快捷键导入SYSTEM_LOGO

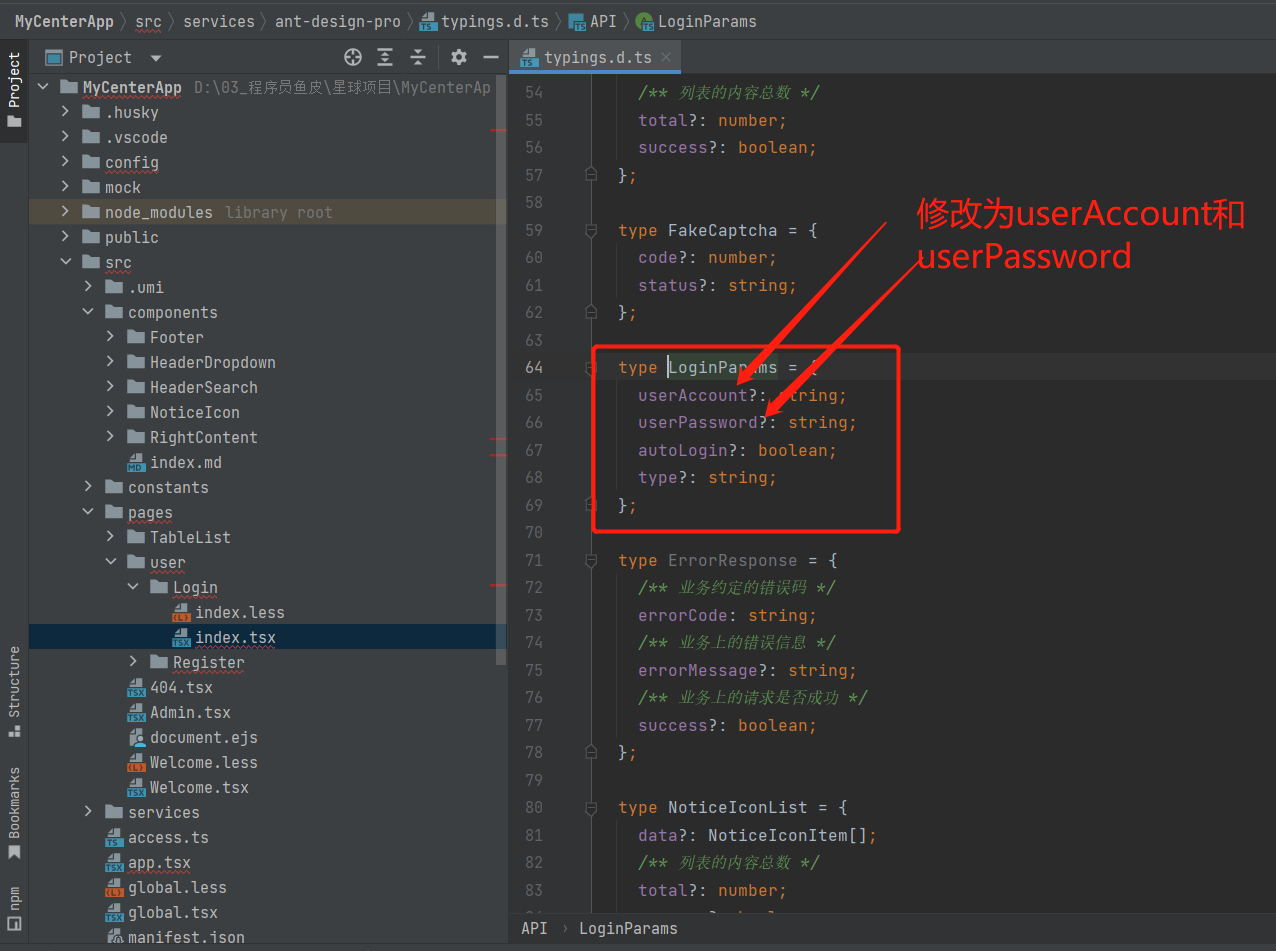
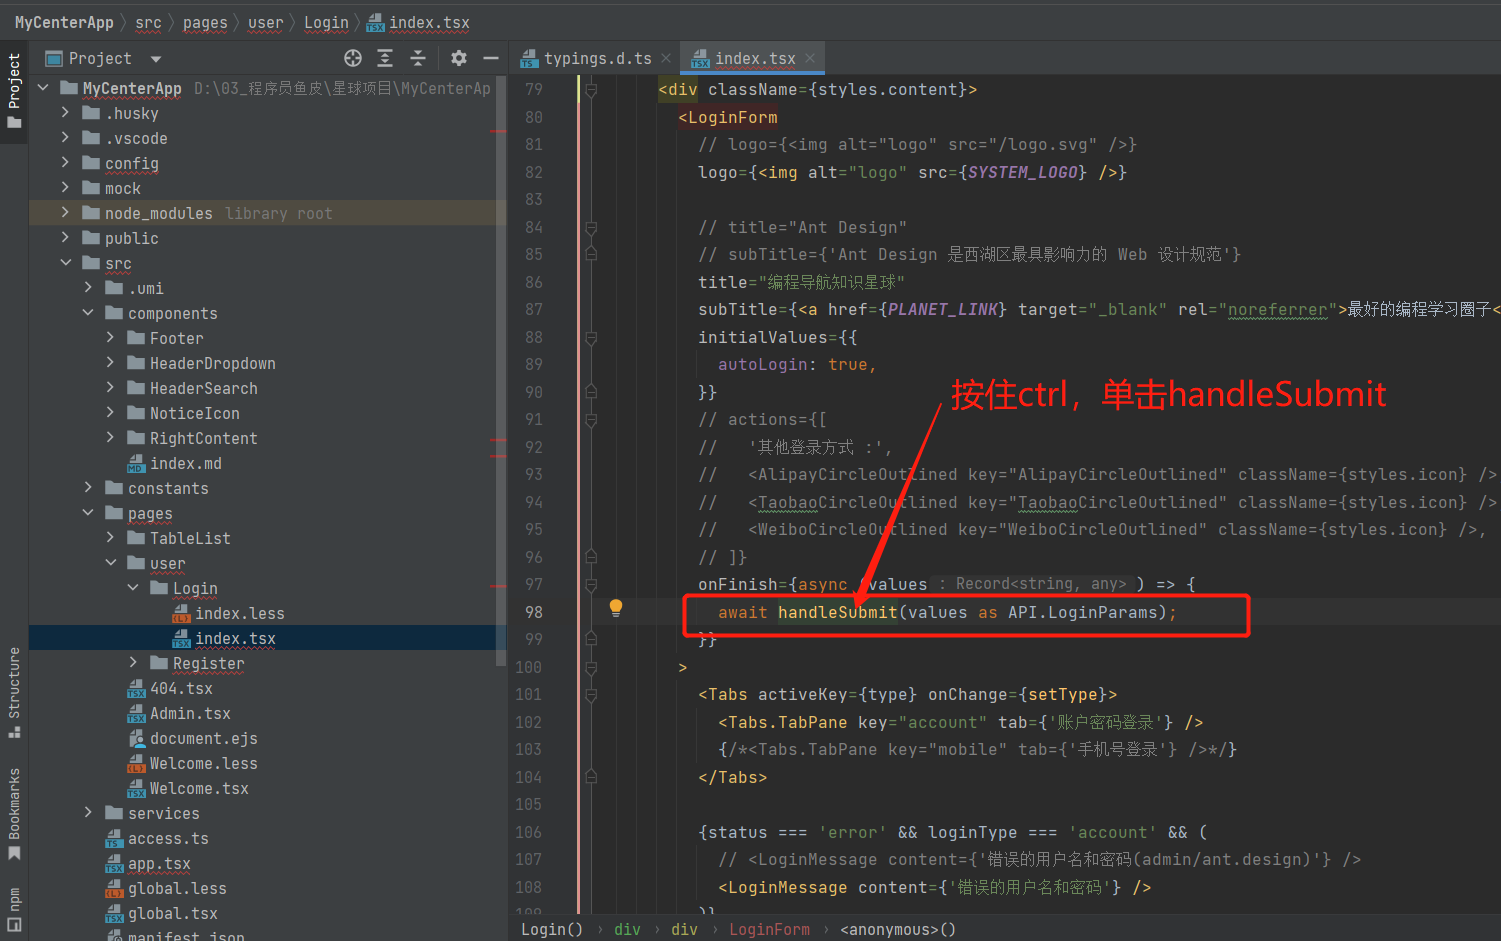
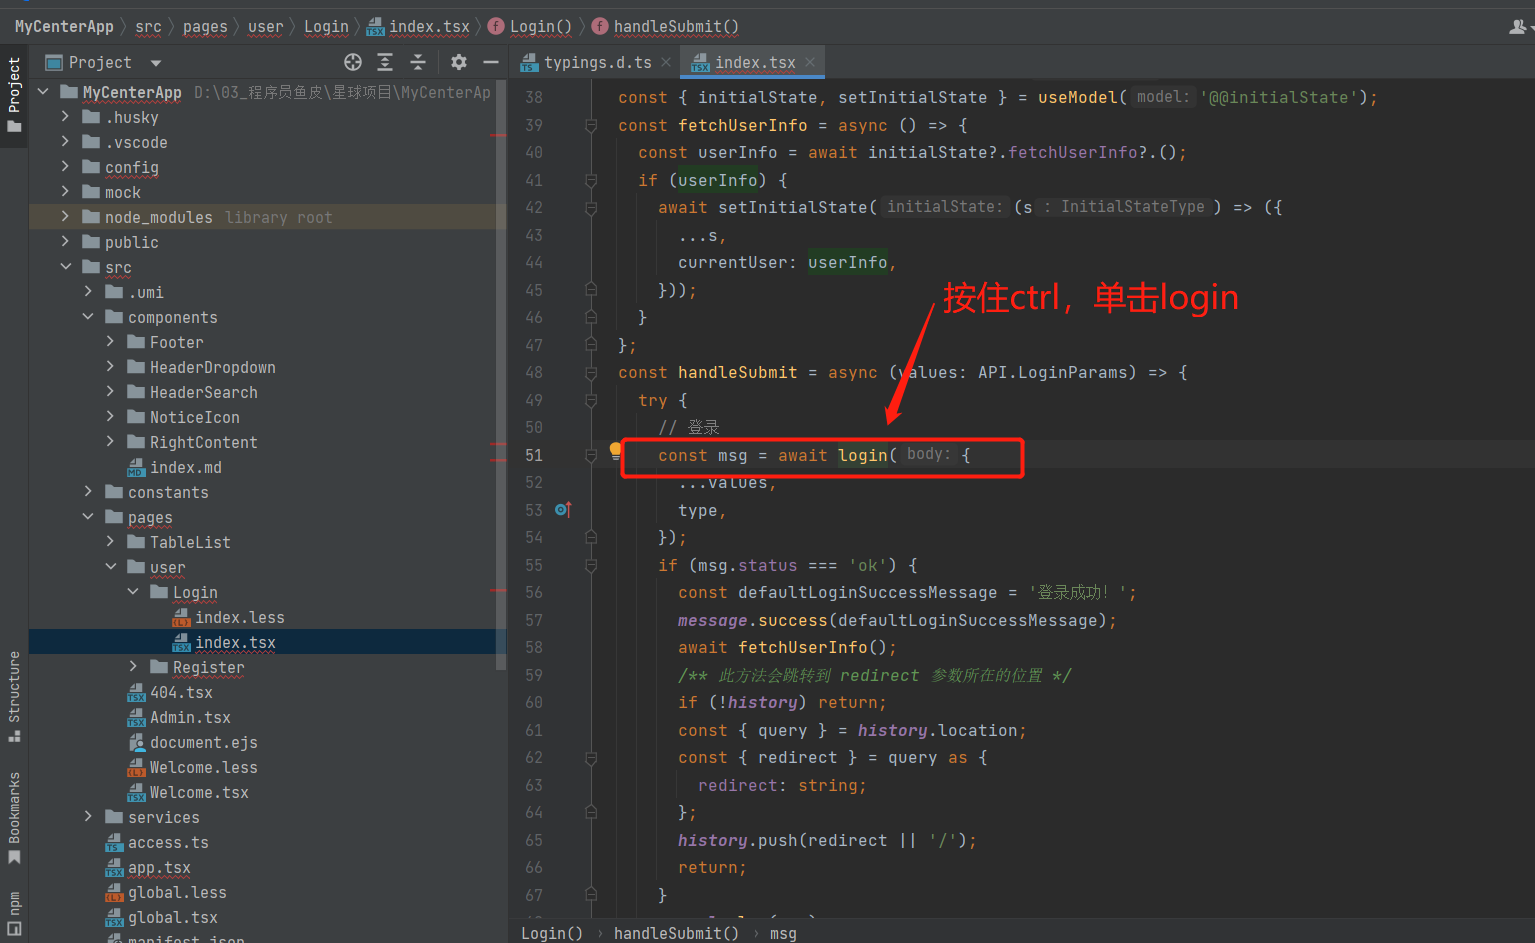
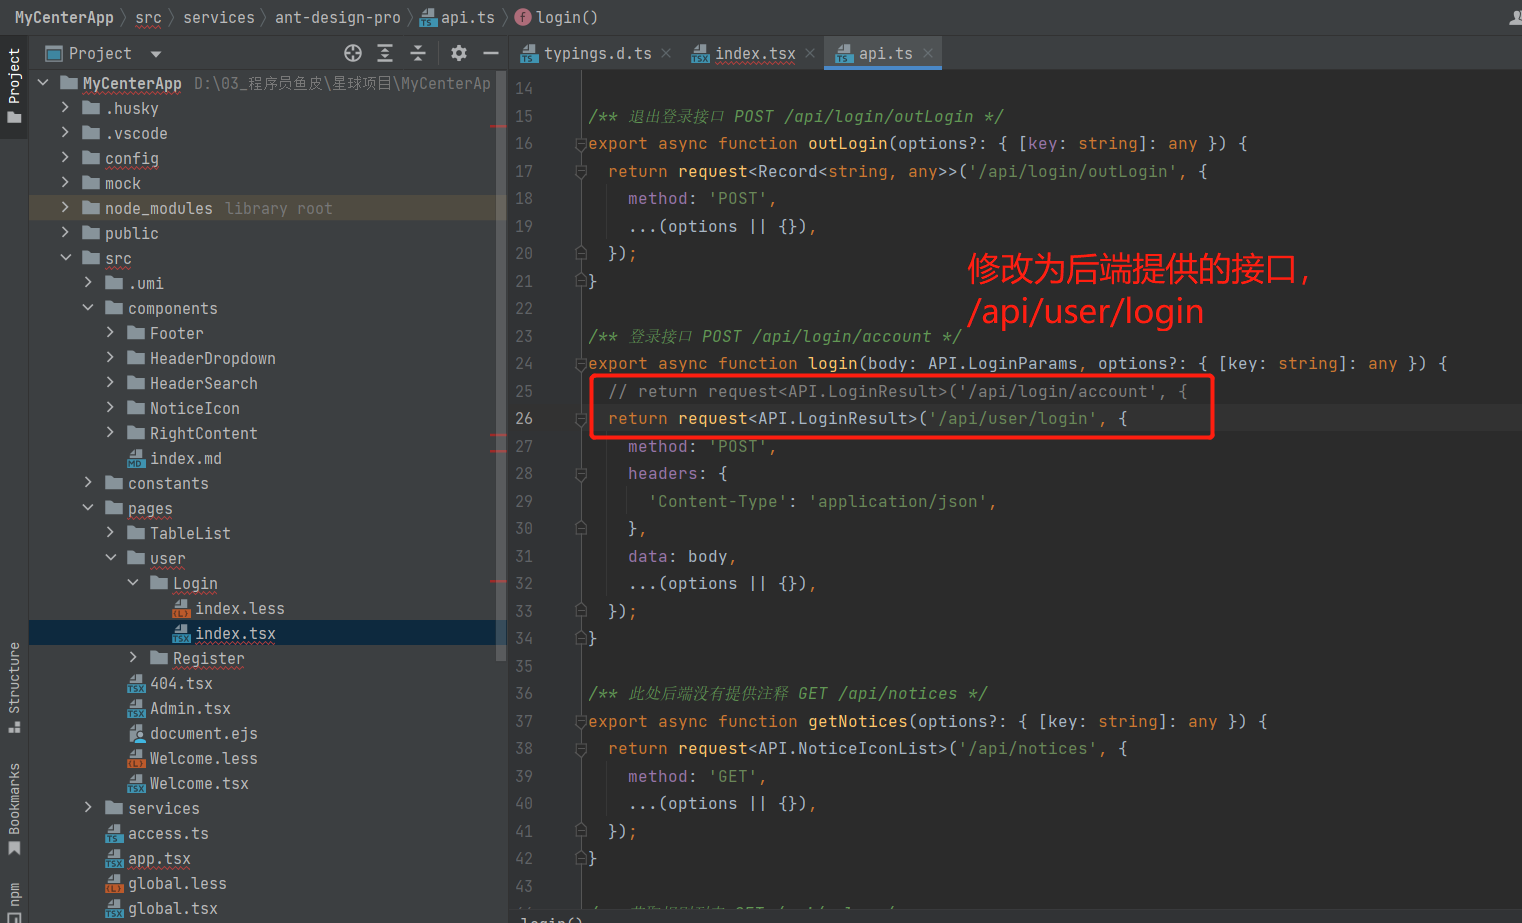
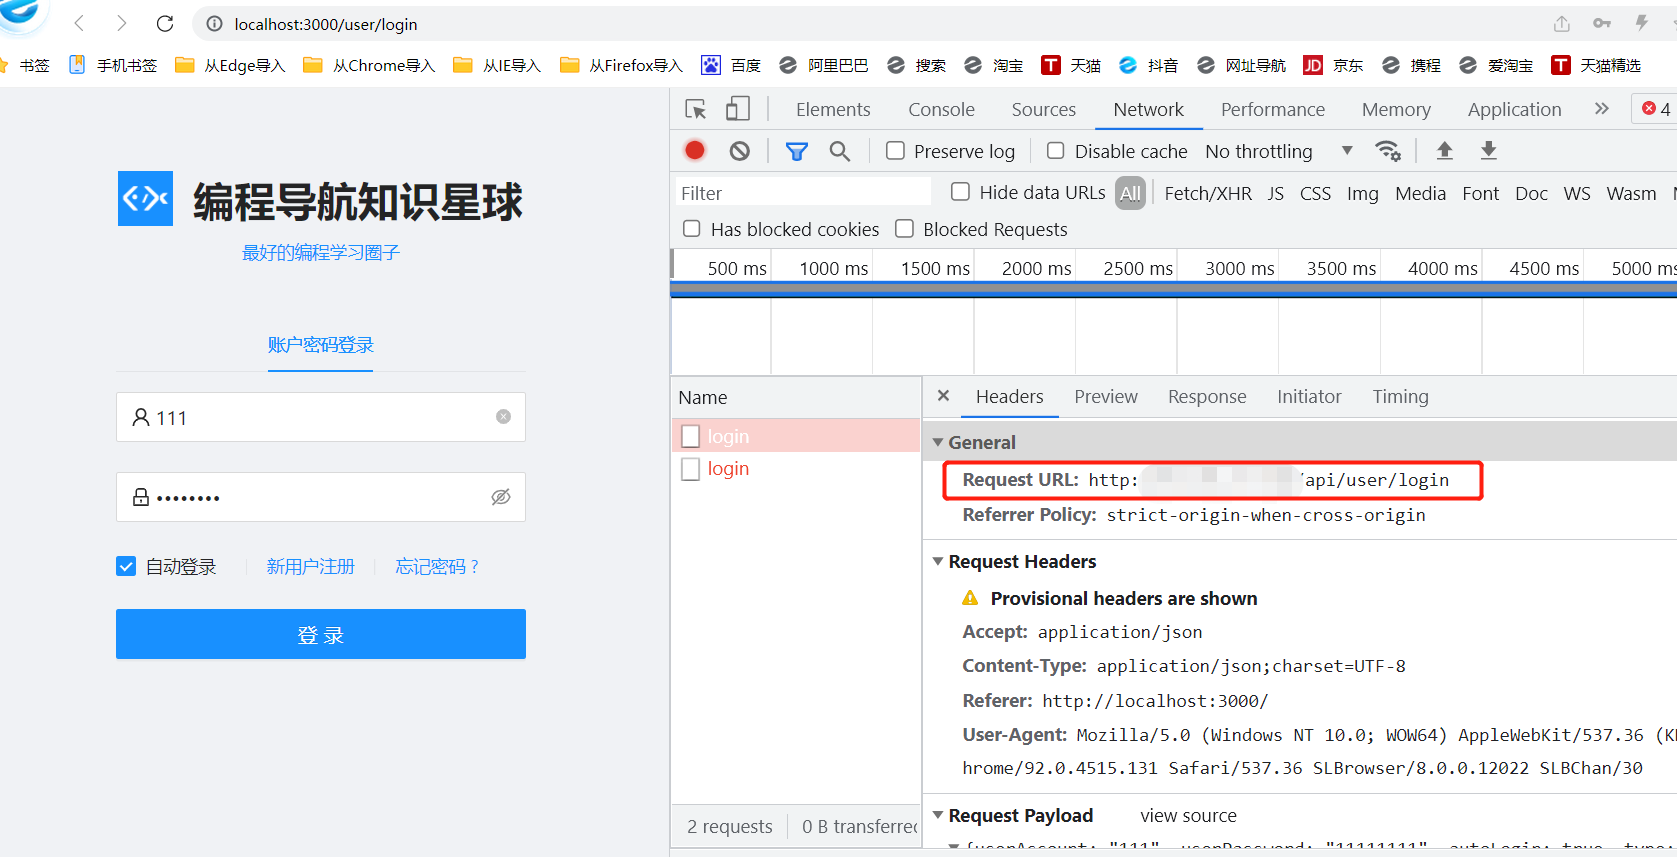
对接后端接口
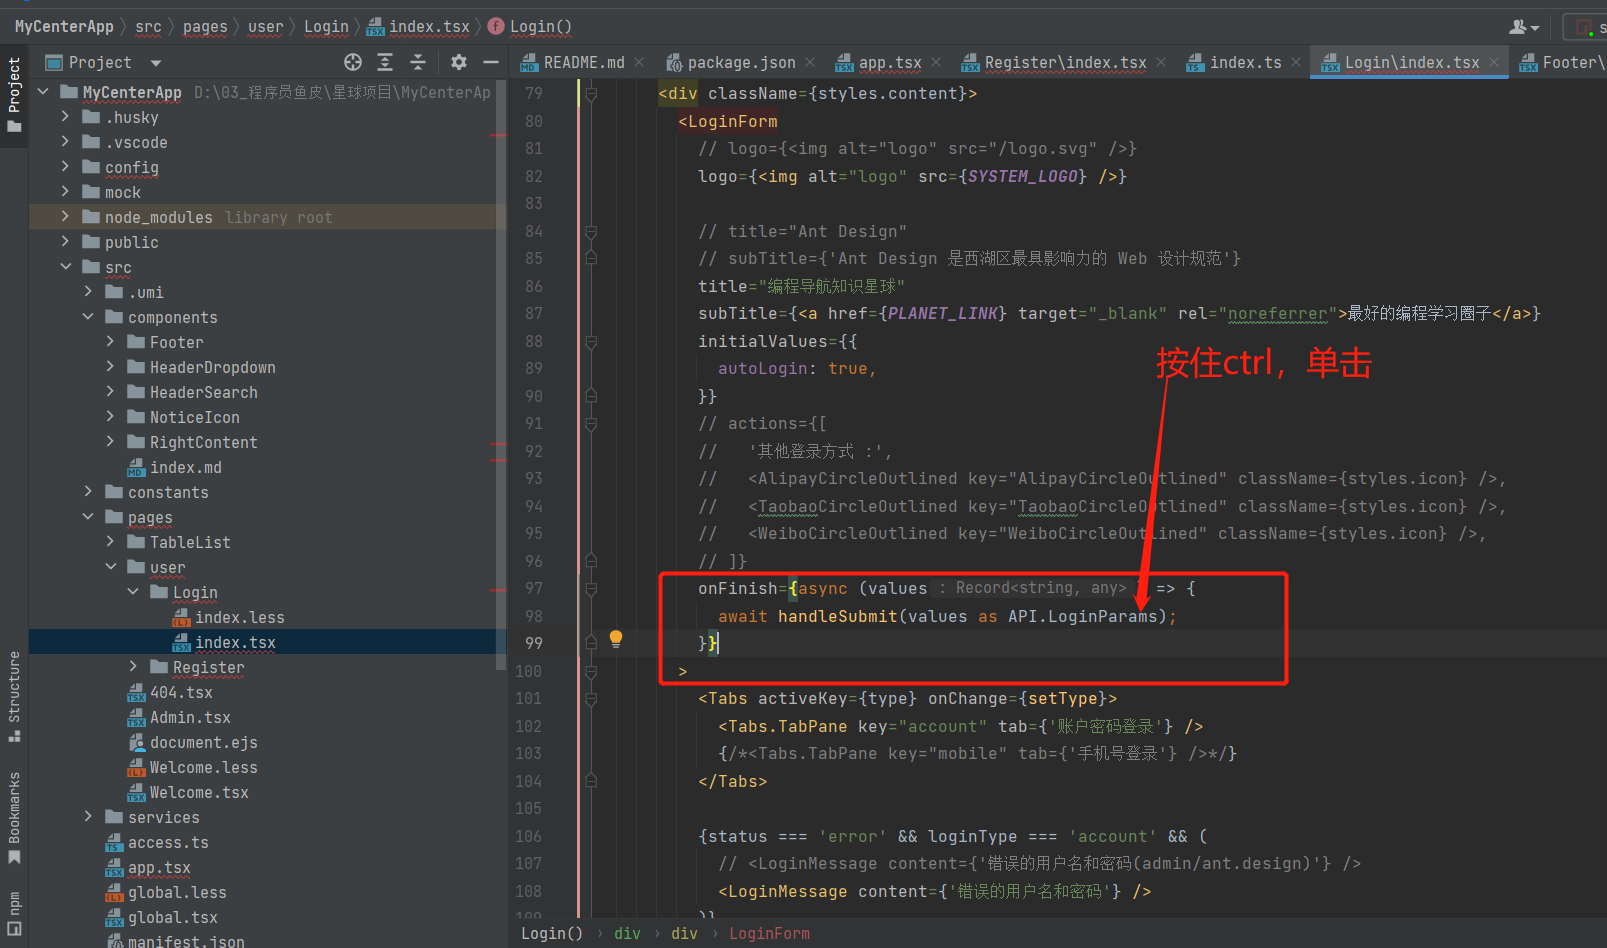
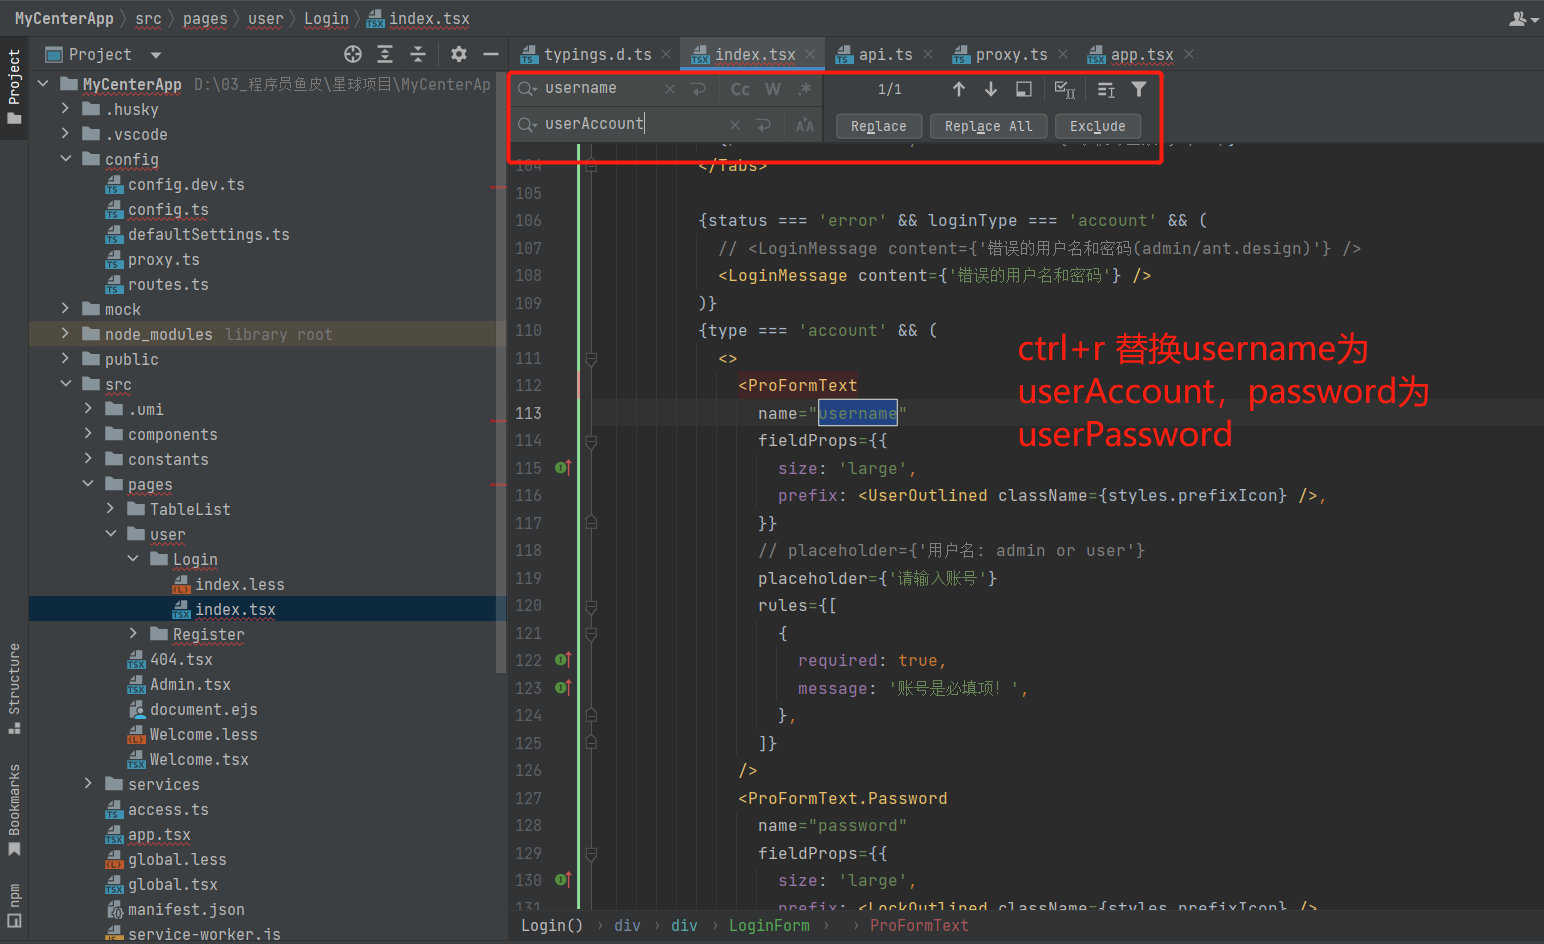
点击username按f2重构为userAccunt,点击password按f2重构为userPassword(webstrom快捷键
shift+f6重构)
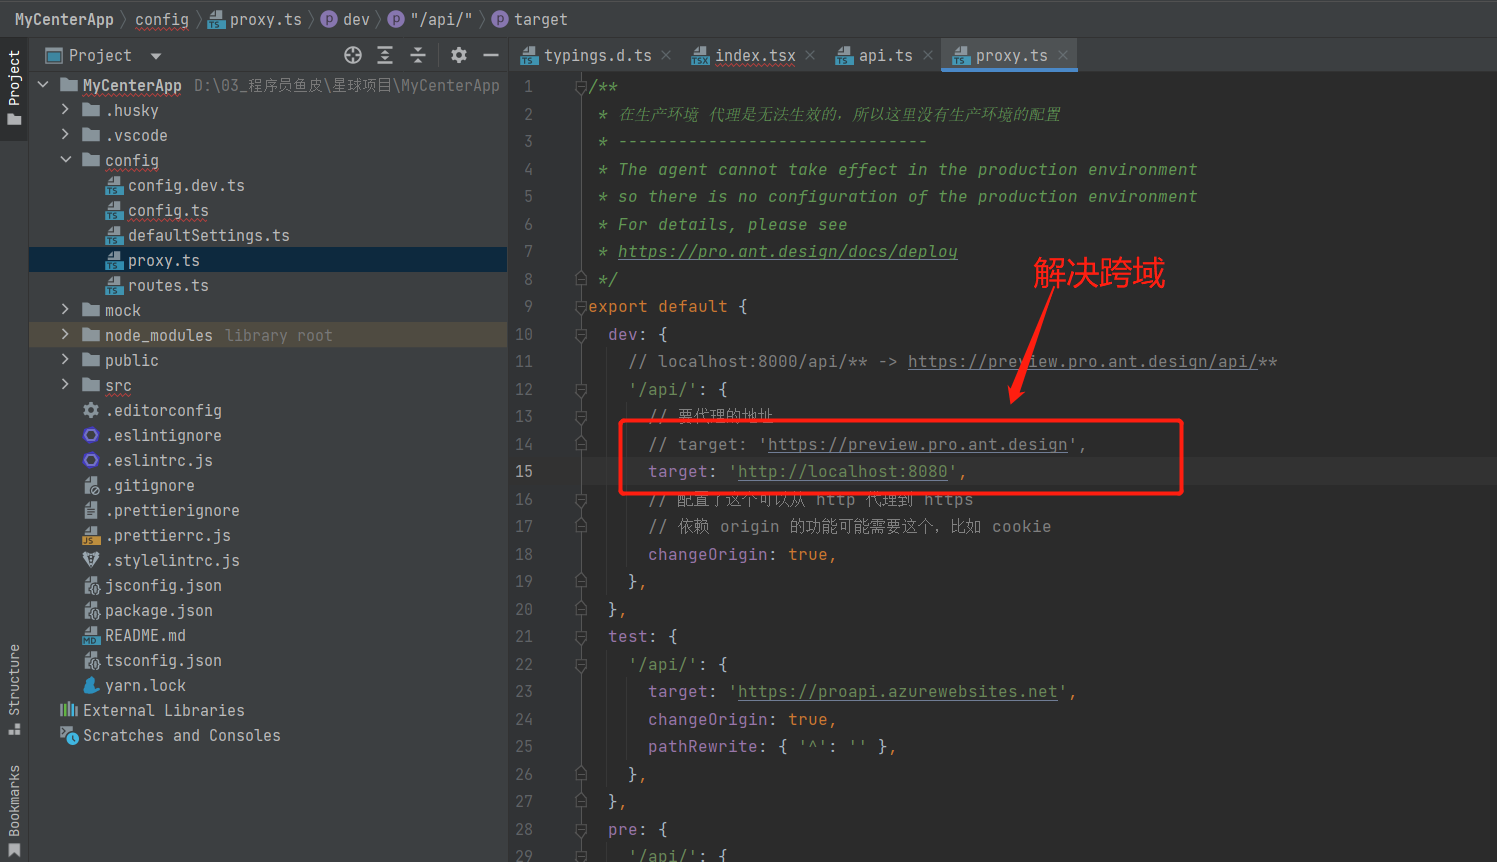
解决跨域问题

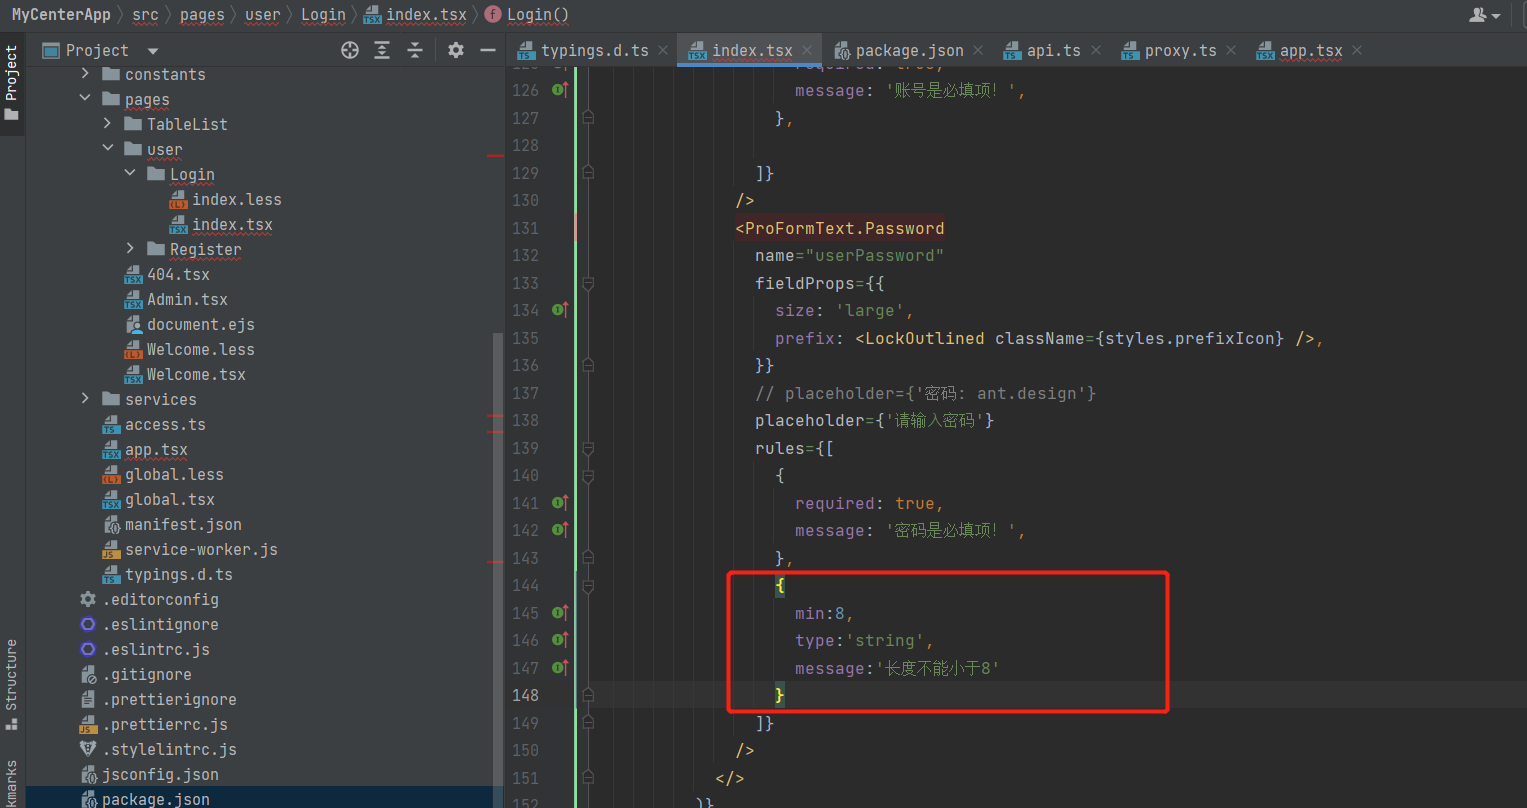
给密码多加⼀个⻓度校验
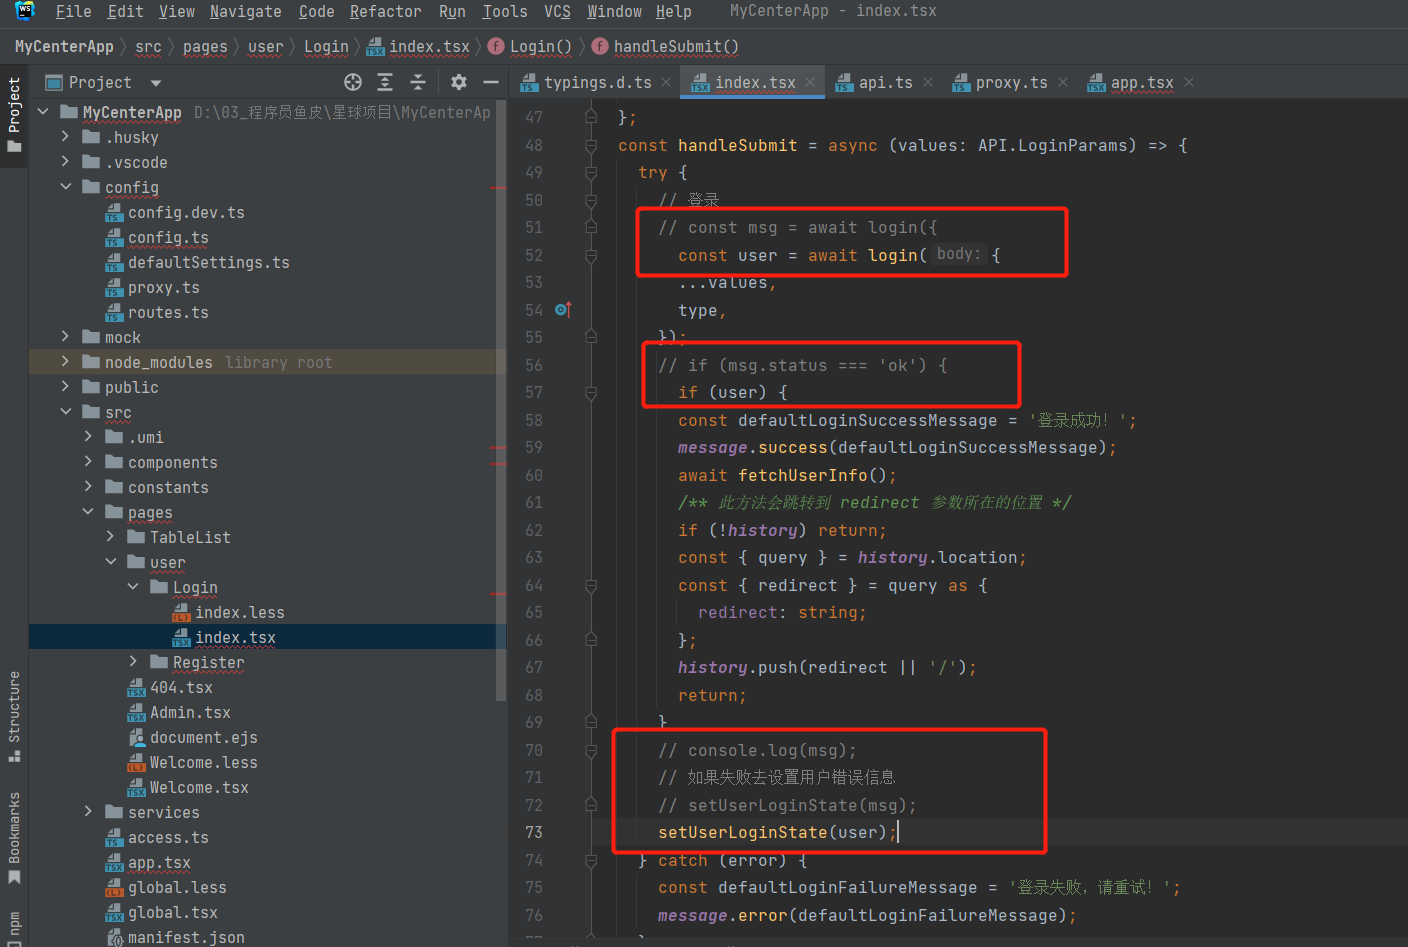
这⾥改成user,如果user存在的话,就显示登录成功,并且设置⽤户的登录状态为user
以start:dev 启动 测试接口
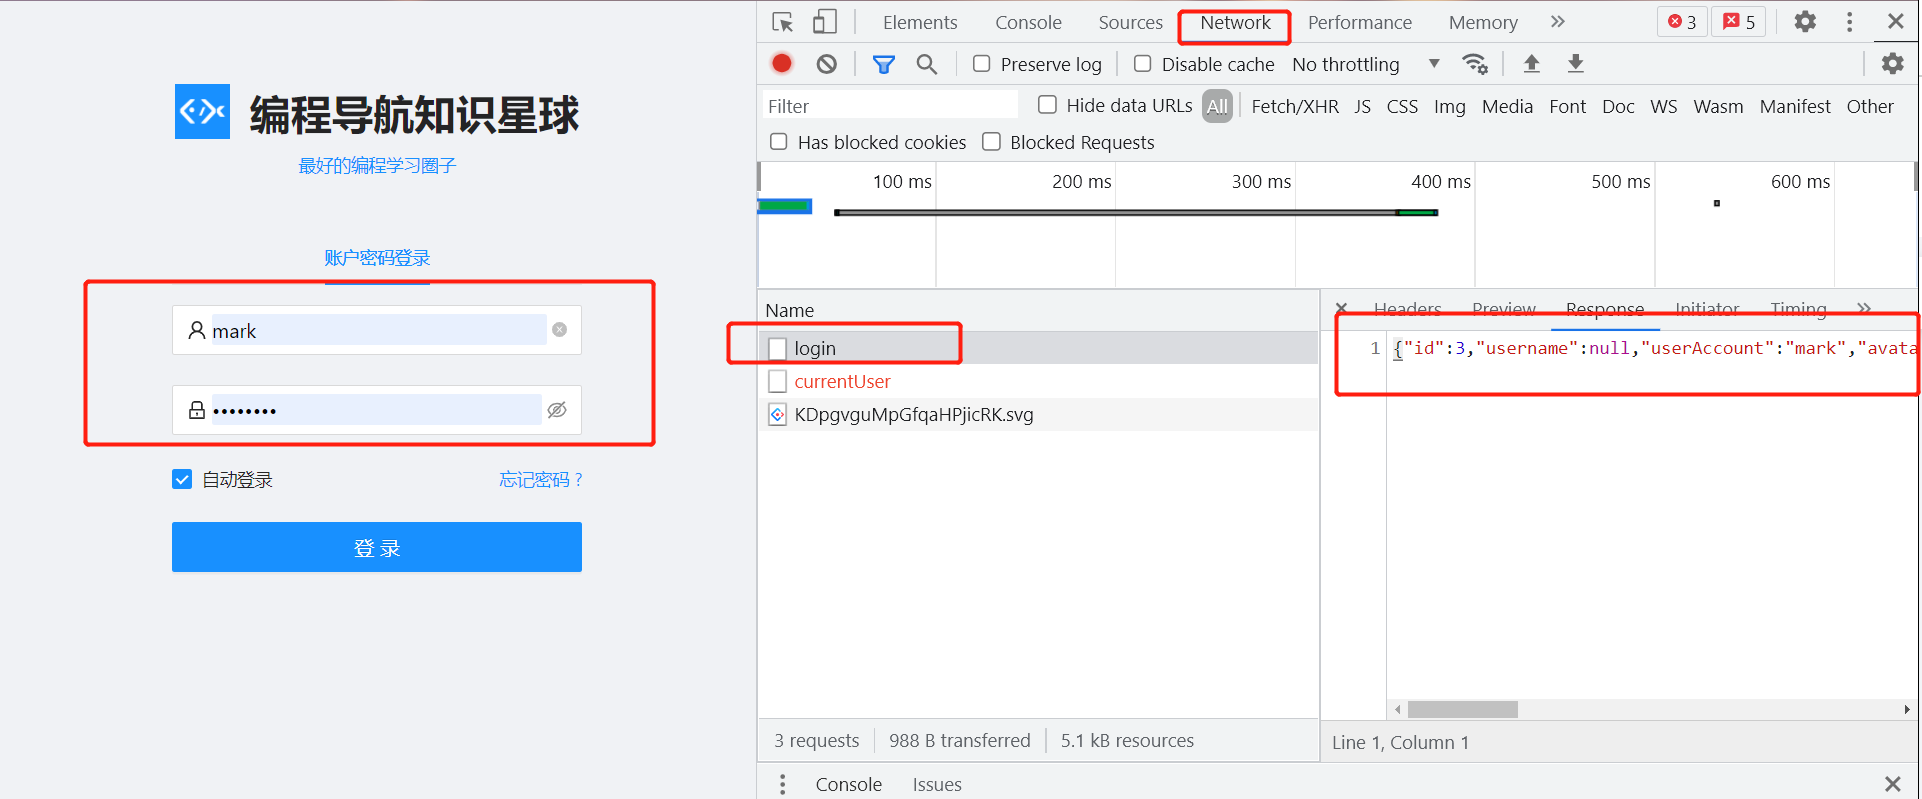
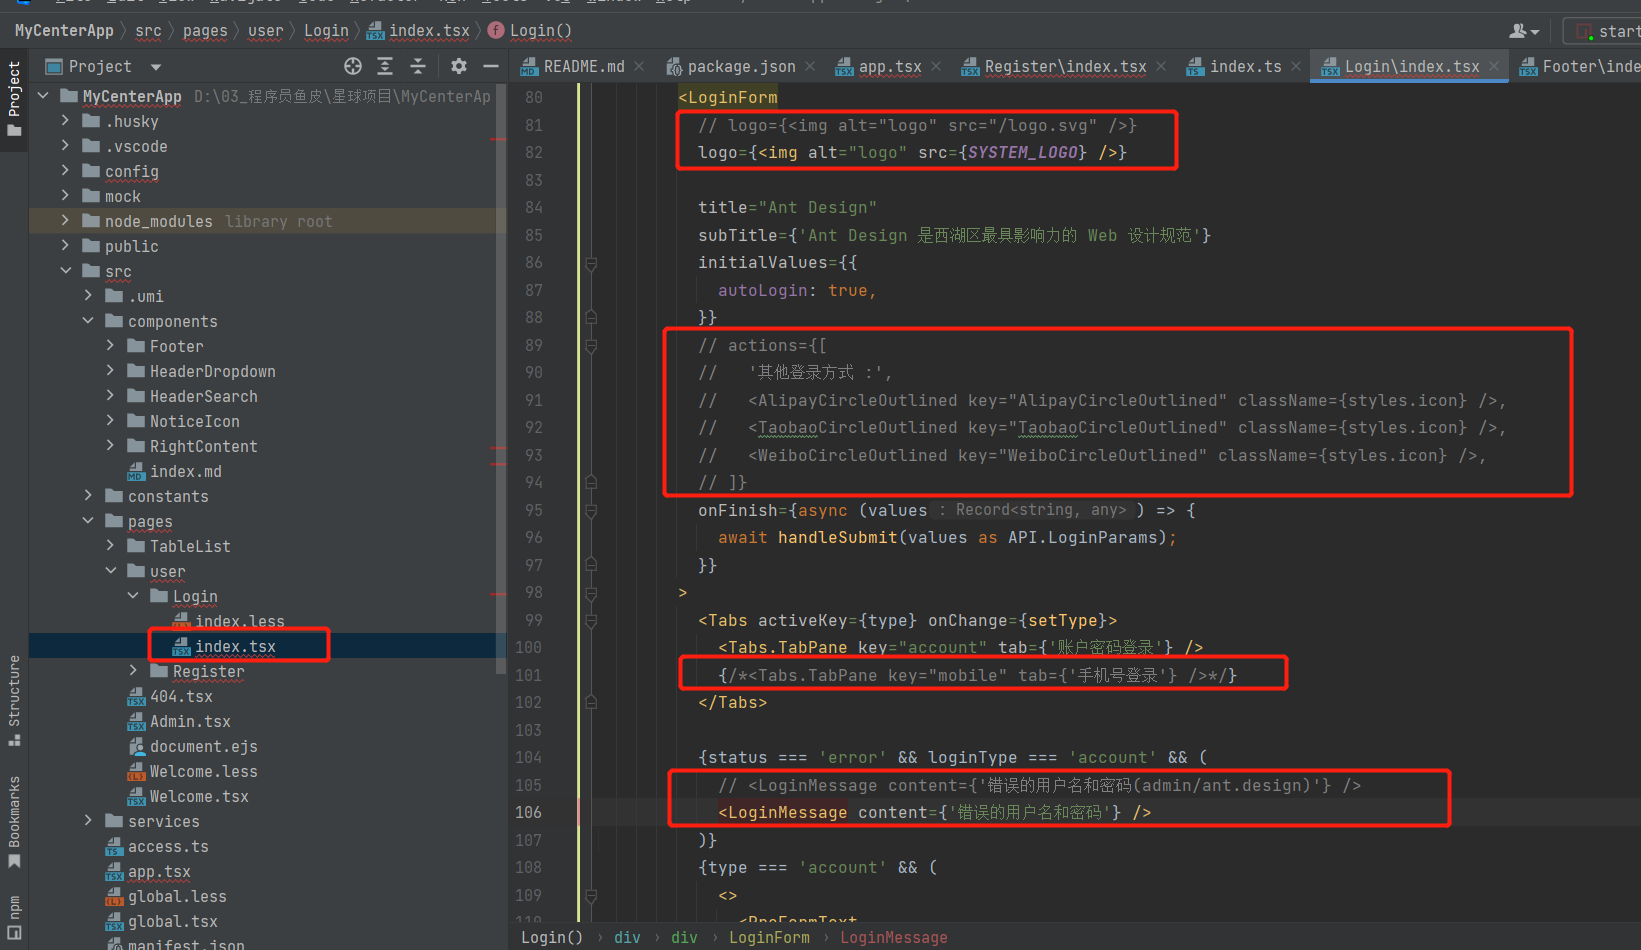
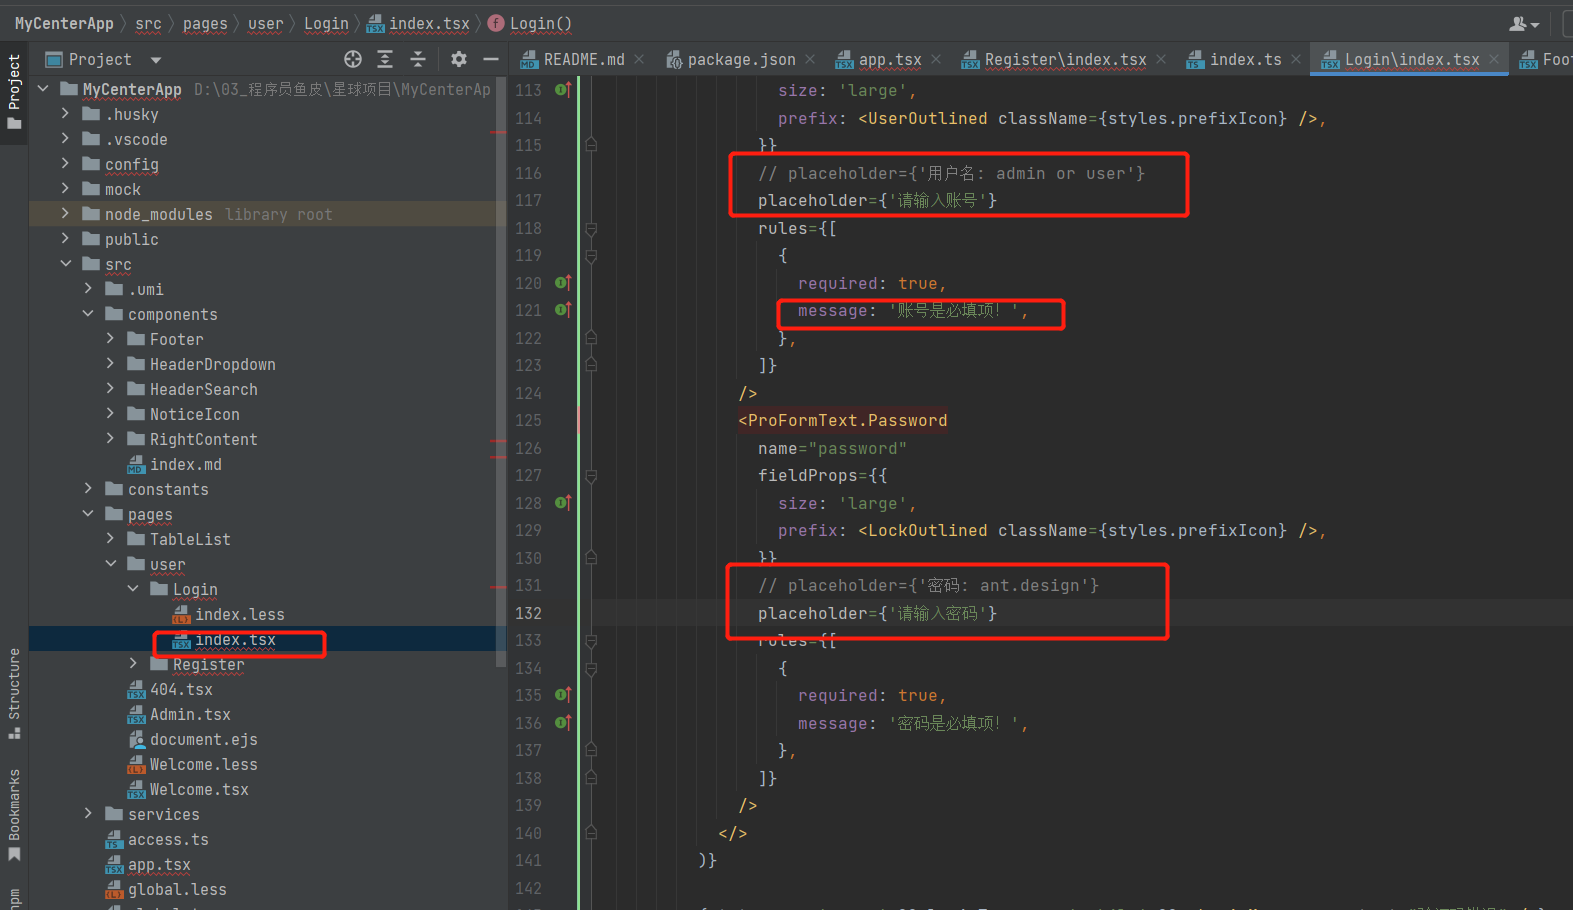
完整的登录页面如下:
import Footer from '@/components/Footer';
import { login } from '@/services/ant-design-pro/api';
import {
LockOutlined,
UserOutlined,
} from '@ant-design/icons';
import {
LoginForm,
ProFormCheckbox,
ProFormText,
} from '@ant-design/pro-components';
import {Alert, Divider, message, Space, Tabs} from 'antd';
import React, { useState } from 'react';
import { history, useModel } from 'umi';
import styles from './index.less';
import {PLANET_LINK, SYSTEM_LOGO} from "@/constants";
import {Link} from "@umijs/preset-dumi/lib/theme";
const LoginMessage: React.FC<{
content: string;
}> = ({ content }) => (
<Alert
style={{
marginBottom: 24,
}}
message={content}
type="error"
showIcon
/>
);
const Login: React.FC = () => {
const [userLoginState, setUserLoginState] = useState<API.LoginResult>({});
const [type, setType] = useState<string>('account');
const { initialState, setInitialState } = useModel('@@initialState');
const fetchUserInfo = async () => {
const userInfo = await initialState?.fetchUserInfo?.();
if (userInfo) {
await setInitialState((s) => ({
...s,
currentUser: userInfo,
}));
}
};
const handleSubmit = async (values: API.LoginParams) => {
try {
// 登录
// const msg = await login({
const user = await login({
...values,
type,
});
// if (msg.status === 'ok') {
if (user) {
const defaultLoginSuccessMessage = '登录成功!';
message.success(defaultLoginSuccessMessage);
await fetchUserInfo();
/** 此方法会跳转到 redirect 参数所在的位置 */
if (!history) return;
const { query } = history.location;
const { redirect } = query as {
redirect: string;
};
history.push(redirect || '/');
return;
}
// console.log(msg);
// 如果失败去设置用户错误信息
// setUserLoginState(msg);
setUserLoginState(user);
} catch (error) {
const defaultLoginFailureMessage = '登录失败,请重试!';
message.error(defaultLoginFailureMessage);
}
};
const { status, type: loginType } = userLoginState;
return (
<div className={styles.container}>
<div className={styles.content}>
<LoginForm
// logo={<img alt="logo" src="/logo.svg" />}
logo={<img alt="logo" src={SYSTEM_LOGO} />}
// title="Ant Design"
// subTitle={'Ant Design 是西湖区最具影响力的 Web 设计规范'}
title="编程导航知识星球"
subTitle={<a href={PLANET_LINK} target="_blank" rel="noreferrer">最好的编程学习圈子</a>}
initialValues={{
autoLogin: true,
}}
// actions={[
// '其他登录方式 :',
// <AlipayCircleOutlined key="AlipayCircleOutlined" className={styles.icon} />,
// <TaobaoCircleOutlined key="TaobaoCircleOutlined" className={styles.icon} />,
// <WeiboCircleOutlined key="WeiboCircleOutlined" className={styles.icon} />,
// ]}
onFinish={async (values) => {
await handleSubmit(values as API.LoginParams);
}}
>
<Tabs activeKey={type} onChange={setType}>
<Tabs.TabPane key="account" tab={'账户密码登录'} />
{/*<Tabs.TabPane key="mobile" tab={'手机号登录'} />*/}
</Tabs>
{status === 'error' && loginType === 'account' && (
// <LoginMessage content={'错误的用户名和密码(admin/ant.design)'} />
<LoginMessage content={'错误的用户名和密码'} />
)}
{type === 'account' && (
<>
<ProFormText
name="userAccount"
fieldProps={{
size: 'large',
prefix: <UserOutlined className={styles.prefixIcon} />,
}}
// placeholder={'用户名: admin or user'}
placeholder={'请输⼊账号'}
rules={[
{
required: true,
message: '账号是必填项!',
},
]}
/>
<ProFormText.Password
name="userPassword"
fieldProps={{
size: 'large',
prefix: <LockOutlined className={styles.prefixIcon} />,
}}
// placeholder={'密码: ant.design'}
placeholder={'请输⼊密码'}
rules={[
{
required: true,
message: '密码是必填项!',
},
{
min:8,
type:'string',
message:'长度不能小于8'
}
]}
/>
</>
)}
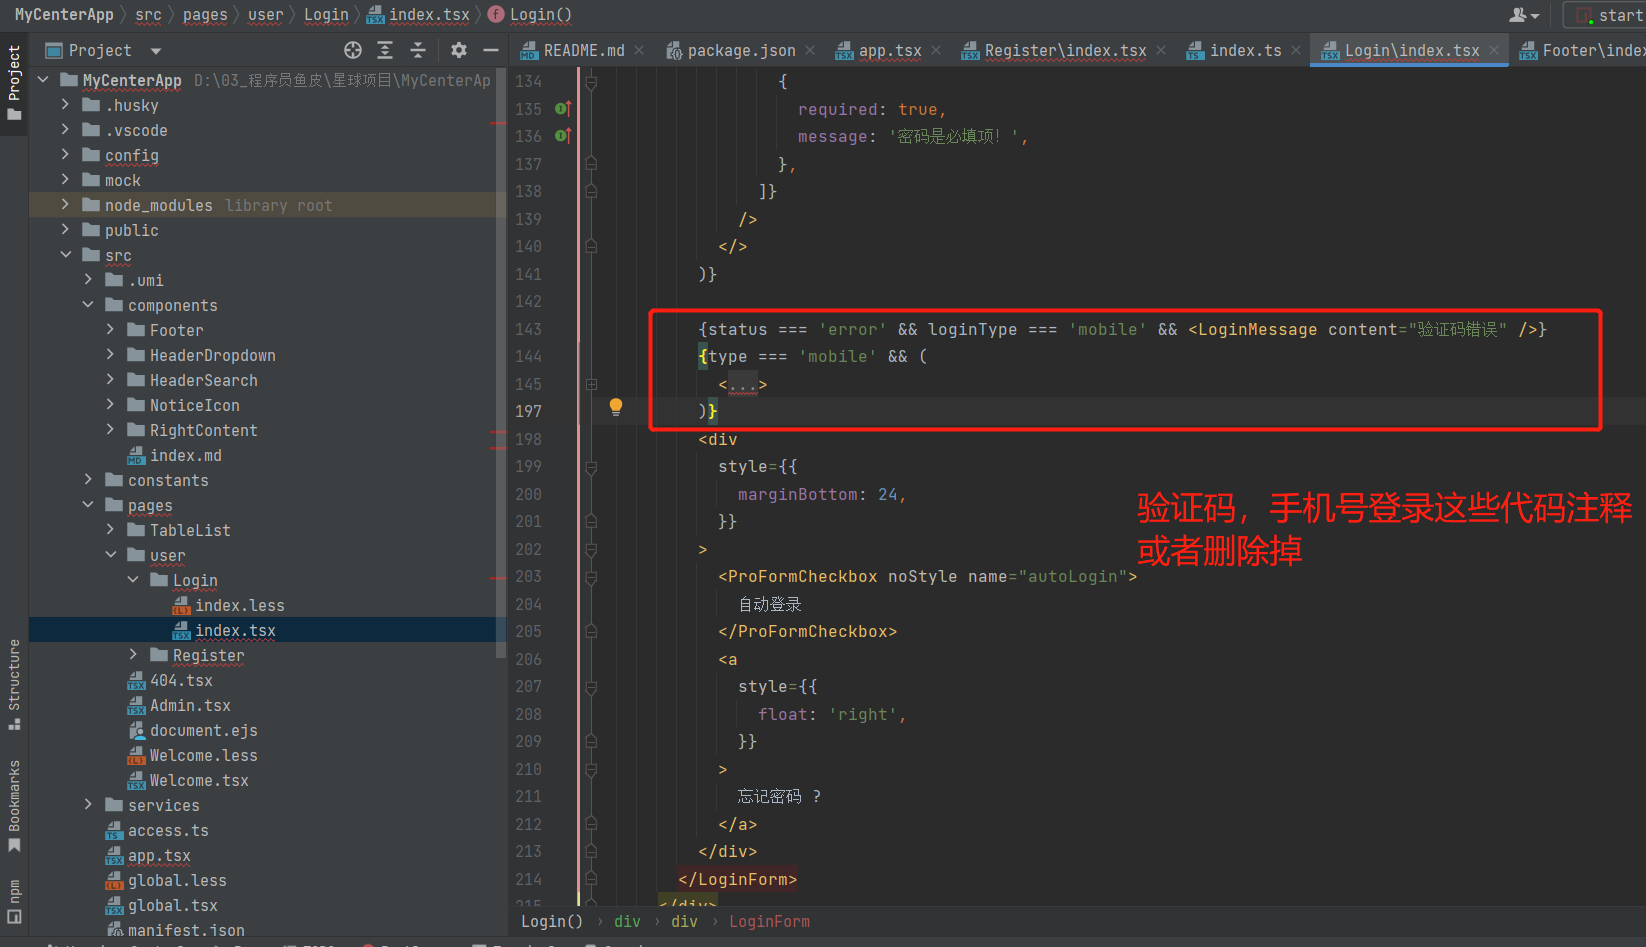
{/*{status === 'error' && loginType === 'mobile' && <LoginMessage content="验证码错误" />}*/}
{/*{type === 'mobile' && (*/}
{/* <>*/}
{/* <ProFormText*/}
{/* fieldProps={{*/}
{/* size: 'large',*/}
{/* prefix: <MobileOutlined className={styles.prefixIcon} />,*/}
{/* }}*/}
{/* name="mobile"*/}
{/* placeholder={'请输入手机号!'}*/}
{/* rules={[*/}
{/* {*/}
{/* required: true,*/}
{/* message: '手机号是必填项!',*/}
{/* },*/}
{/* {*/}
{/* pattern: /^1\d{10}$/,*/}
{/* message: '不合法的手机号!',*/}
{/* },*/}
{/* ]}*/}
{/* />*/}
{/* <ProFormCaptcha*/}
{/* fieldProps={{*/}
{/* size: 'large',*/}
{/* prefix: <LockOutlined className={styles.prefixIcon} />,*/}
{/* }}*/}
{/* captchaProps={{*/}
{/* size: 'large',*/}
{/* }}*/}
{/* placeholder={'请输入验证码!'}*/}
{/* captchaTextRender={(timing, count) => {*/}
{/* if (timing) {*/}
{/* return `${count} ${'秒后重新获取'}`;*/}
{/* }*/}
{/* return '获取验证码';*/}
{/* }}*/}
{/* name="captcha"*/}
{/* rules={[*/}
{/* {*/}
{/* required: true,*/}
{/* message: '验证码是必填项!',*/}
{/* },*/}
{/* ]}*/}
{/* onGetCaptcha={async (phone) => {*/}
{/* const result = await getFakeCaptcha({*/}
{/* phone,*/}
{/* });*/}
{/* if (result === false) {*/}
{/* return;*/}
{/* }*/}
{/* message.success('获取验证码成功!验证码为:1234');*/}
{/* }}*/}
{/* />*/}
{/* </>*/}
{/*)}*/}
<div
style={{
marginBottom: 24,
}}
>
<Space split={<Divider type="vertical" />}>
<ProFormCheckbox noStyle name="autoLogin">
自动登录
</ProFormCheckbox>
<Link to="/user/register">新用户注册</Link>
<a
style={{
float: 'right',
}}
href={PLANET_LINK}
target="_blank"
rel="noreferrer"
>
忘记密码 ?
</a>
</Space>
</div>
</LoginForm>
</div>
<Footer />
</div>
);
};
export default Login;
4.注册页面
1.编写注册页面
# 2.添加路由规则
{ name: '注册', path: '/user/register', component: './user/Register' },
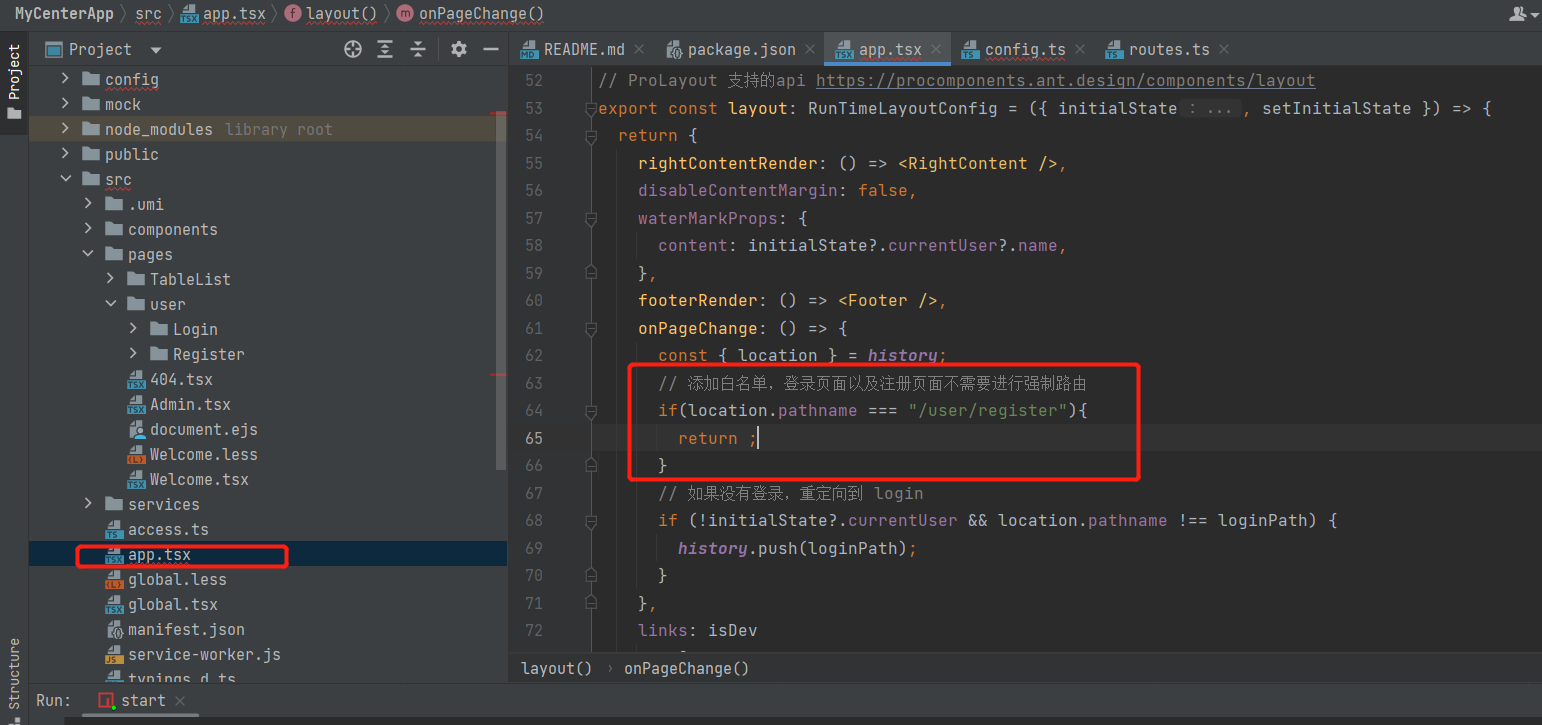
3.在添加完组件以及路由之后,输入 http//localhost:8000/user/register ,发现被强制路由至登录页面。此时想到 ant design pro 是一个后台管理系统,在未登录情况下想操作其它页面,势必会被强制路由到登录页面。所以需要修改此逻辑。解决方案:修改项目入口文件 src/app.tsx

// 添加白名单,登录页面以及注册页面不需要进行强制路由
if(location.pathname === "/user/register"){
return ;
}
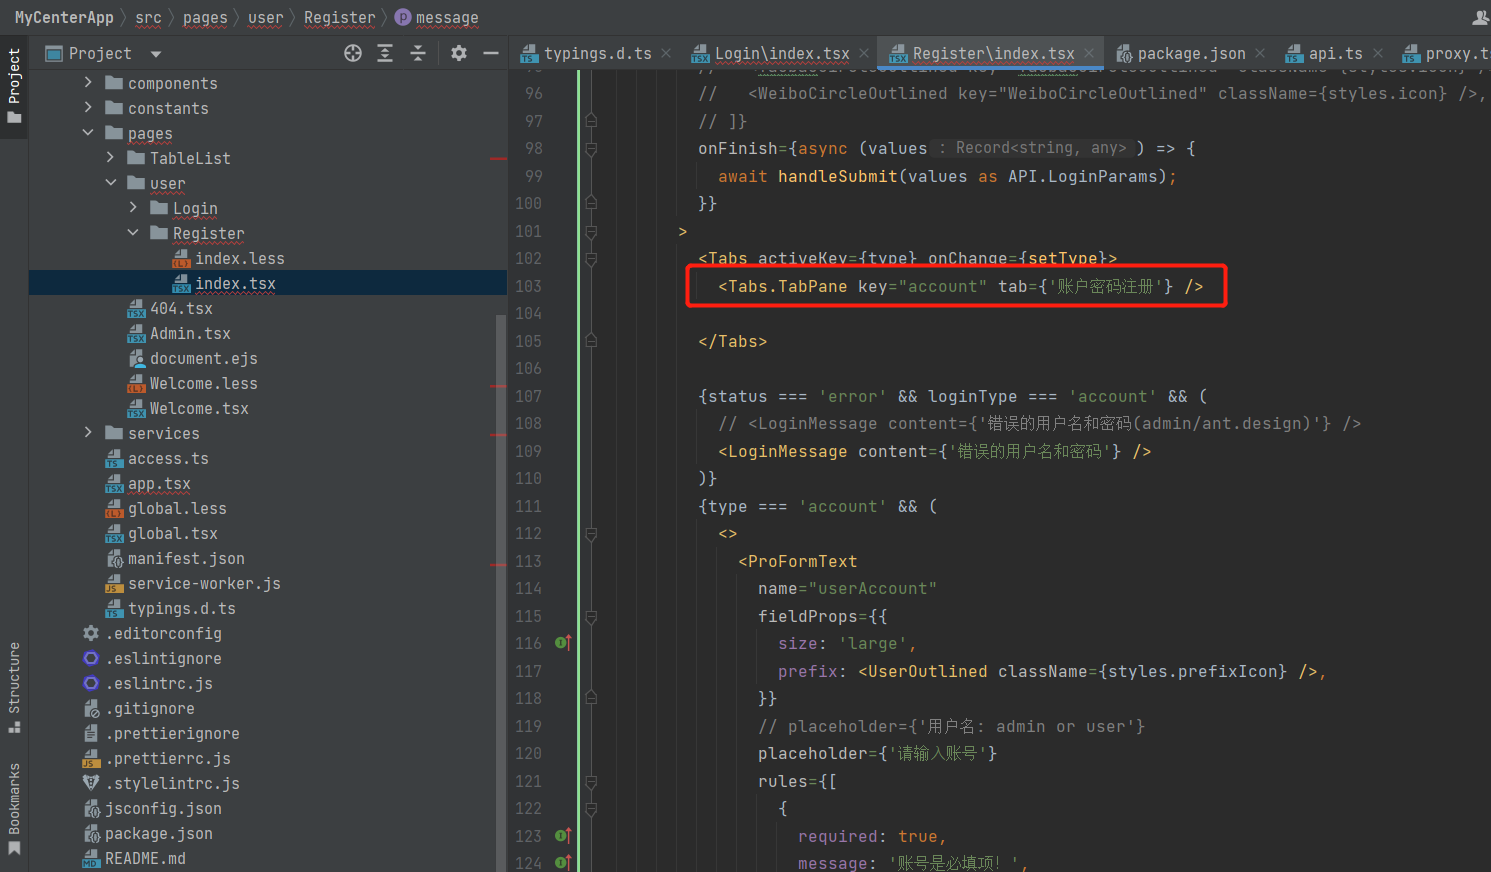
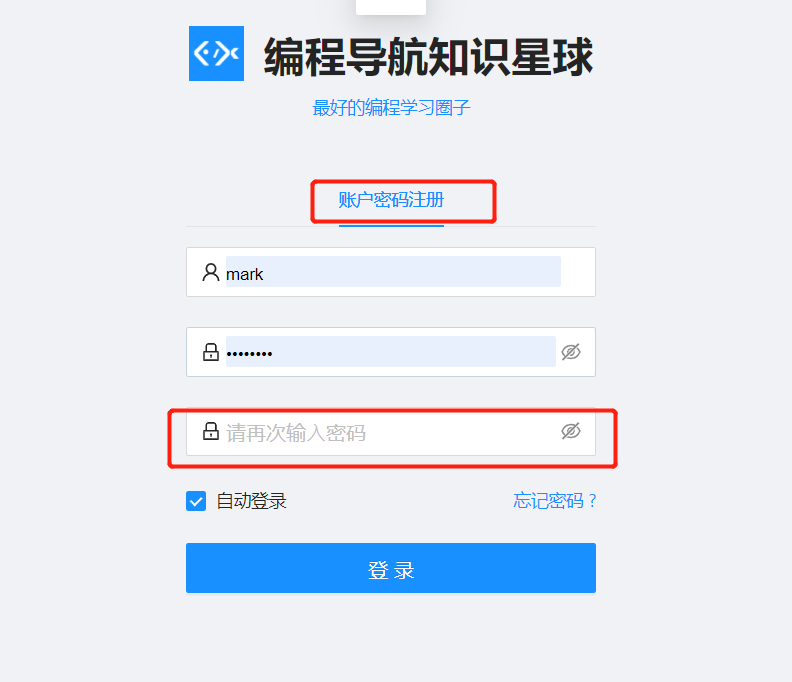
修改注册页面
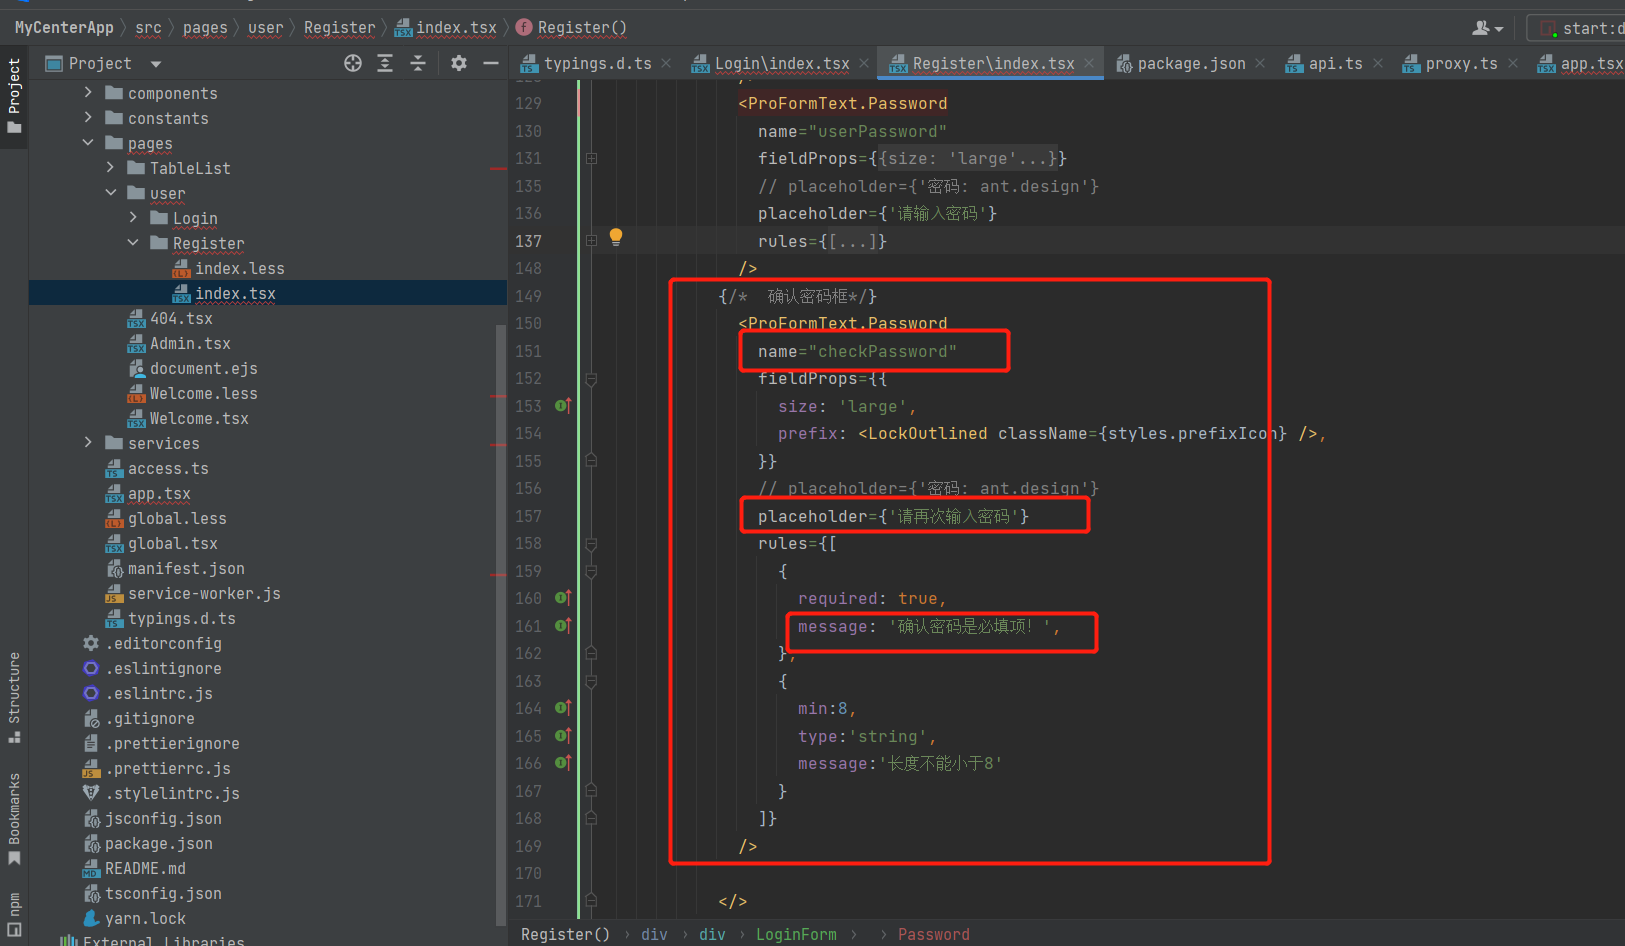
添加确认密码框
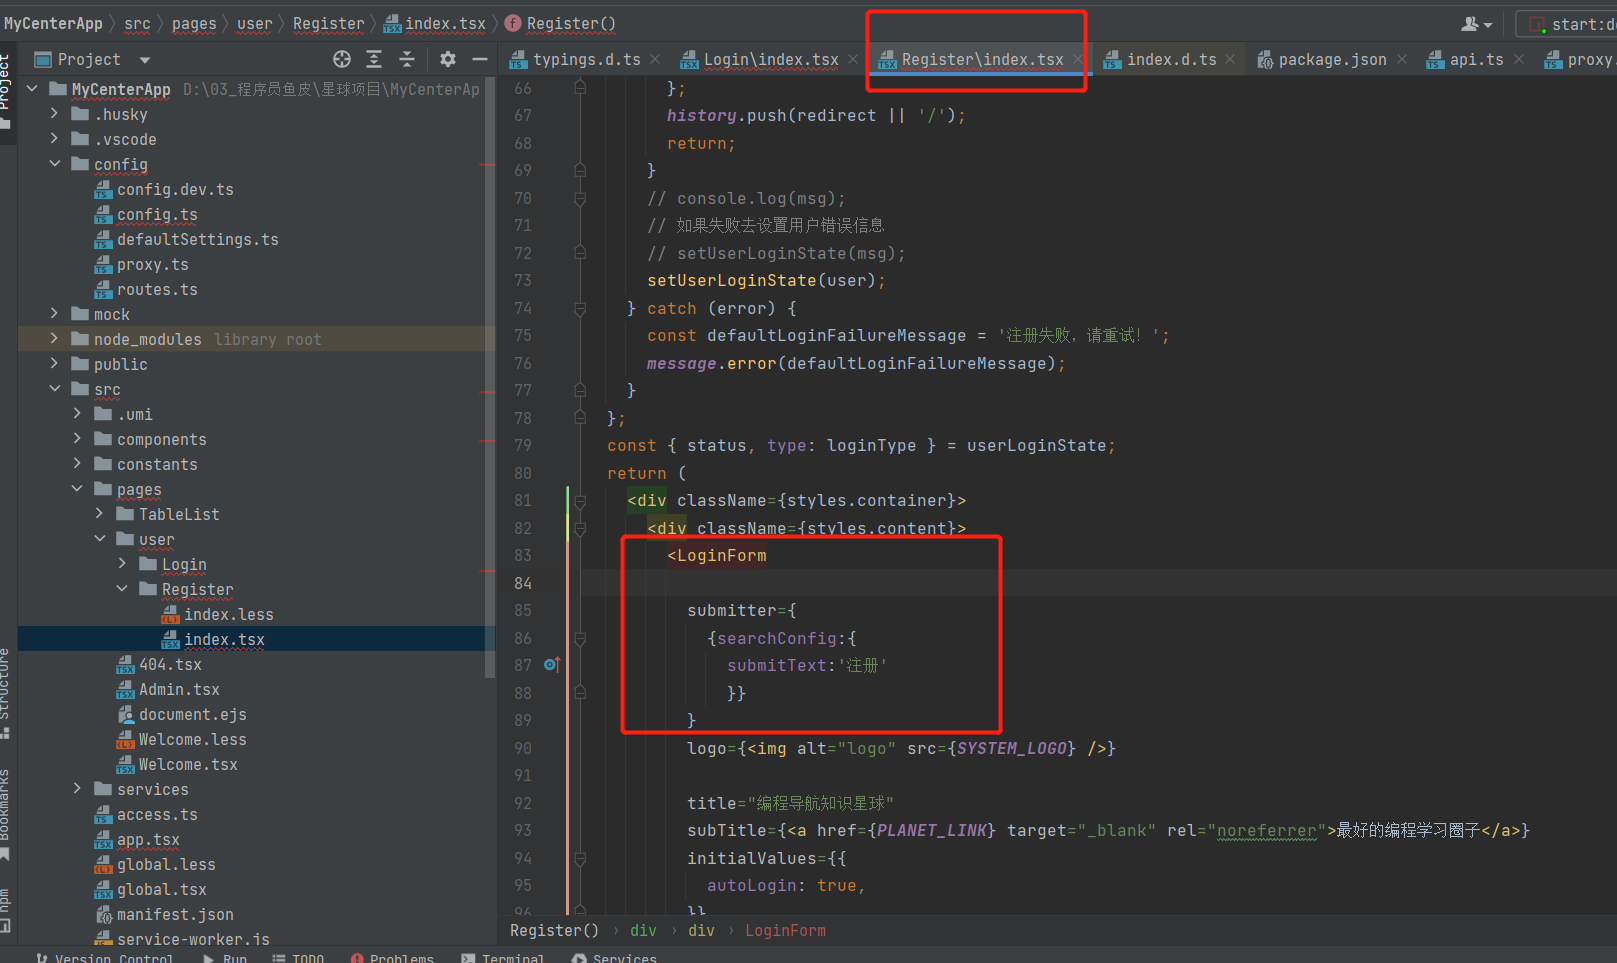
然后按ctrl+r把register 中的 登录 全局替换成 注册
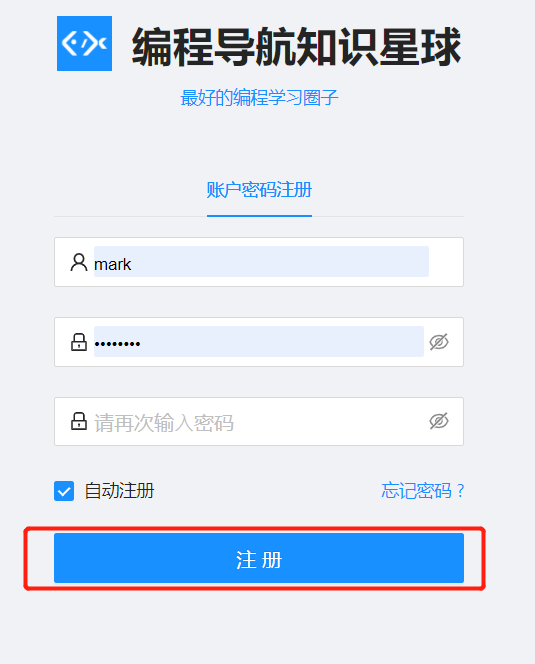
把登录按钮改为 注册按钮
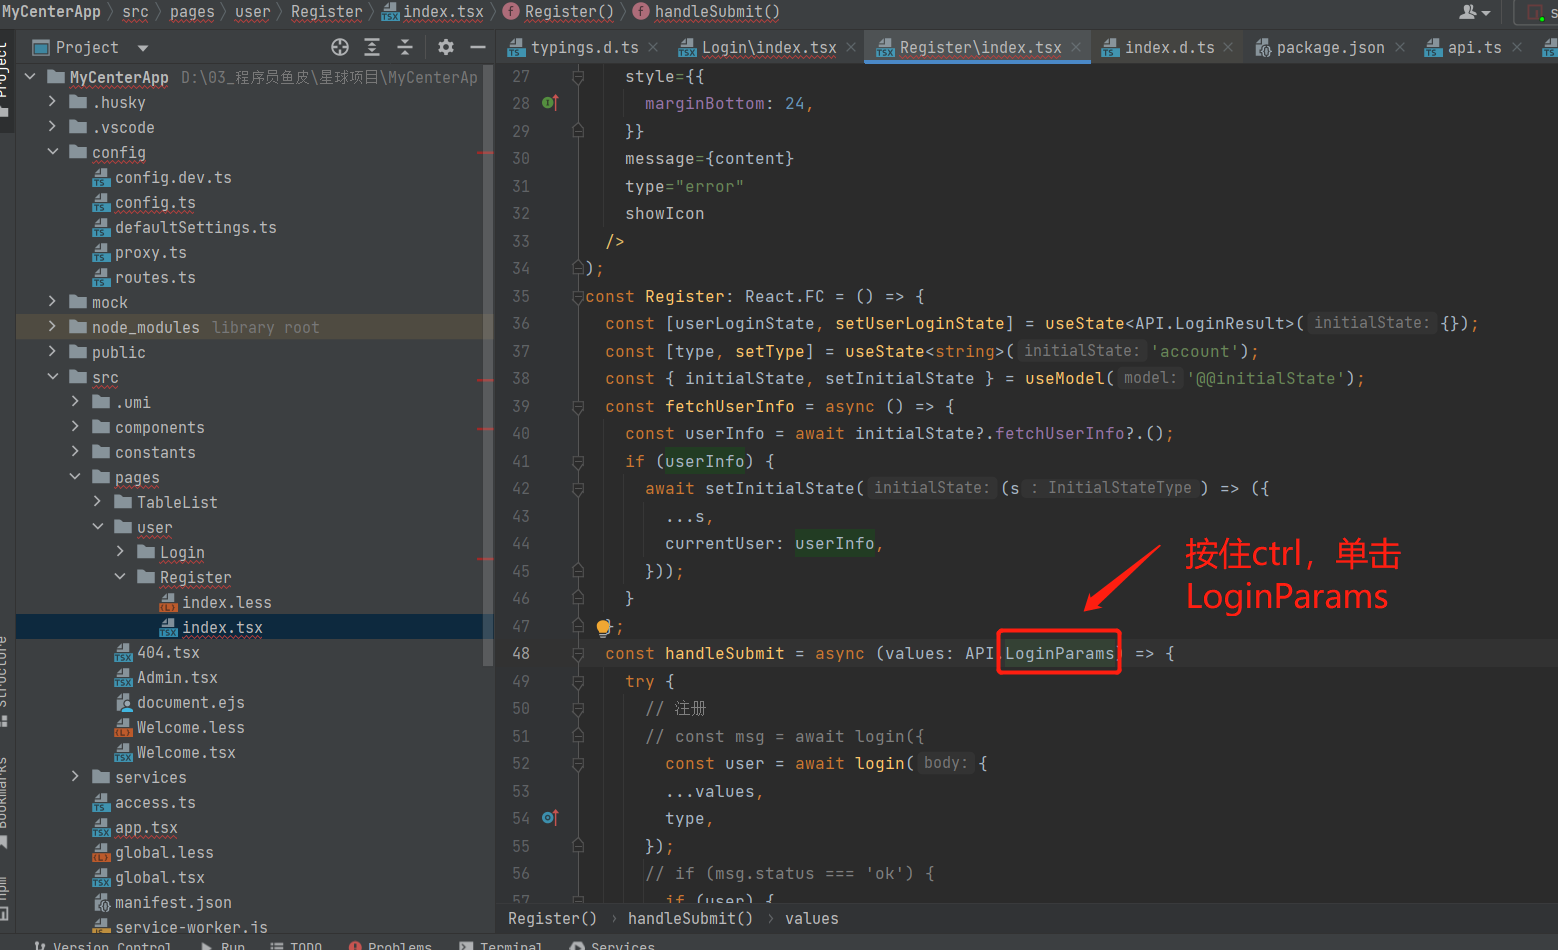
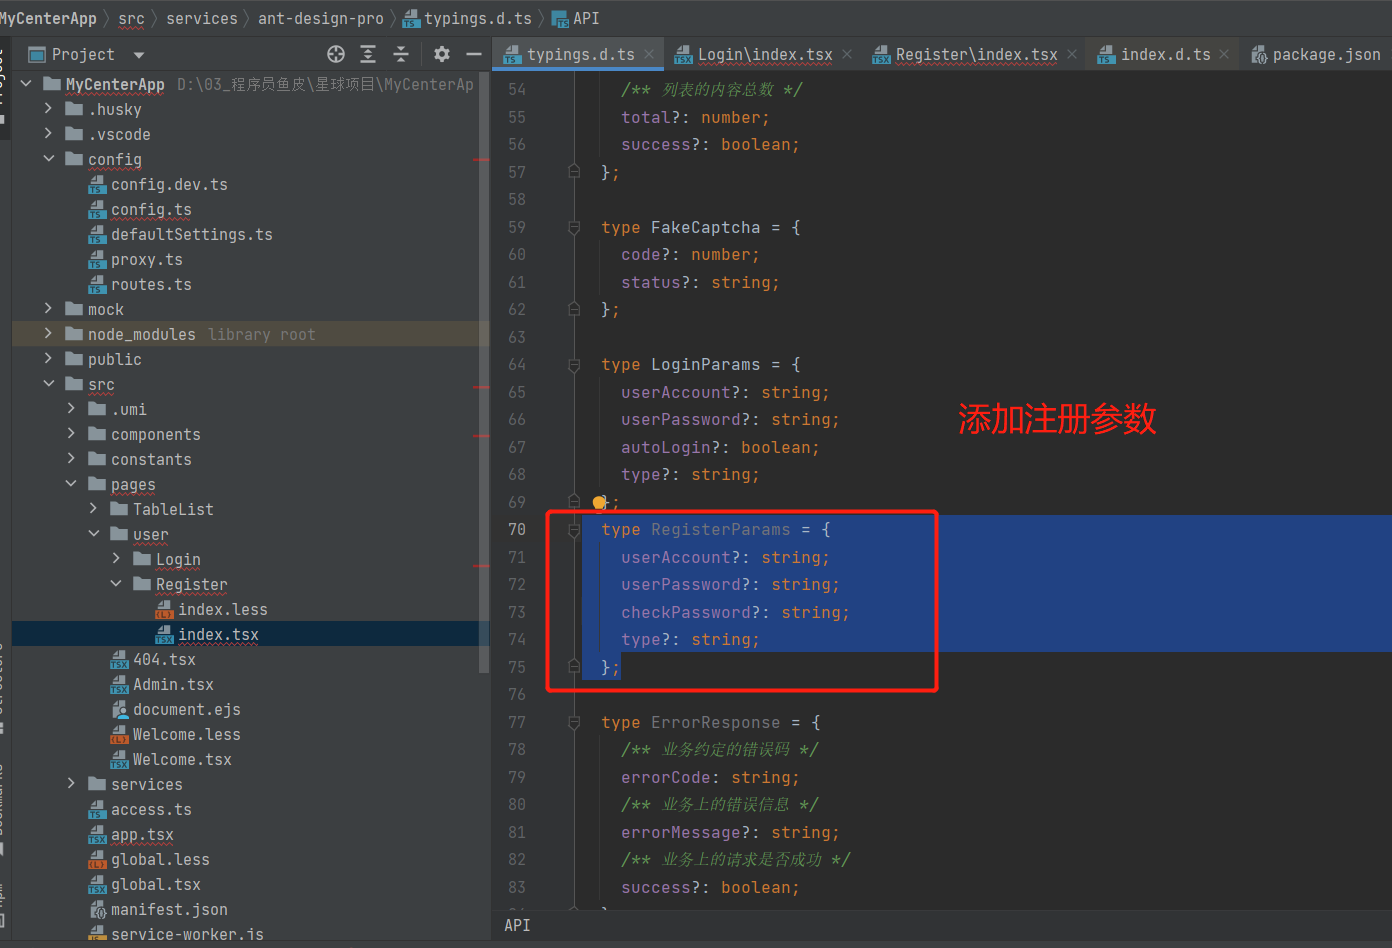
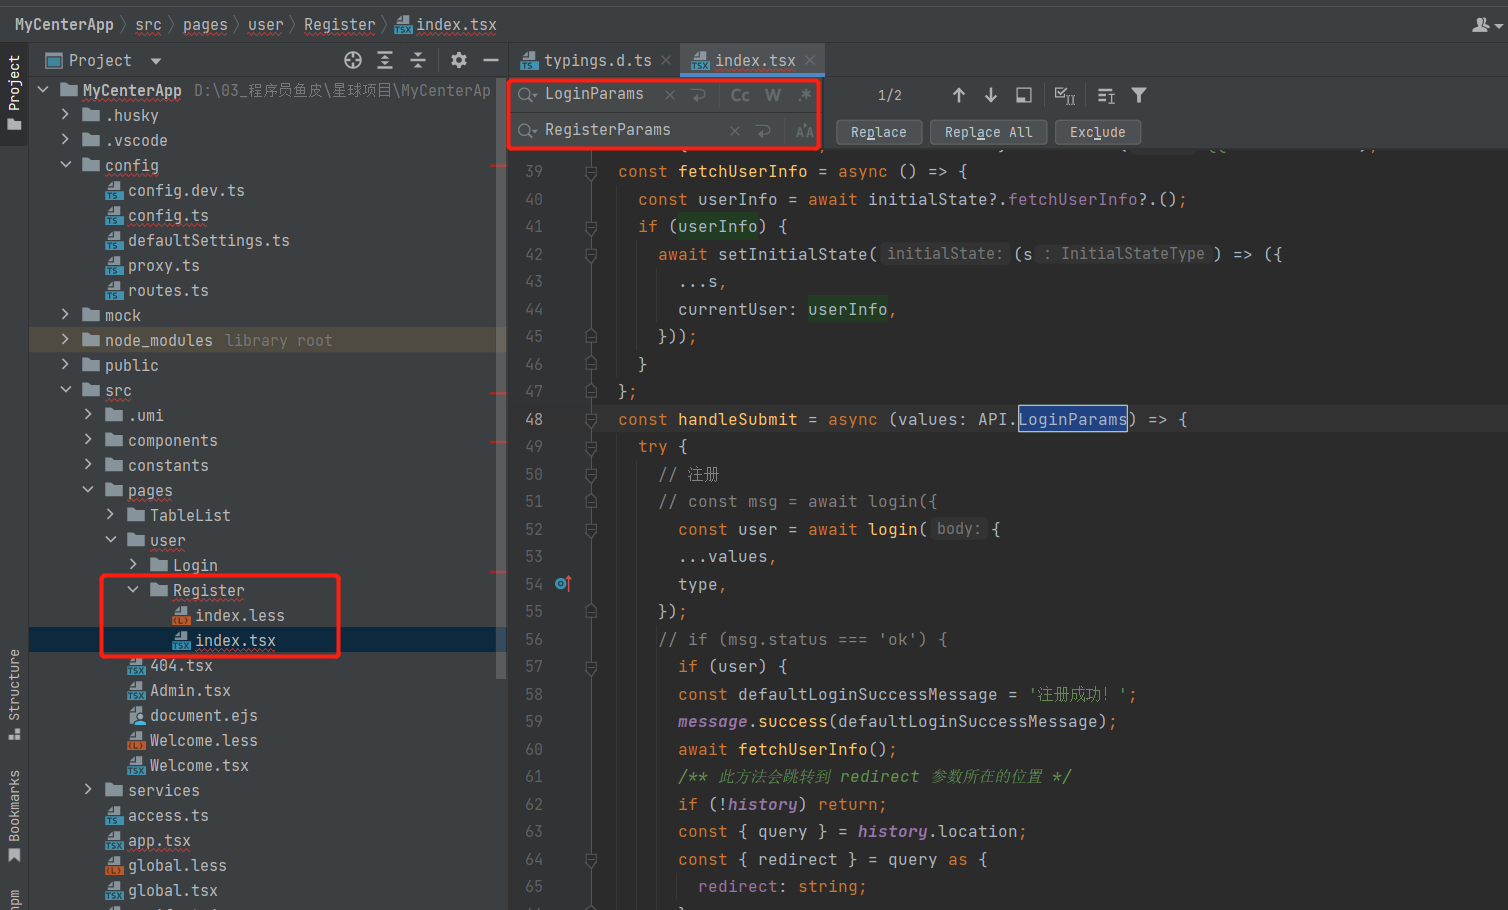
回到index.tsx,把 LoginParams 全部替换为 RegisterParams
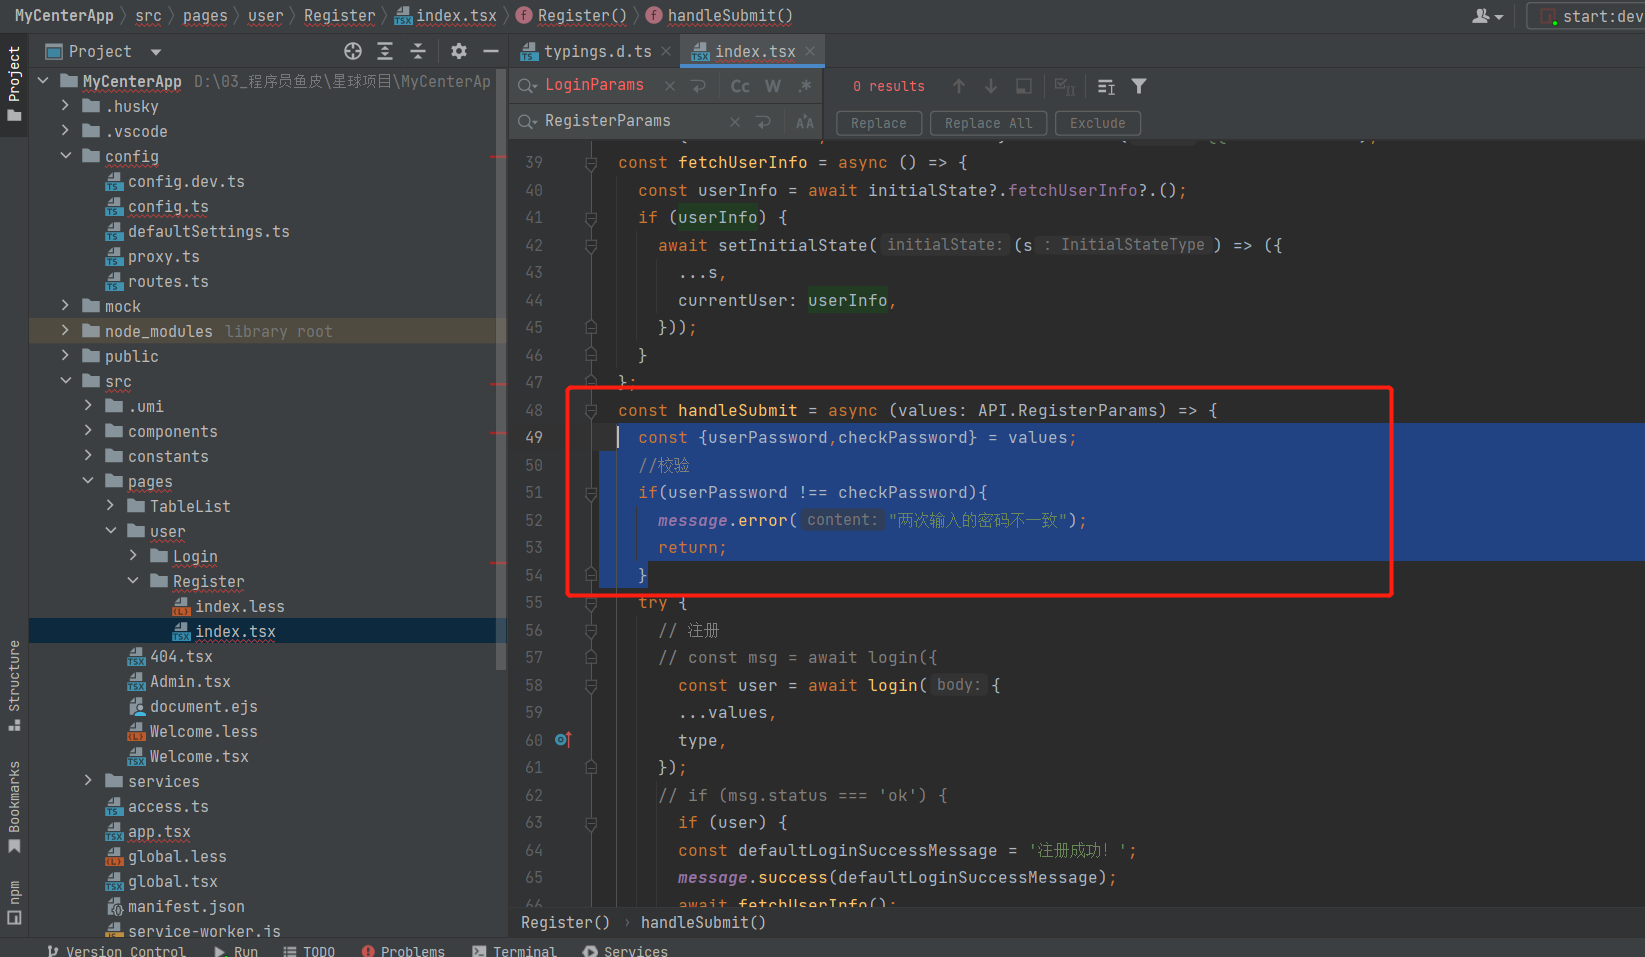
在提交前写⼀些校验,代码如下:
const {userPassword,checkPassword} = values;
  //校验
  if(userPassword !== checkPassword){
    message.error("两次输入的密码不一致");
    return;
  }
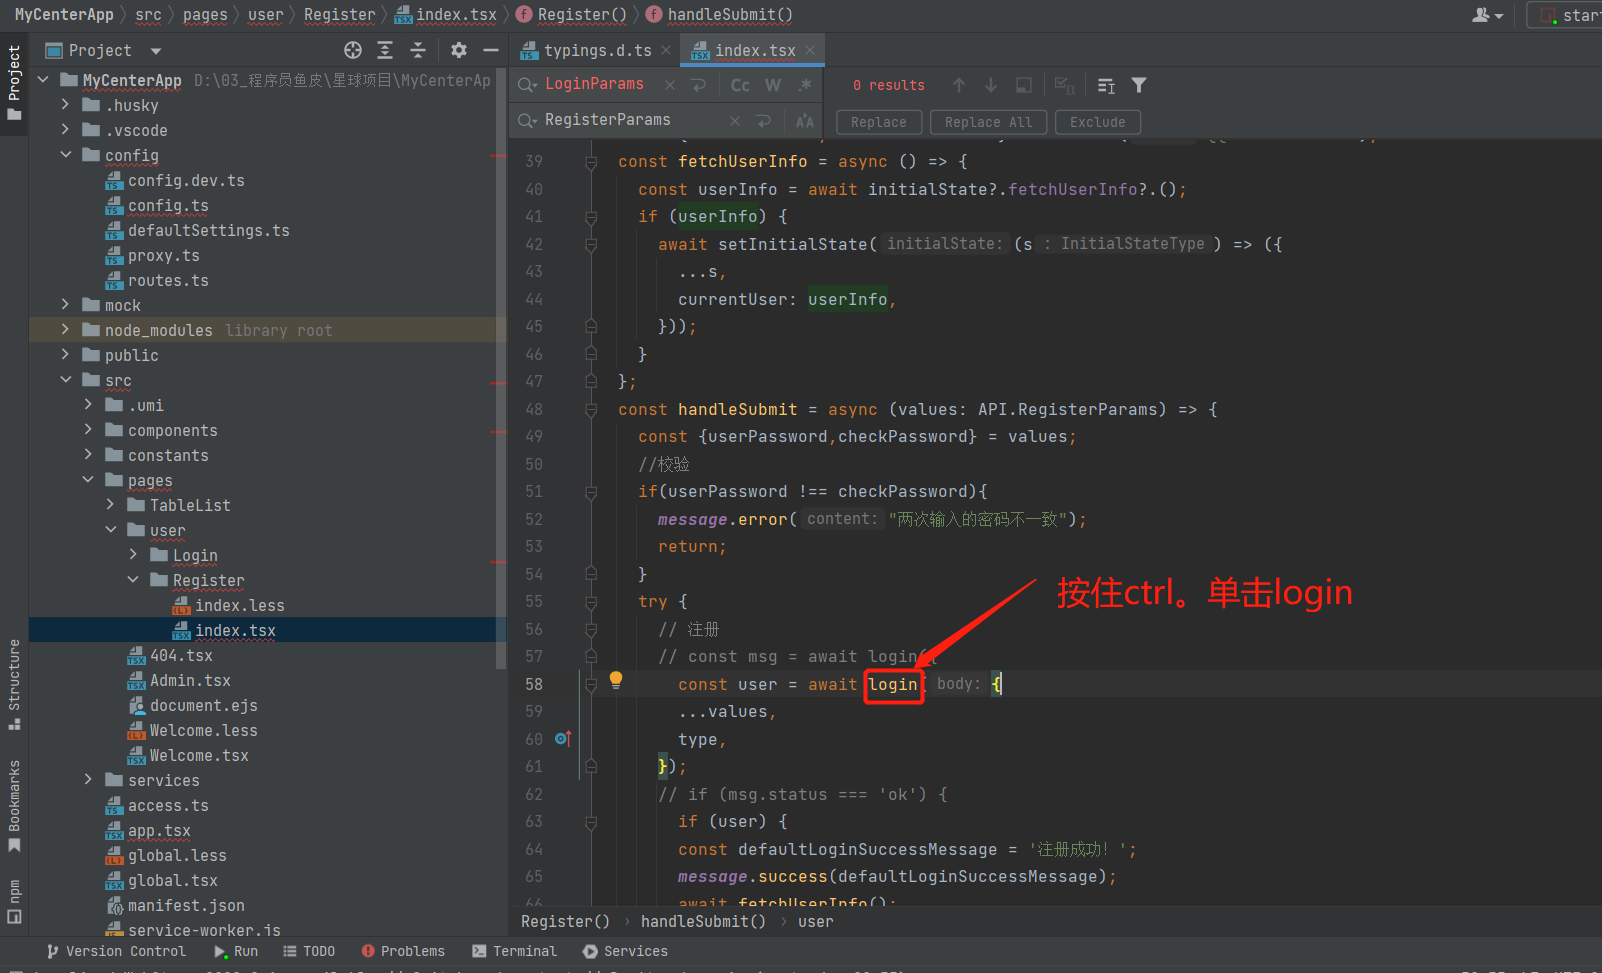
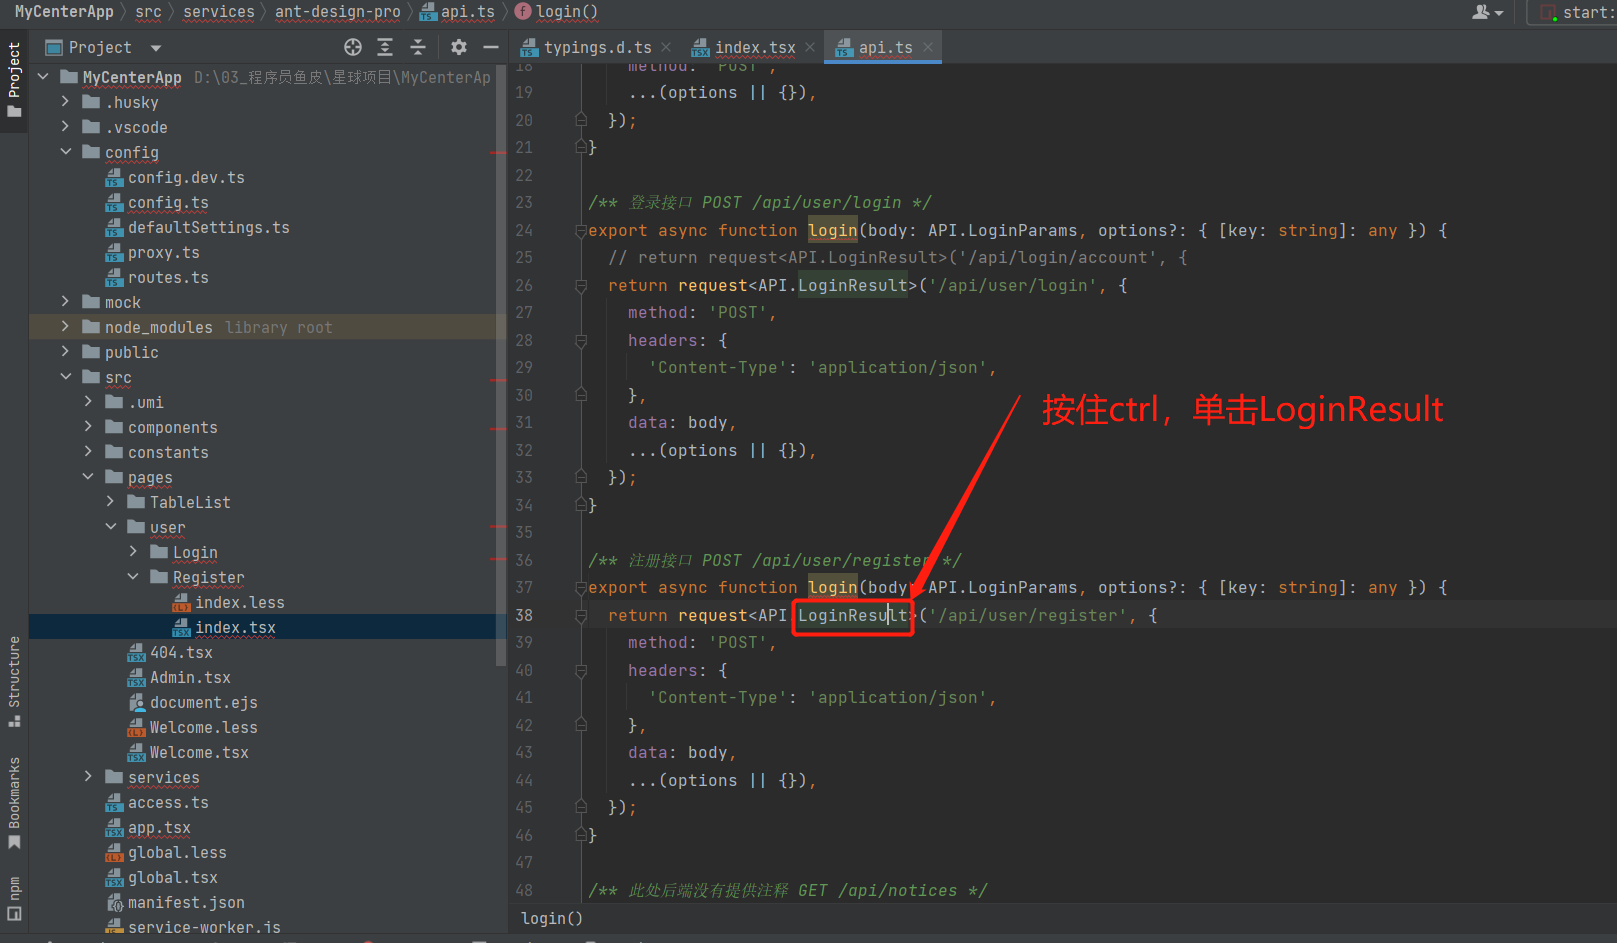
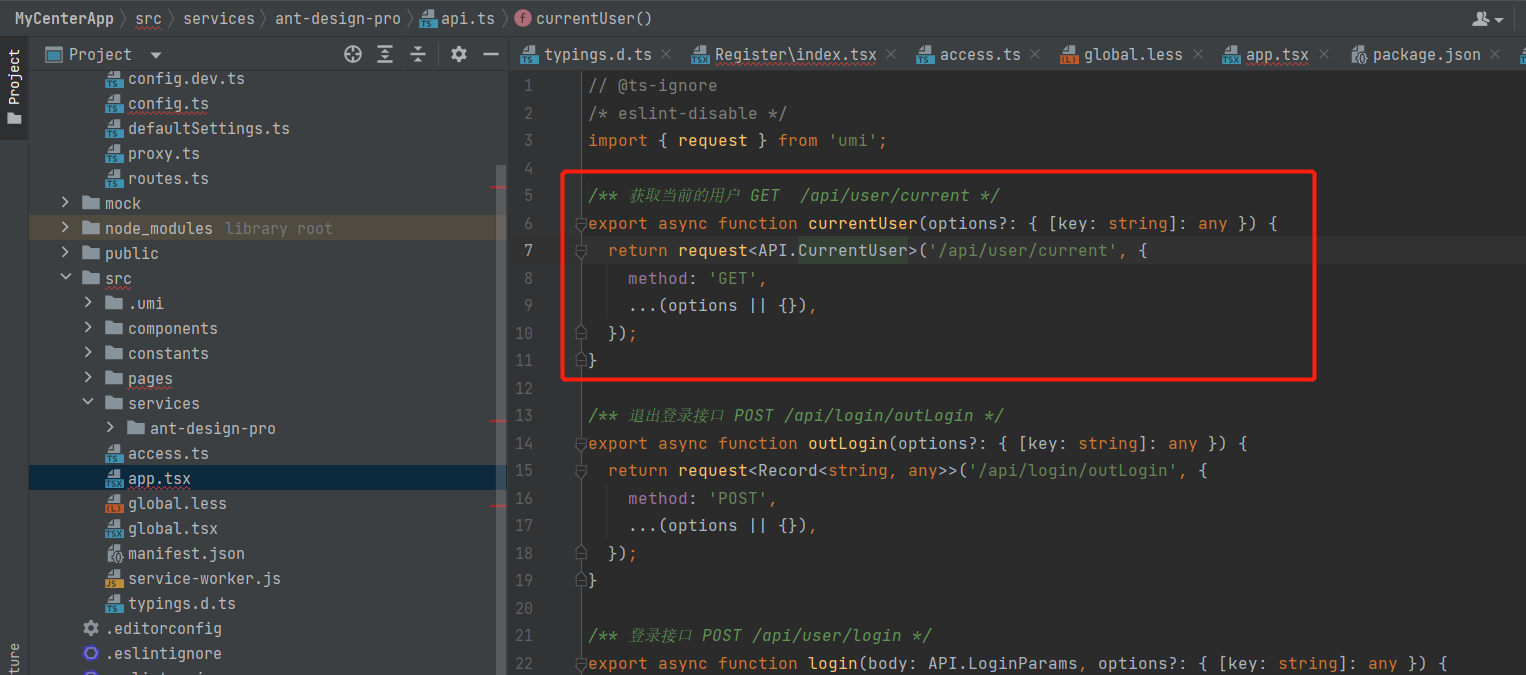
还要写⼀个注册⽅法的接口,ctrl+点击login
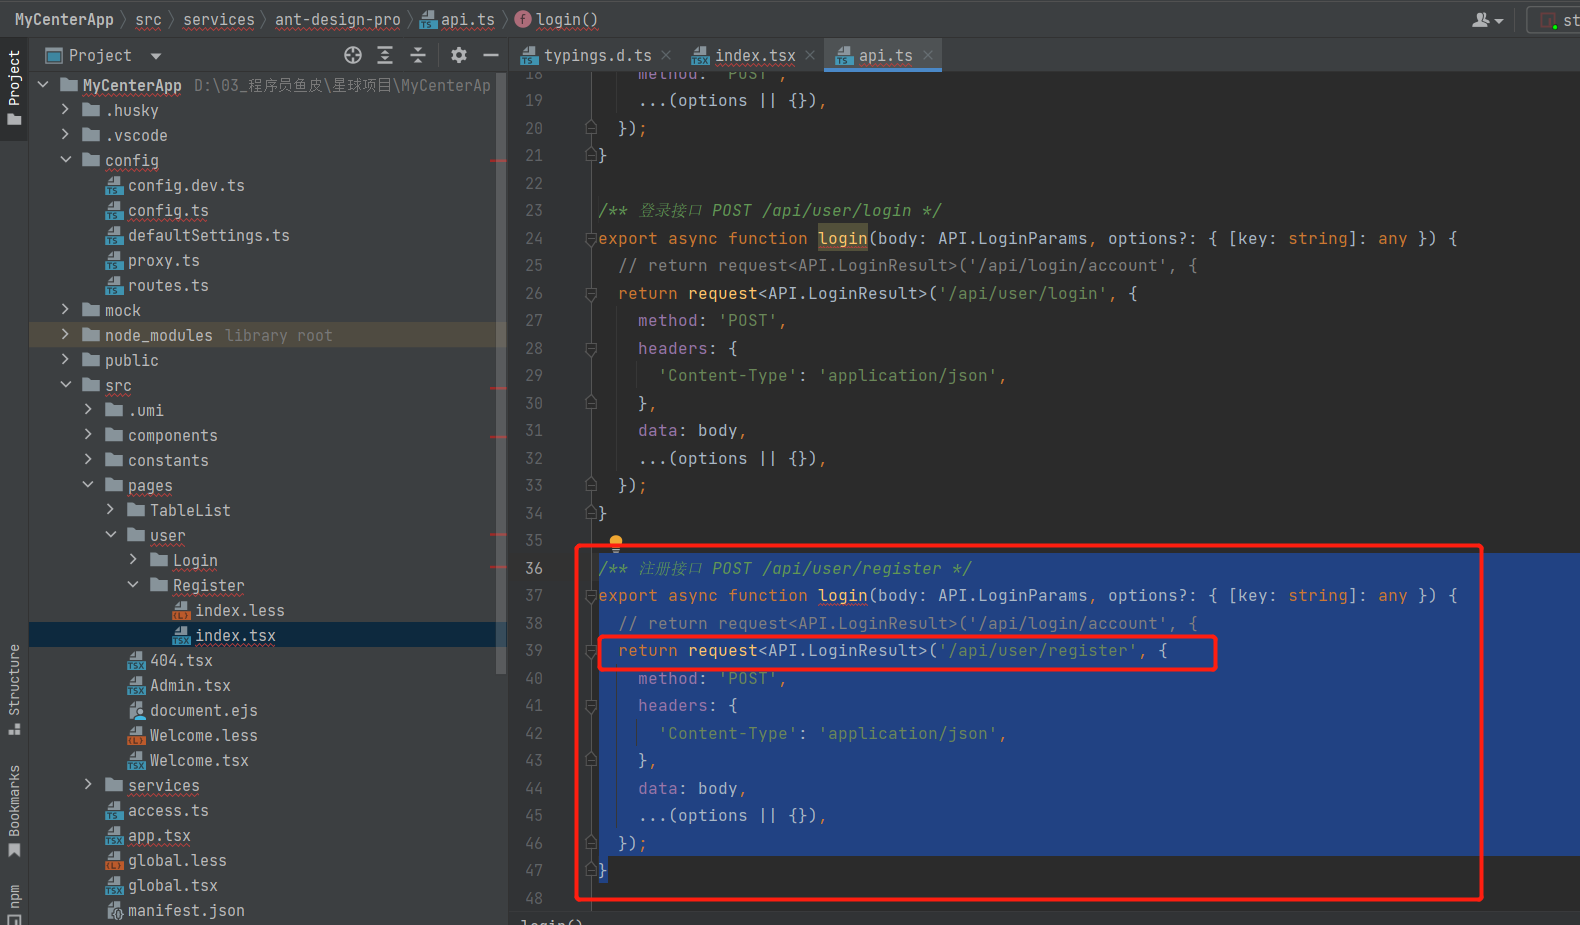
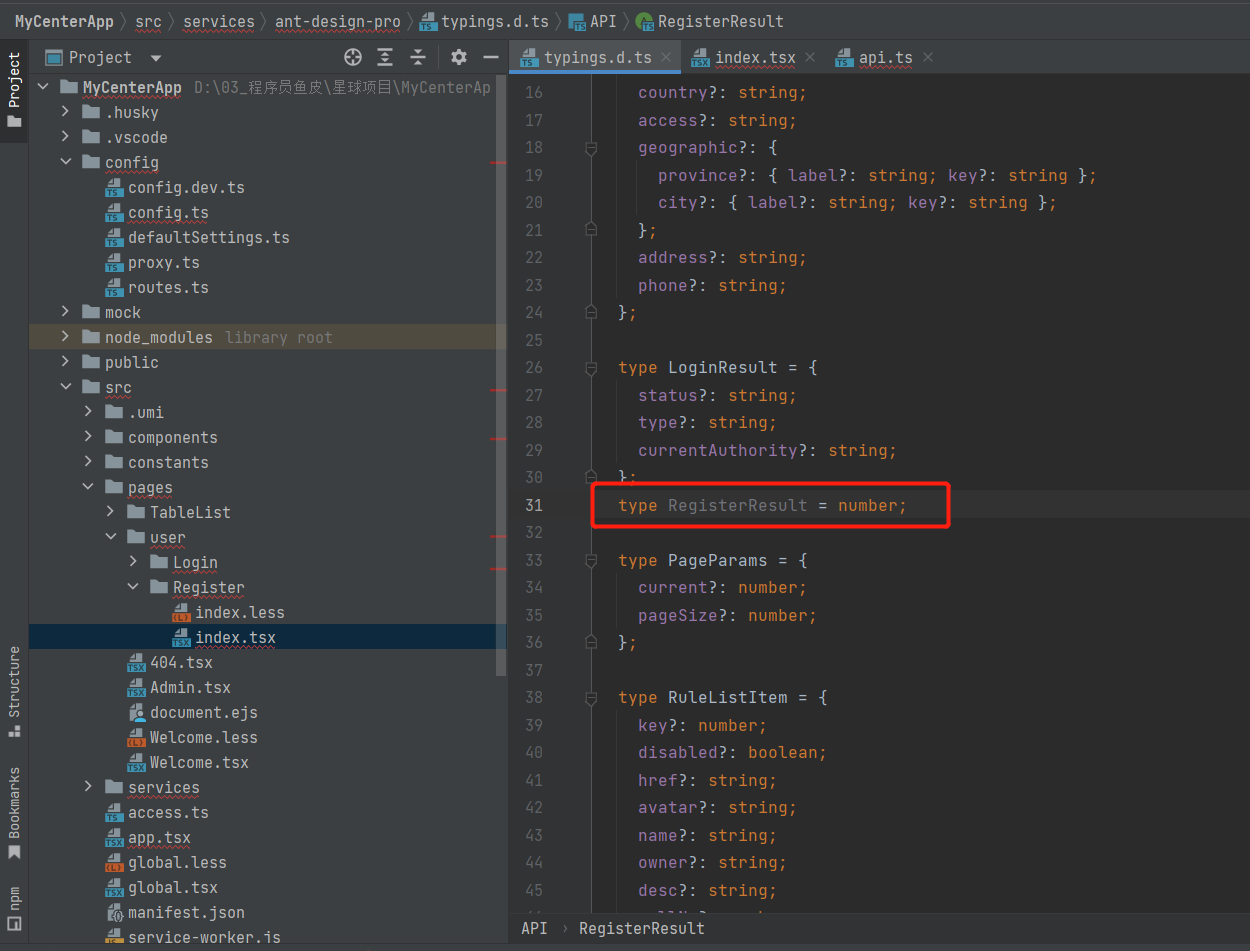
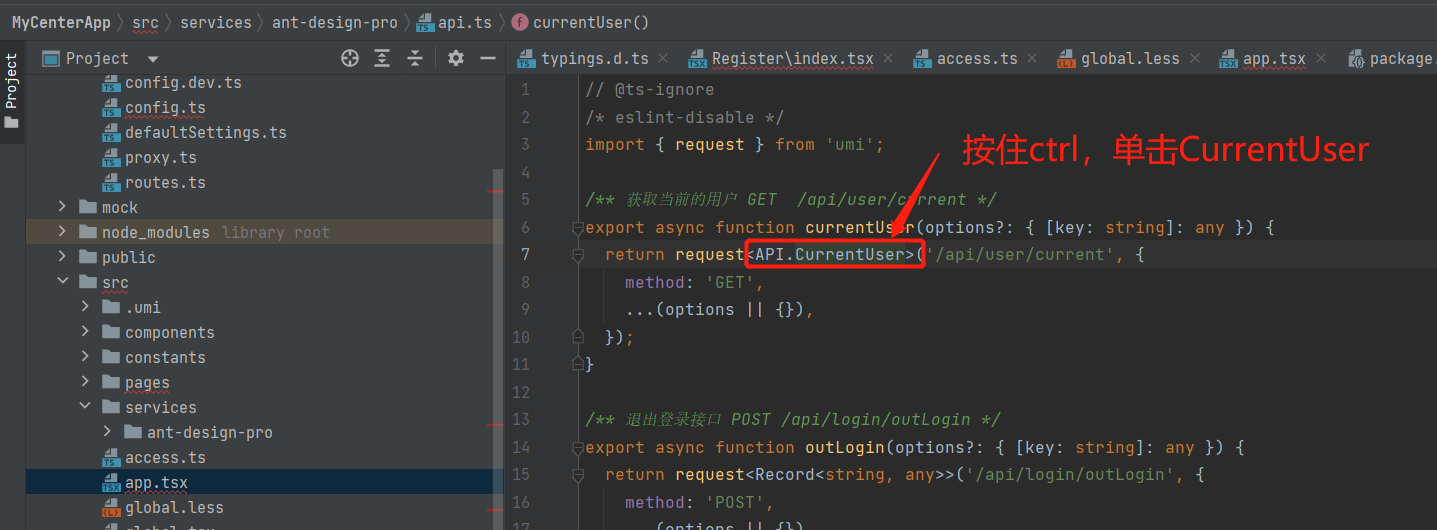
按住ctrl点击 LoginResult (这⾥定义了向后端发送请求之后,前端接收的返回类型)
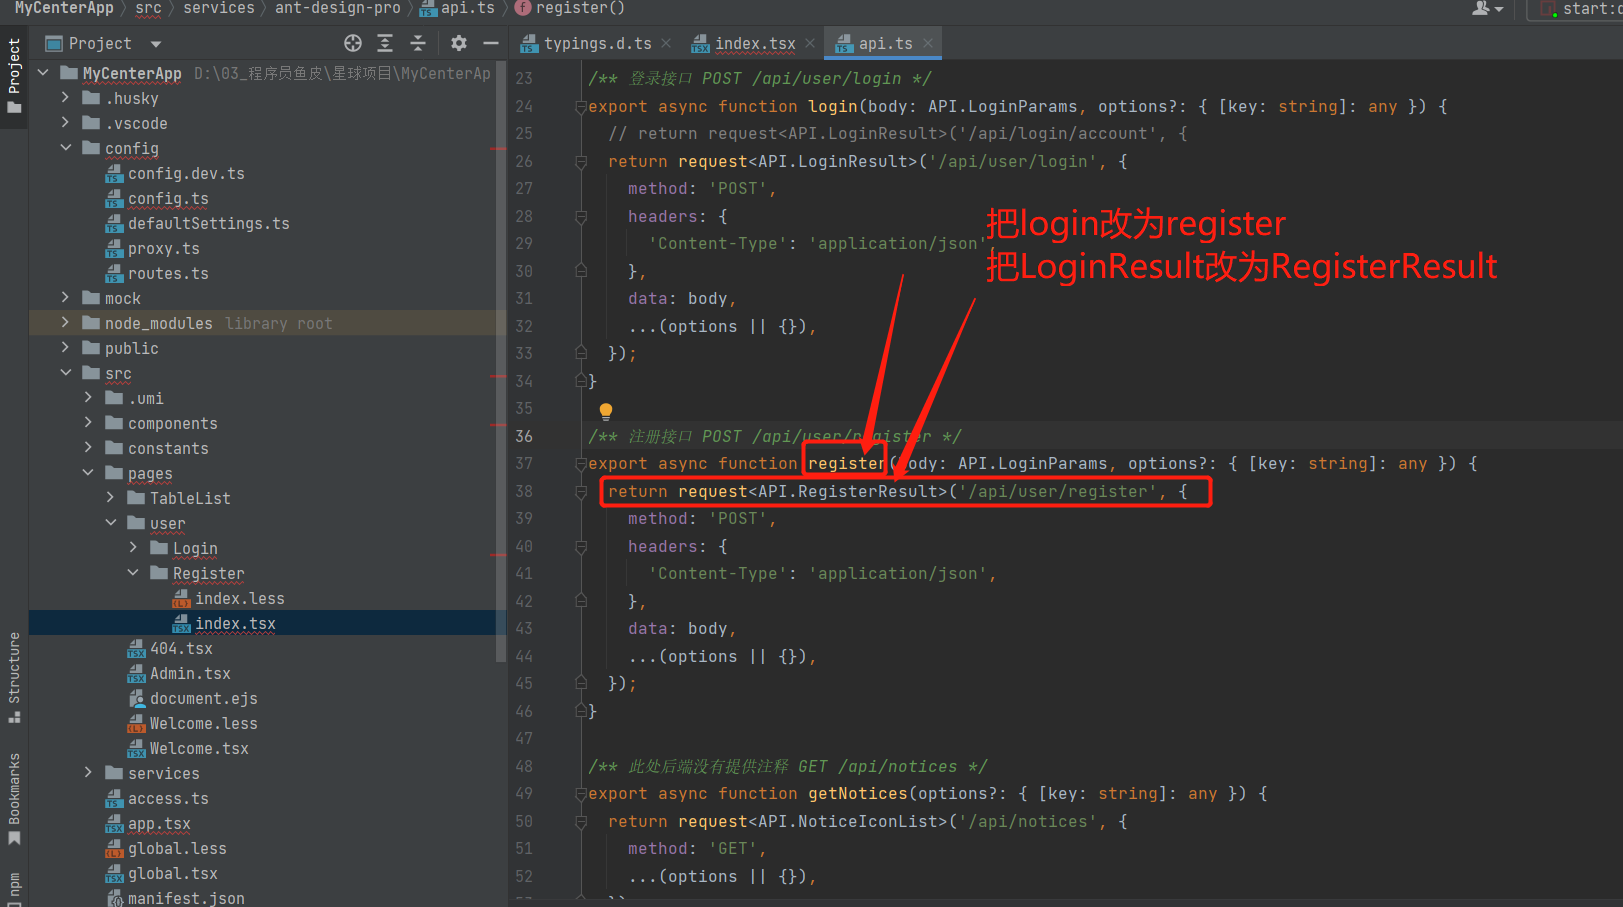
删除没用的代码(比如一些登录页面的错误提示)
完整的注册页面如下:
import Footer from '@/components/Footer';
import {register} from '@/services/ant-design-pro/api';
import {
LockOutlined,
UserOutlined,
} from '@ant-design/icons';
import {
LoginForm,
ProFormText,
} from '@ant-design/pro-components';
import { Alert, message, Tabs } from 'antd';
import React, { useState } from 'react';
import { history } from 'umi';
import styles from './index.less';
import {PLANET_LINK, SYSTEM_LOGO} from "@/constants";
const LoginMessage: React.FC<{
content: string;
}> = ({ content }) => (
<Alert
style={{
marginBottom: 24,
}}
message={content}
type="error"
showIcon
/>
);
const Register: React.FC = () => {
const [type, setType] = useState<string>('account');
const handleSubmit = async (values: API.RegisterParams) => {
const {userPassword,checkPassword} = values;
//校验
if(userPassword !== checkPassword){
message.error("两次输入的密码不一致");
return;
}
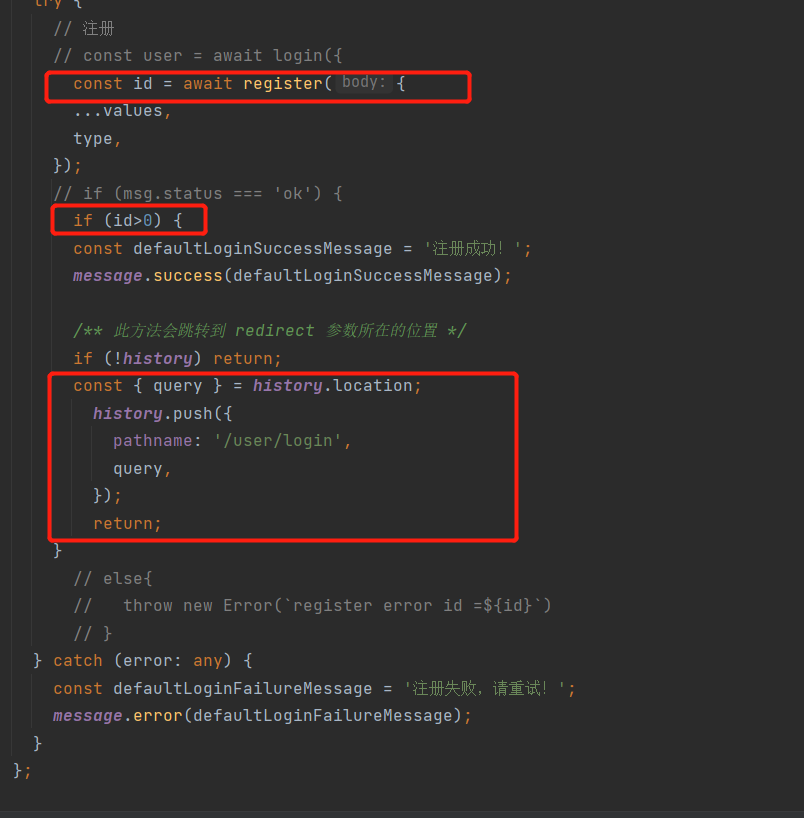
try {
// 注册
// const user = await login({
const id = await register({
...values,
type,
});
// if (msg.status === 'ok') {
if (id>0) {
const defaultLoginSuccessMessage = '注册成功!';
message.success(defaultLoginSuccessMessage);
/** 此方法会跳转到 redirect 参数所在的位置 */
if (!history) return;
const { query } = history.location;
history.push({
pathname: '/user/login',
query,
});
return;
}
// else{
// throw new Error(`register error id =${id}`)
// }
} catch (error: any) {
const defaultLoginFailureMessage = '注册失败,请重试!';
message.error(defaultLoginFailureMessage);
}
};
return (
<div className={styles.container}>
<div className={styles.content}>
<LoginForm
submitter={
{searchConfig:{
submitText:'注册'
}}
}
logo={<img alt="logo" src={SYSTEM_LOGO} />}
title="编程导航知识星球"
subTitle={<a href={PLANET_LINK} target="_blank" rel="noreferrer">最好的编程学习圈子</a>}
initialValues={{
autoLogin: true,
}}
onFinish={async (values) => {
await handleSubmit(values as API.RegisterParams);
}}
>
<Tabs activeKey={type} onChange={setType}>
<Tabs.TabPane key="account" tab={'账户密码注册'} />
</Tabs>
{status === 'error' && loginType === 'account' && (
// <LoginMessage content={'错误的用户名和密码(admin/ant.design)'} />
<LoginMessage content={'错误的用户名和密码'} />
)}
{type === 'account' && (
<>
<ProFormText
name="userAccount"
fieldProps={{
size: 'large',
prefix: <UserOutlined className={styles.prefixIcon} />,
}}
// placeholder={'用户名: admin or user'}
placeholder={'请输⼊账号'}
rules={[
{
required: true,
message: '账号是必填项!',
},
]}
/>
<ProFormText.Password
name="userPassword"
fieldProps={{
size: 'large',
prefix: <LockOutlined className={styles.prefixIcon} />,
}}
// placeholder={'密码: ant.design'}
placeholder={'请输⼊密码'}
rules={[
{
required: true,
message: '密码是必填项!',
},
{
min:8,
type:'string',
message:'长度不能小于8'
}
]}
/>
{/* 确认密码框*/}
<ProFormText.Password
name="checkPassword"
fieldProps={{
size: 'large',
prefix: <LockOutlined className={styles.prefixIcon} />,
}}
// placeholder={'密码: ant.design'}
placeholder={'请再次输⼊密码'}
rules={[
{
required: true,
message: '确认密码是必填项!',
},
{
min:8,
type:'string',
message:'长度不能小于8'
}
]}
/>
</>
)}
</LoginForm>
</div>
<Footer />
</div>
);
};
export default Register;
5.修改用户登录态
修改如下
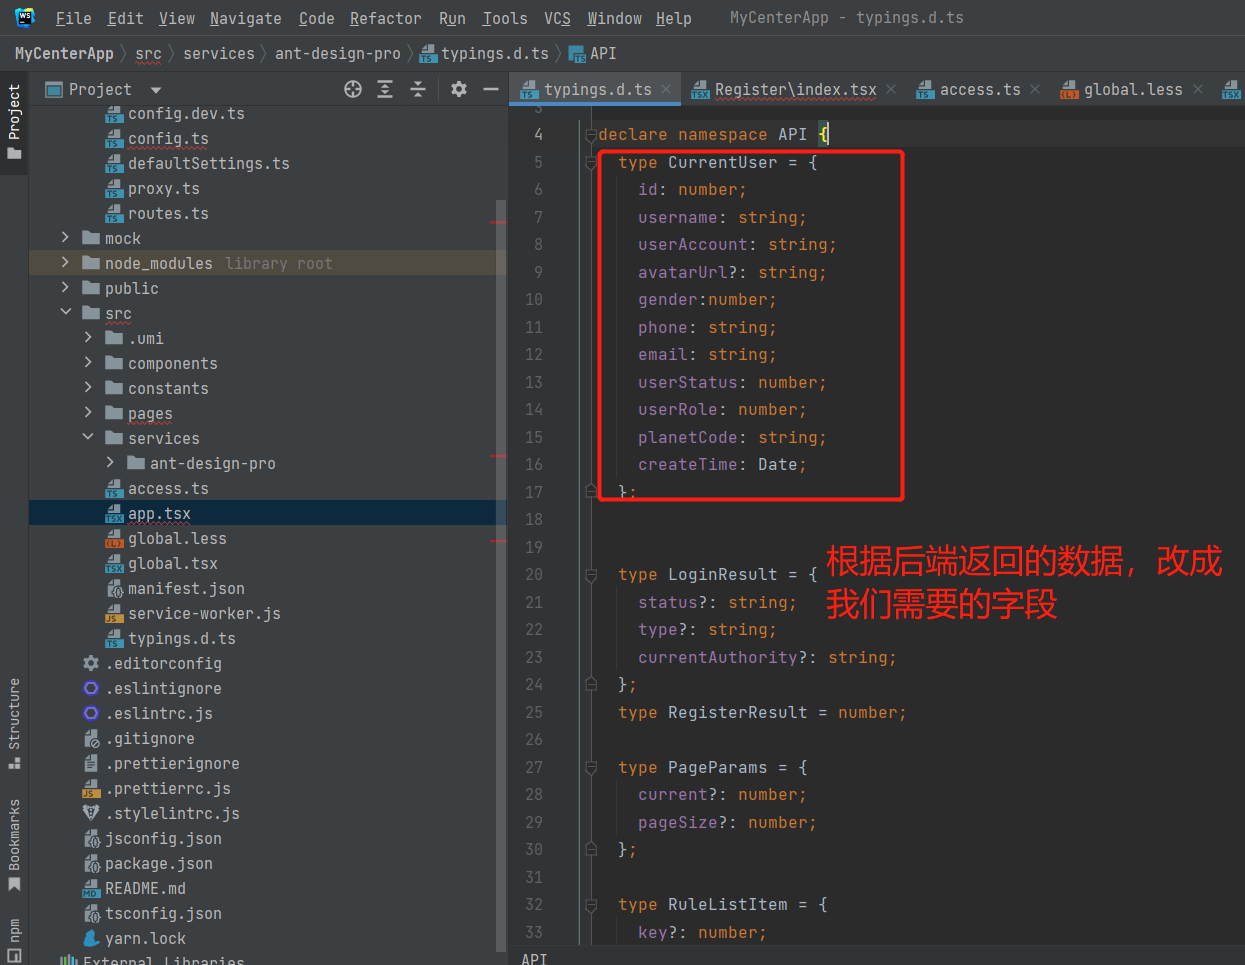
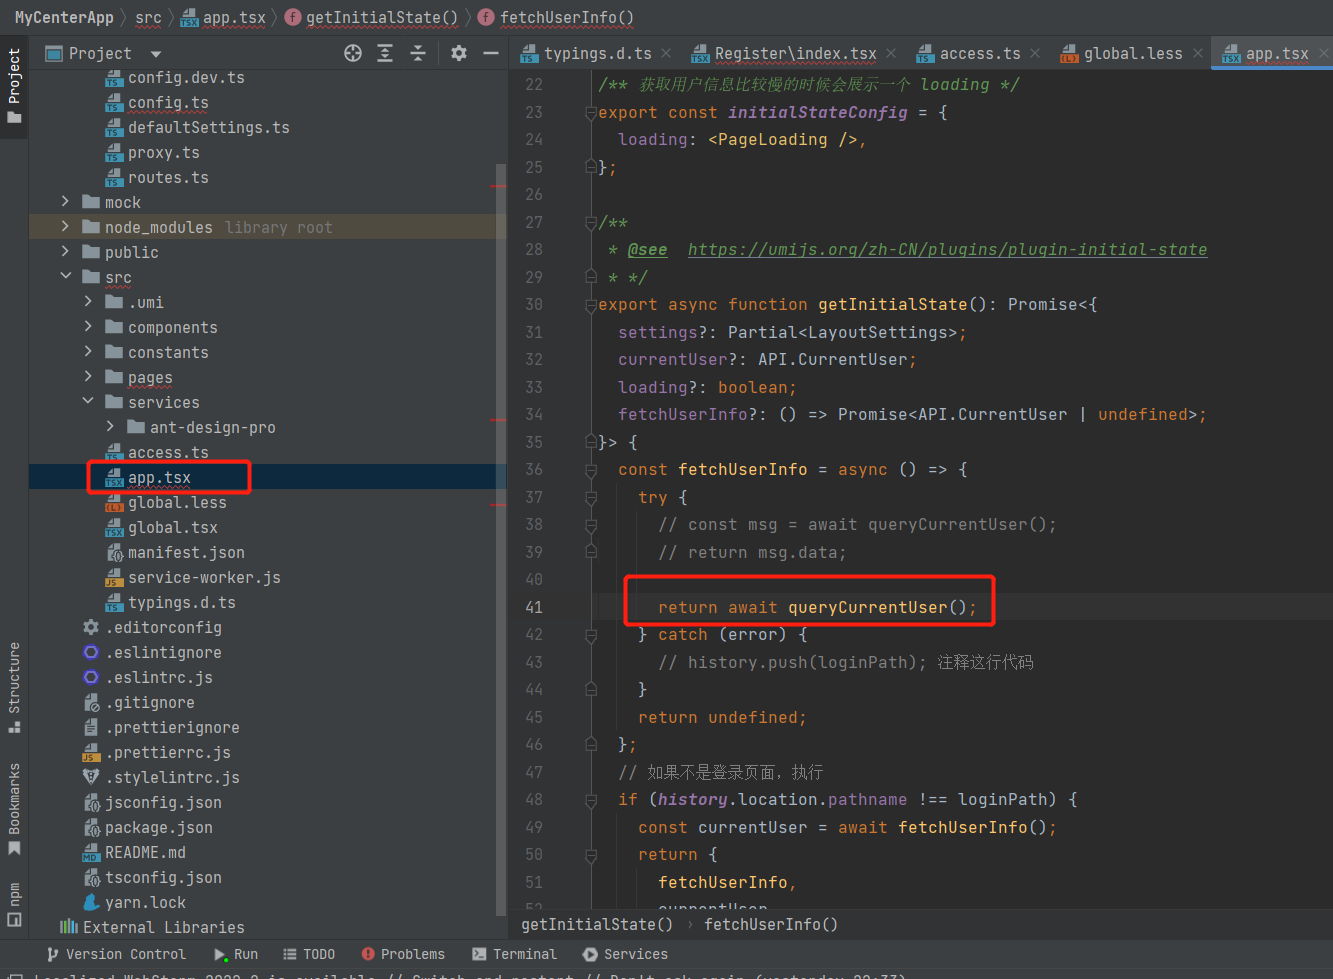
修改返回值
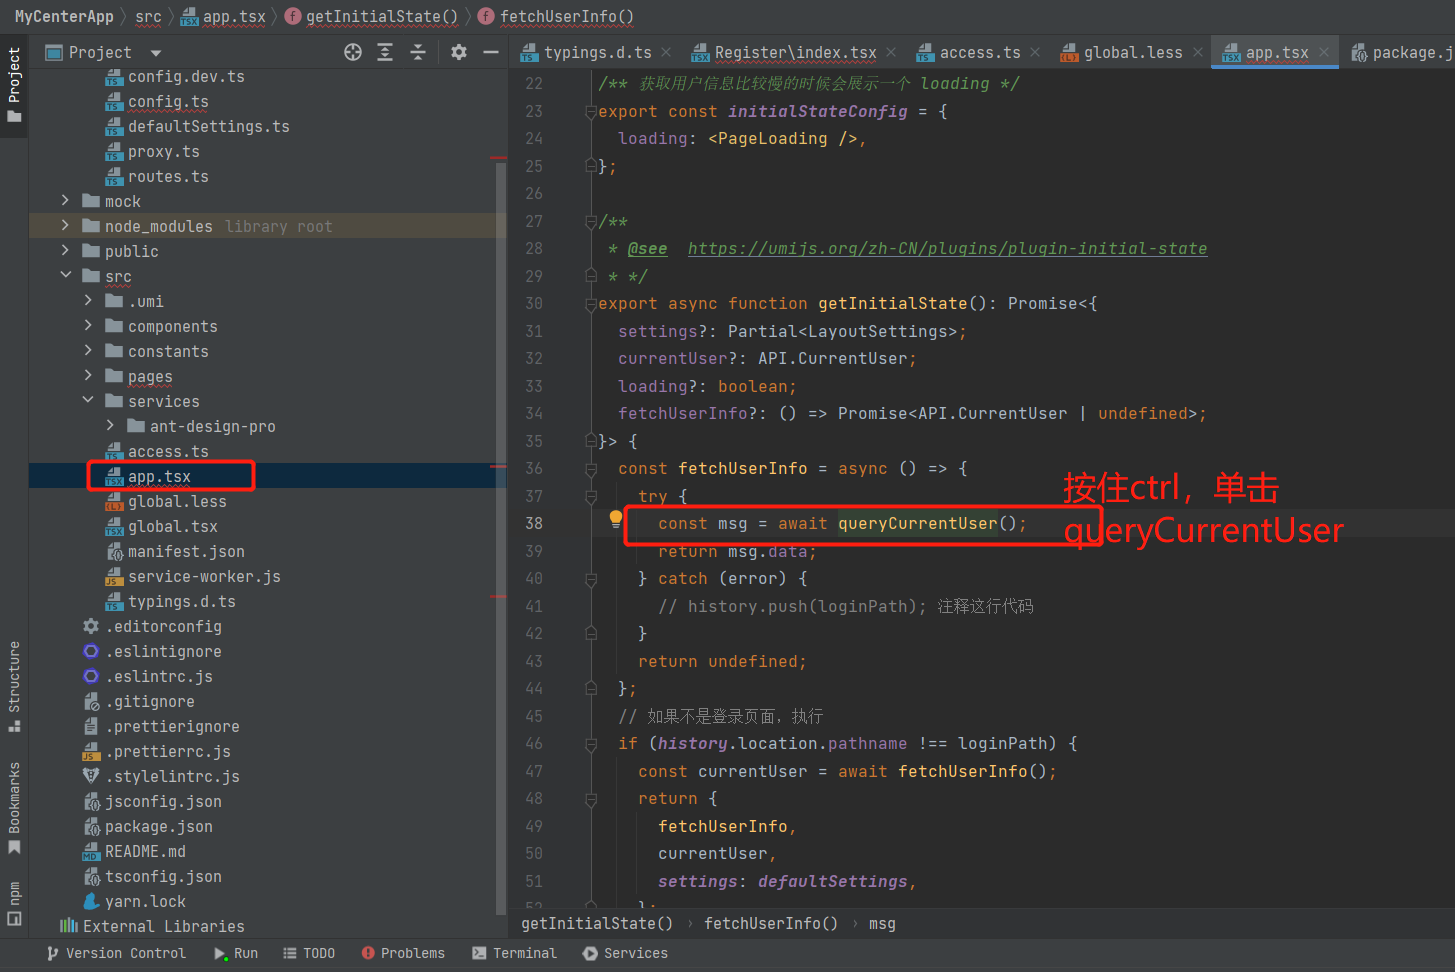
完整的app.tsx如下:
import Footer from '@/components/Footer';
import RightContent from '@/components/RightContent';
import { BookOutlined, LinkOutlined } from '@ant-design/icons';
import type { Settings as LayoutSettings } from '@ant-design/pro-components';
import { PageLoading, SettingDrawer } from '@ant-design/pro-components';
import type { RunTimeLayoutConfig } from 'umi';
import { history, Link } from 'umi';
import defaultSettings from '../config/defaultSettings';
import { currentUser as queryCurrentUser } from './services/ant-design-pro/api';
const isDev = process.env.NODE_ENV === 'development';
const loginPath = '/user/login';
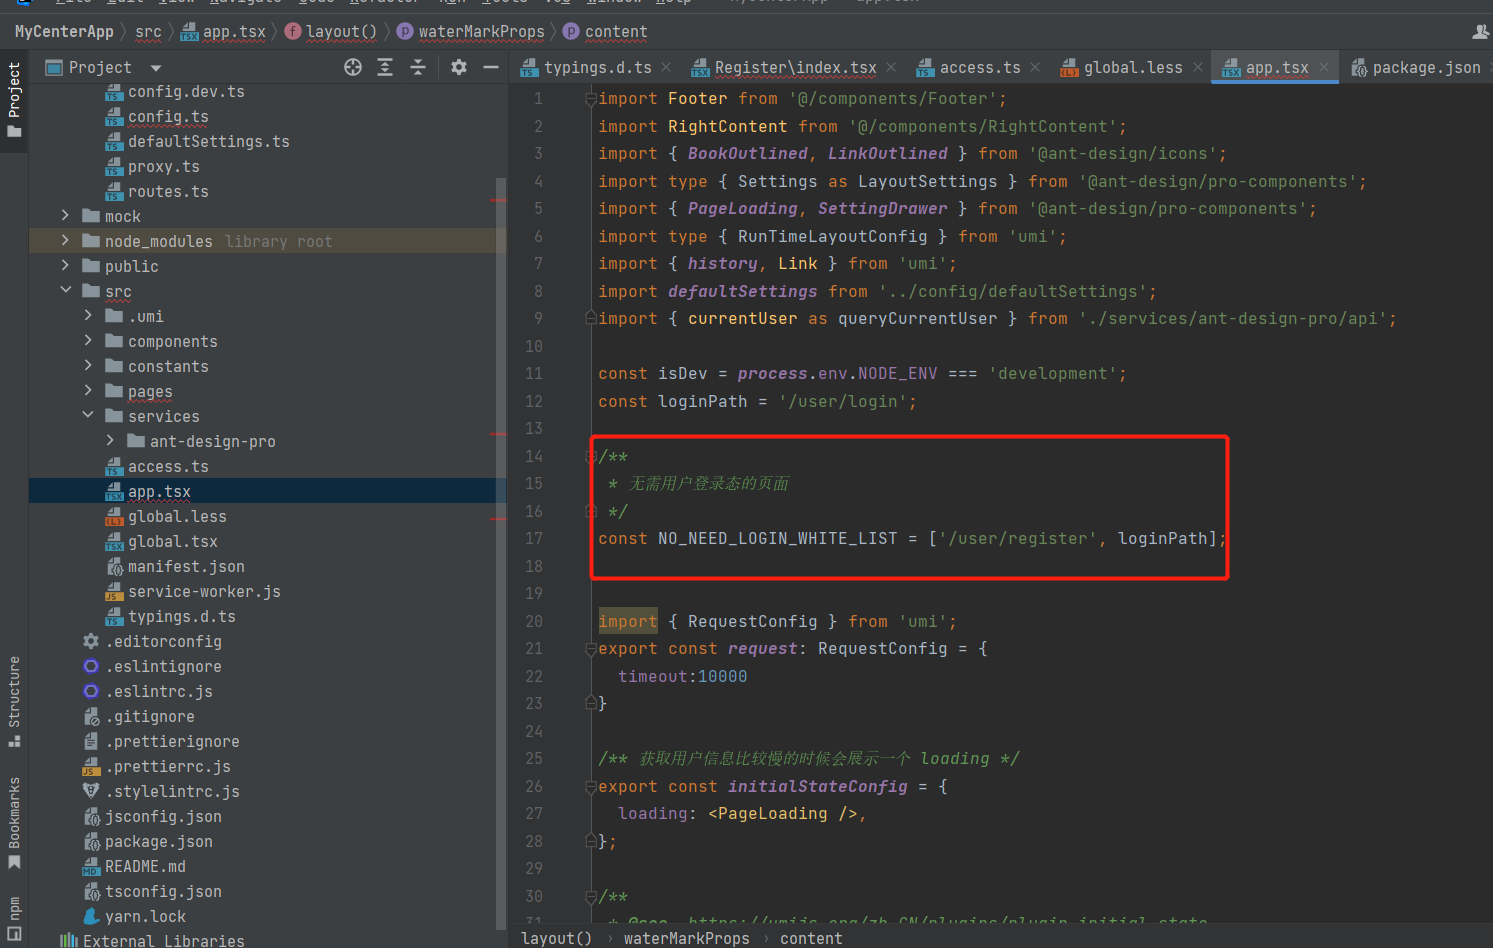
/**
* 无需用户登录态的页面
*/
const NO_NEED_LOGIN_WHITE_LIST = ['/user/register', loginPath];
import { RequestConfig } from 'umi';
export const request: RequestConfig = {
timeout:10000
}
/** 获取用户信息比较慢的时候会展示一个 loading */
export const initialStateConfig = {
loading: <PageLoading />,
};
/**
* @see https://umijs.org/zh-CN/plugins/plugin-initial-state
* */
export async function getInitialState(): Promise<{
settings?: Partial<LayoutSettings>;
currentUser?: API.CurrentUser;
loading?: boolean;
fetchUserInfo?: () => Promise<API.CurrentUser | undefined>;
}> {
const fetchUserInfo = async () => {
try {
// const msg = await queryCurrentUser();
// return msg.data;
return await queryCurrentUser();
} catch (error) {
// history.push(loginPath); 注释这行代码
}
return undefined;
};
// // 如果不是登录页面,执行
// if (history.location.pathname !== loginPath) {
// const currentUser = await fetchUserInfo();
// return {
// fetchUserInfo,
// currentUser,
// settings: defaultSettings,
// };
// }
// return {
// fetchUserInfo,
// settings: defaultSettings,
// };
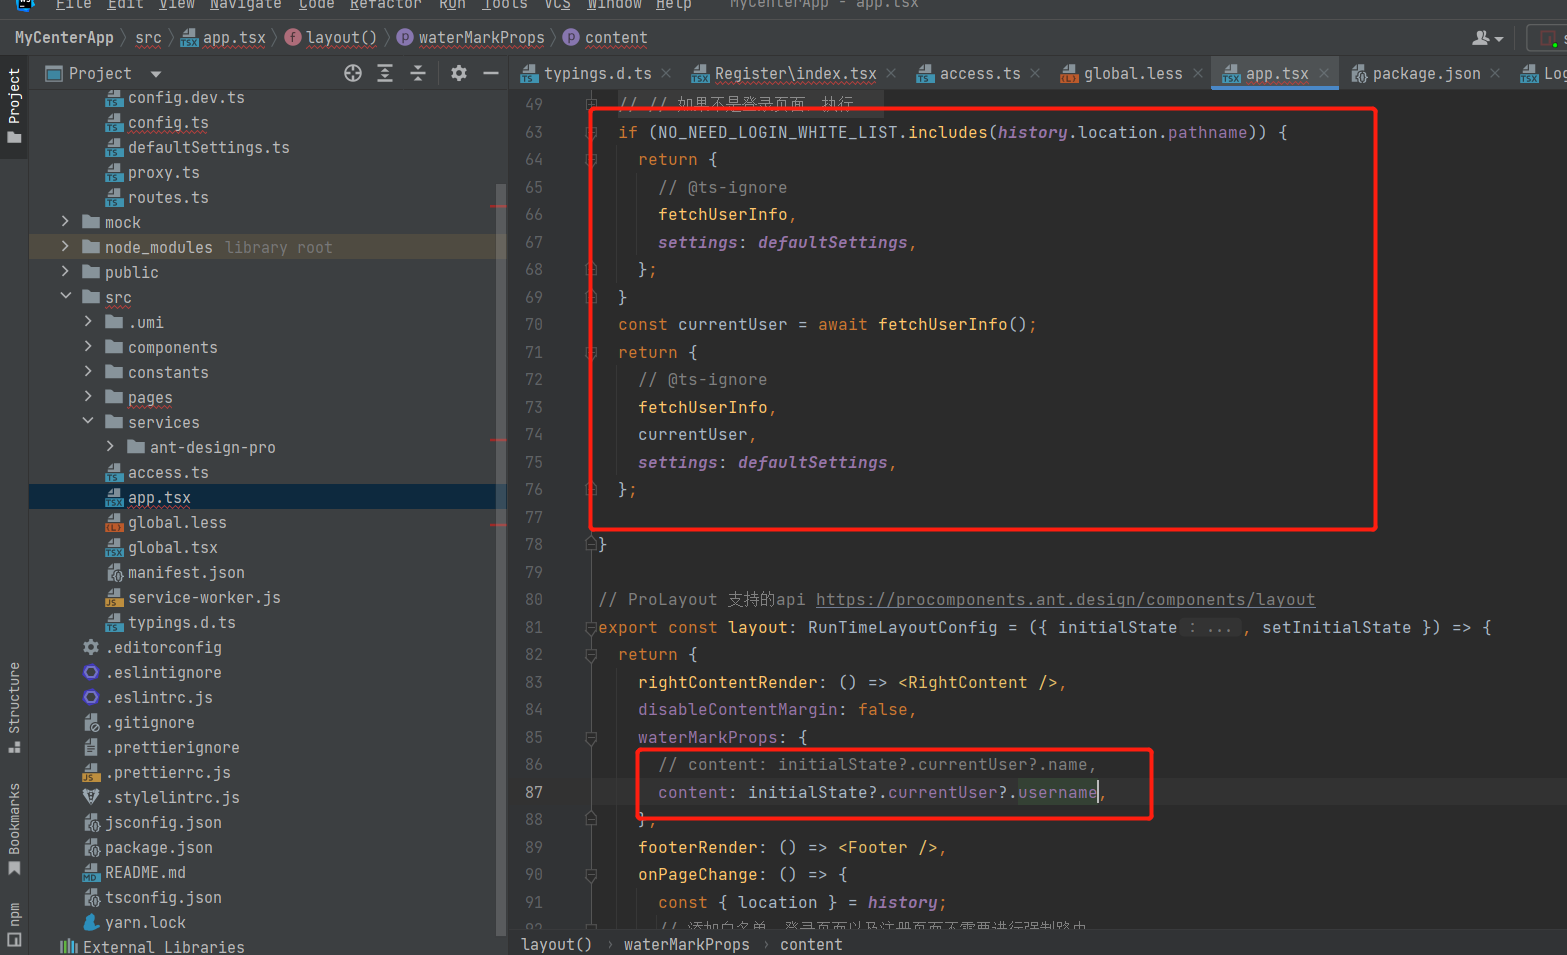
// 如果是无需登录的页面,不执行
if (NO_NEED_LOGIN_WHITE_LIST.includes(history.location.pathname)) {
return {
// @ts-ignore
fetchUserInfo,
settings: defaultSettings,
};
}
const currentUser = await fetchUserInfo();
return {
// @ts-ignore
fetchUserInfo,
currentUser,
settings: defaultSettings,
};
}
// ProLayout 支持的api https://procomponents.ant.design/components/layout
export const layout: RunTimeLayoutConfig = ({ initialState, setInitialState }) => {
return {
rightContentRender: () => <RightContent />,
disableContentMargin: false,
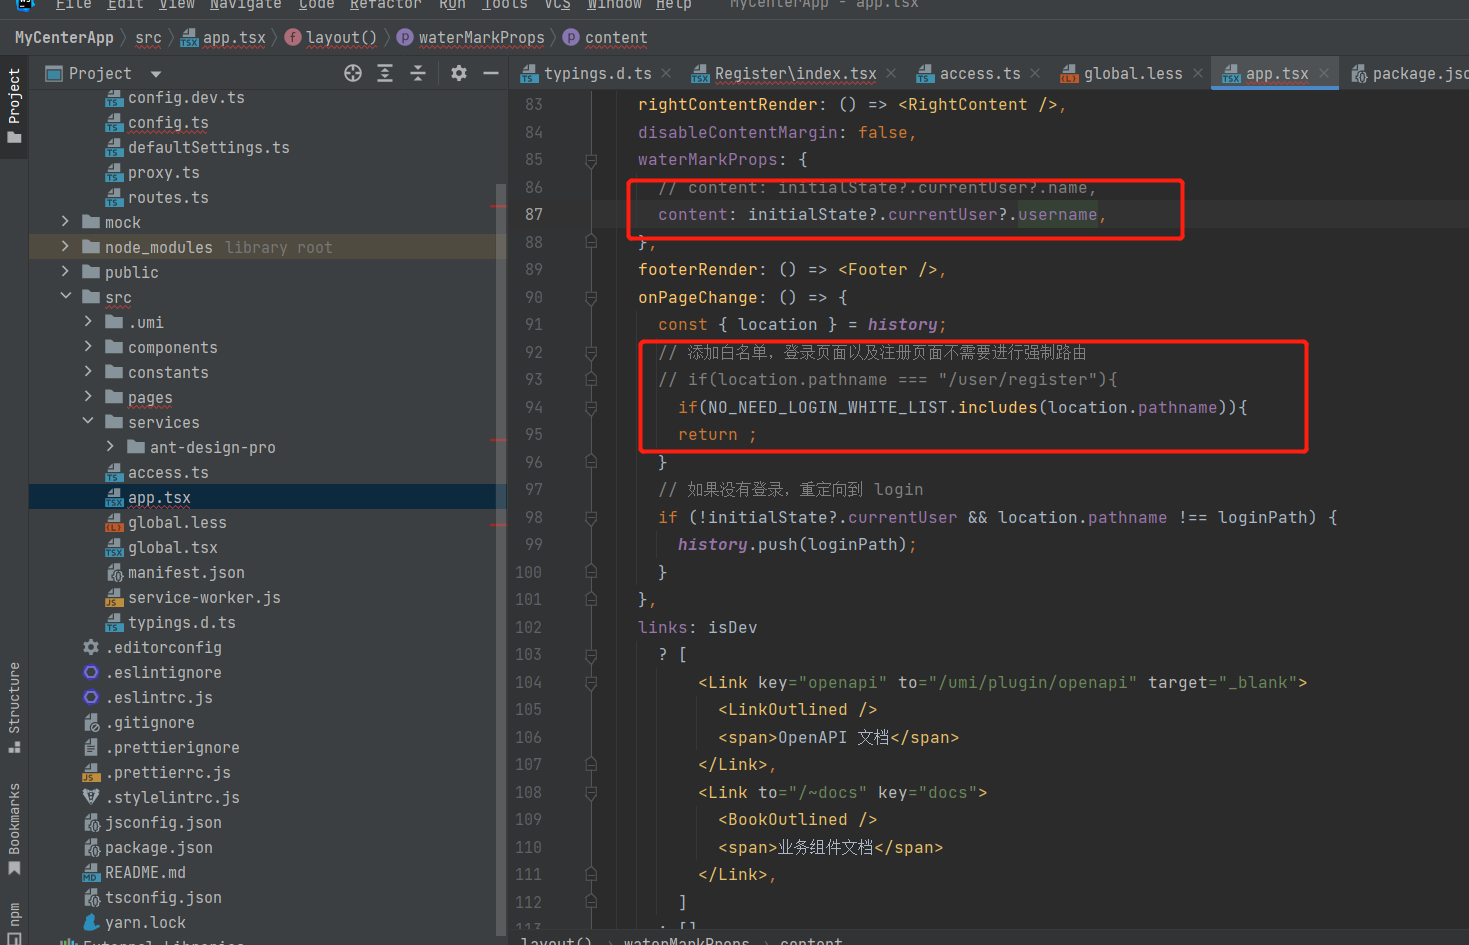
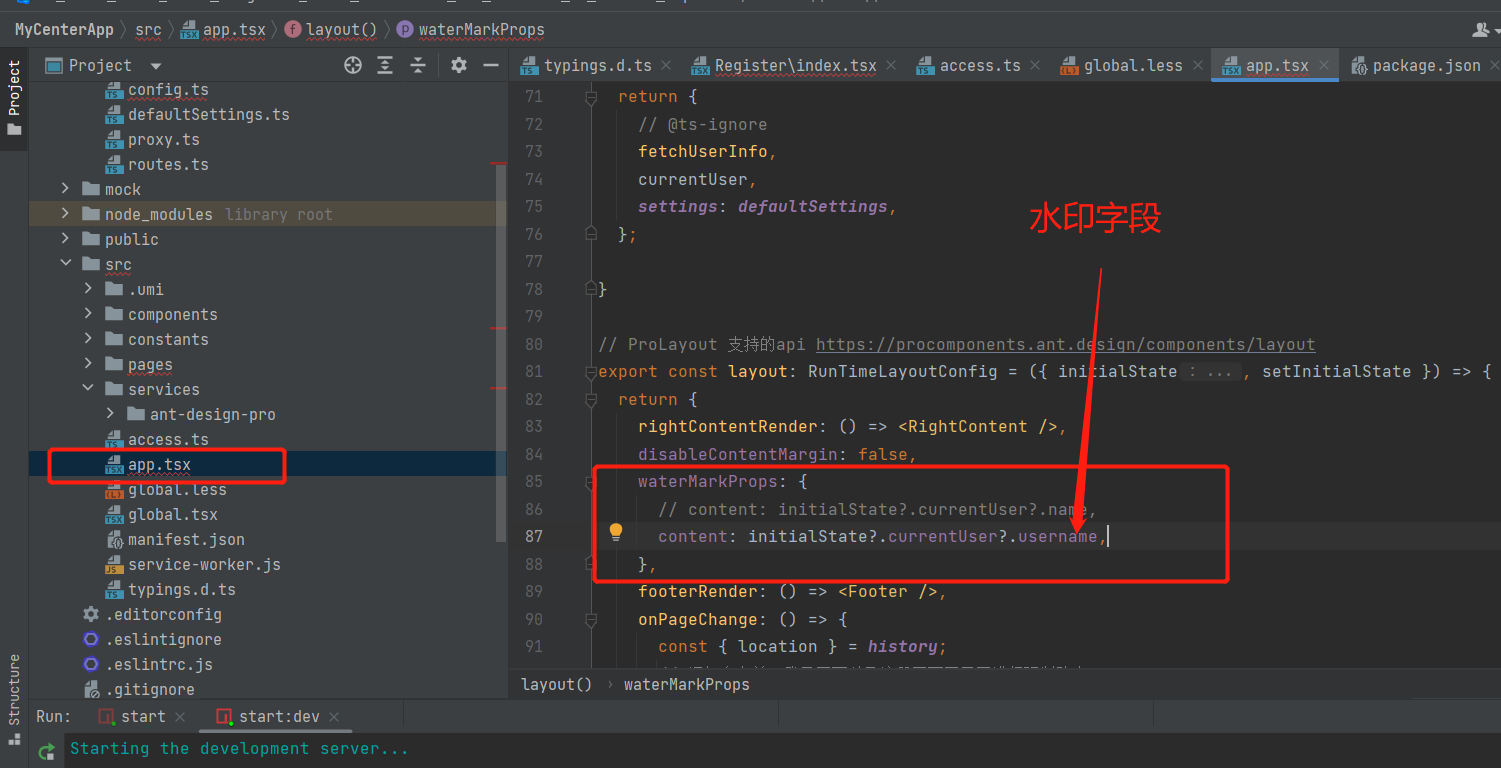
waterMarkProps: {
// content: initialState?.currentUser?.name,
content: initialState?.currentUser?.username,
},
footerRender: () => <Footer />,
onPageChange: () => {
const { location } = history;
// 添加白名单,登录页面以及注册页面不需要进行强制路由
// if(location.pathname === "/user/register"){
if(NO_NEED_LOGIN_WHITE_LIST.includes(location.pathname)){
return ;
}
// 如果没有登录,重定向到 login
if (!initialState?.currentUser && location.pathname !== loginPath) {
history.push(loginPath);
}
},
links: isDev
? [
<Link key="openapi" to="/umi/plugin/openapi" target="_blank">
<LinkOutlined />
<span>OpenAPI 文档</span>
</Link>,
<Link to="/~docs" key="docs">
<BookOutlined />
<span>业务组件文档</span>
</Link>,
]
: [],
menuHeaderRender: undefined,
// 自定义 403 页面
// unAccessible: <div>unAccessible</div>,
// 增加一个 loading 的状态
childrenRender: (children, props) => {
// if (initialState?.loading) return <PageLoading />;
return (
<>
{children}
{!props.location?.pathname?.includes('/login') && (
<SettingDrawer
disableUrlParams
enableDarkTheme
settings={initialState?.settings}
onSettingChange={(settings) => {
setInitialState((preInitialState) => ({
...preInitialState,
settings,
}));
}}
/>
)}
</>
);
},
...initialState?.settings,
};
};
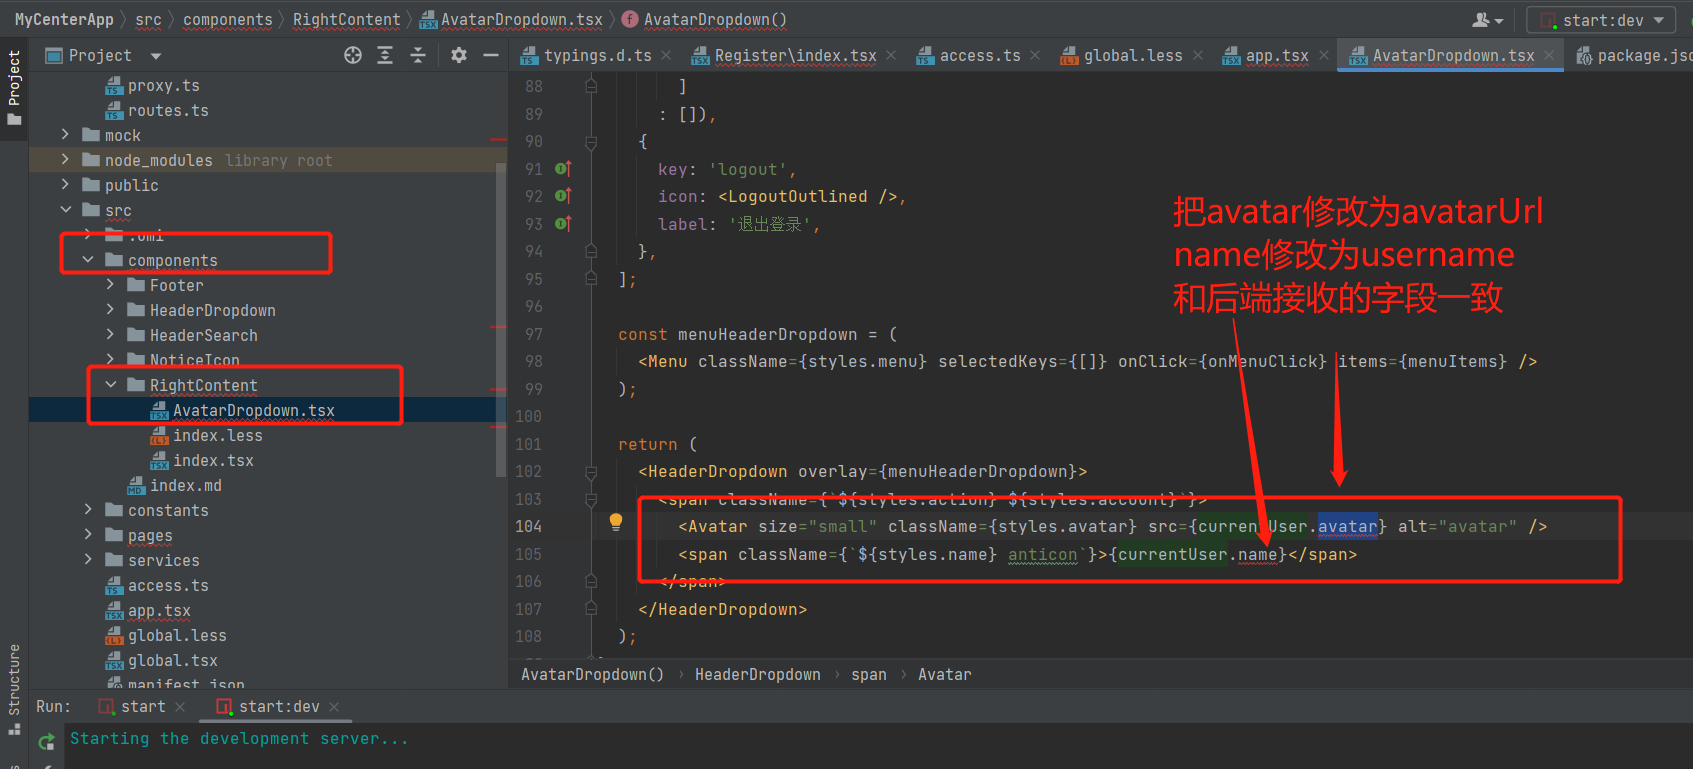
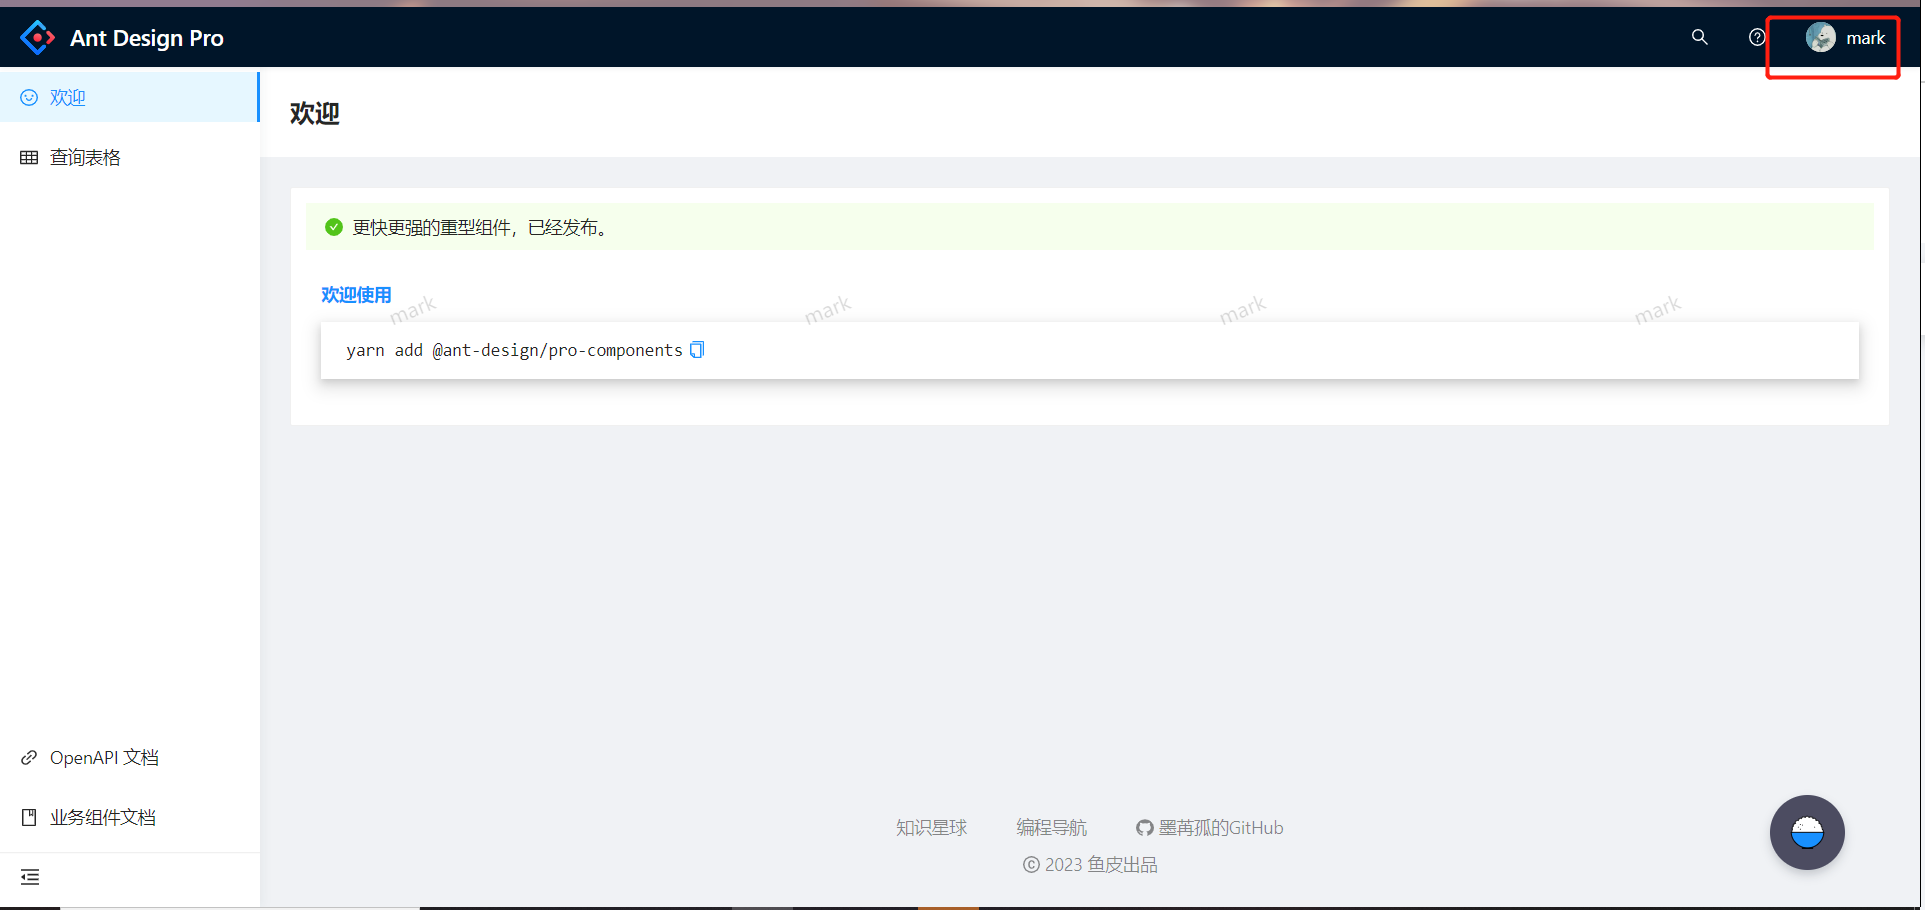
6.显示用户头像和水印效果
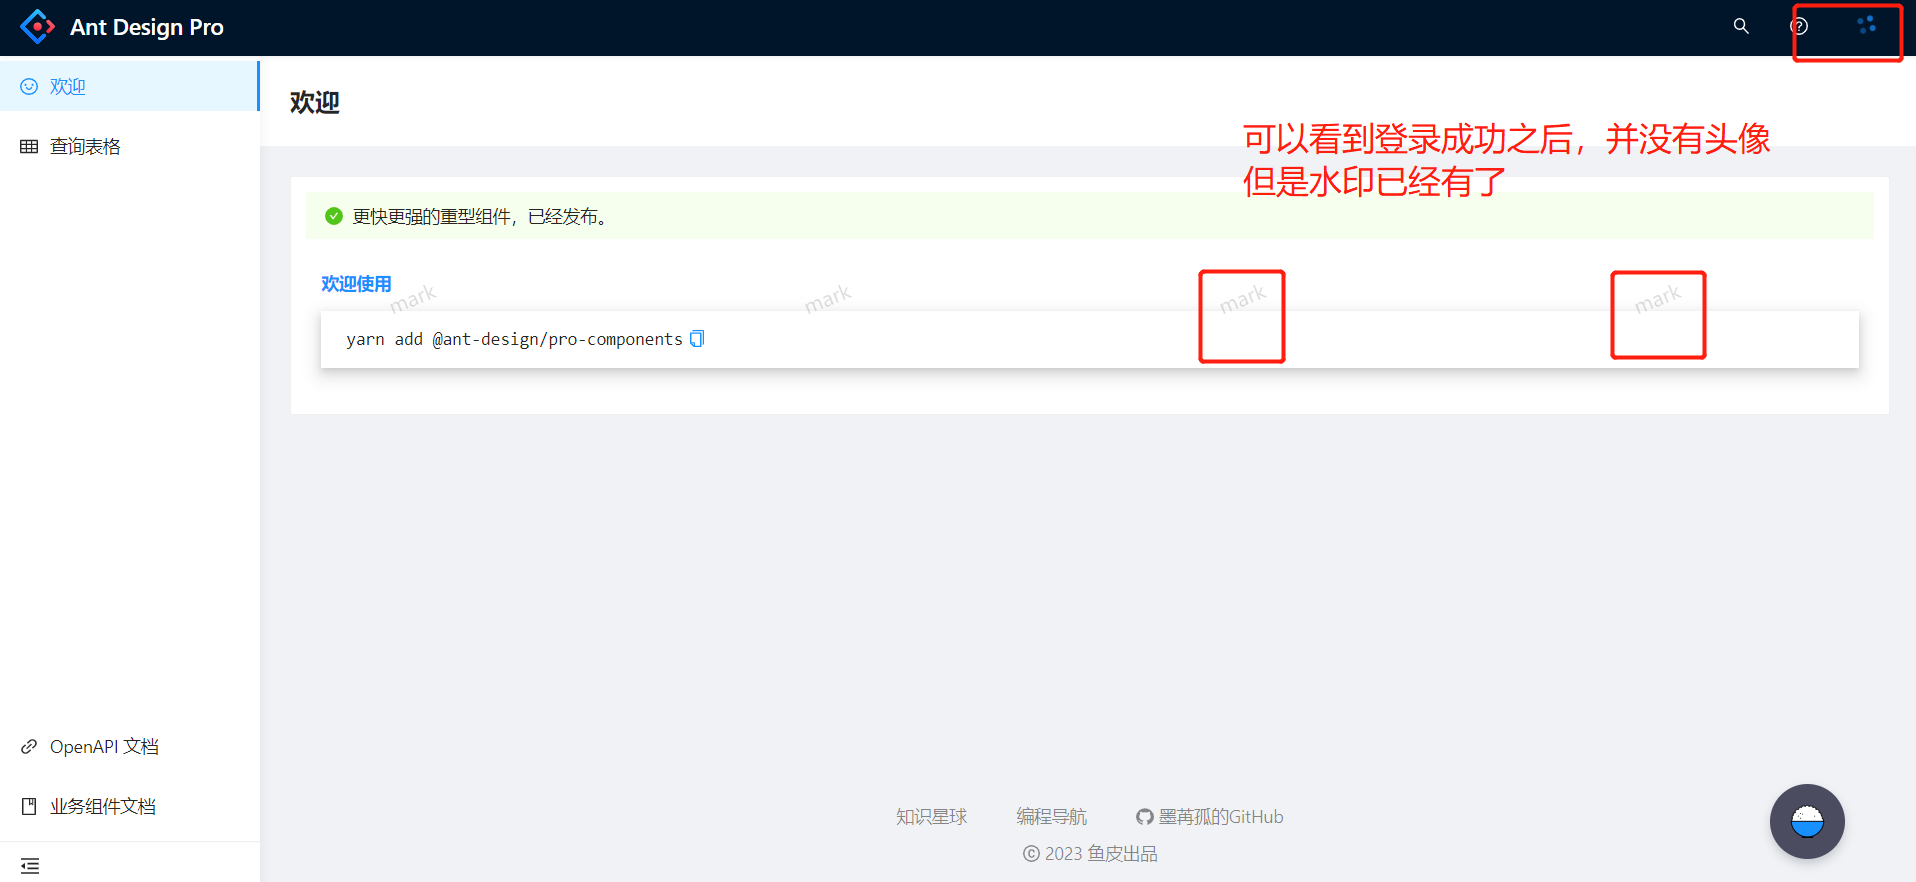
水印显示需要修改如下:
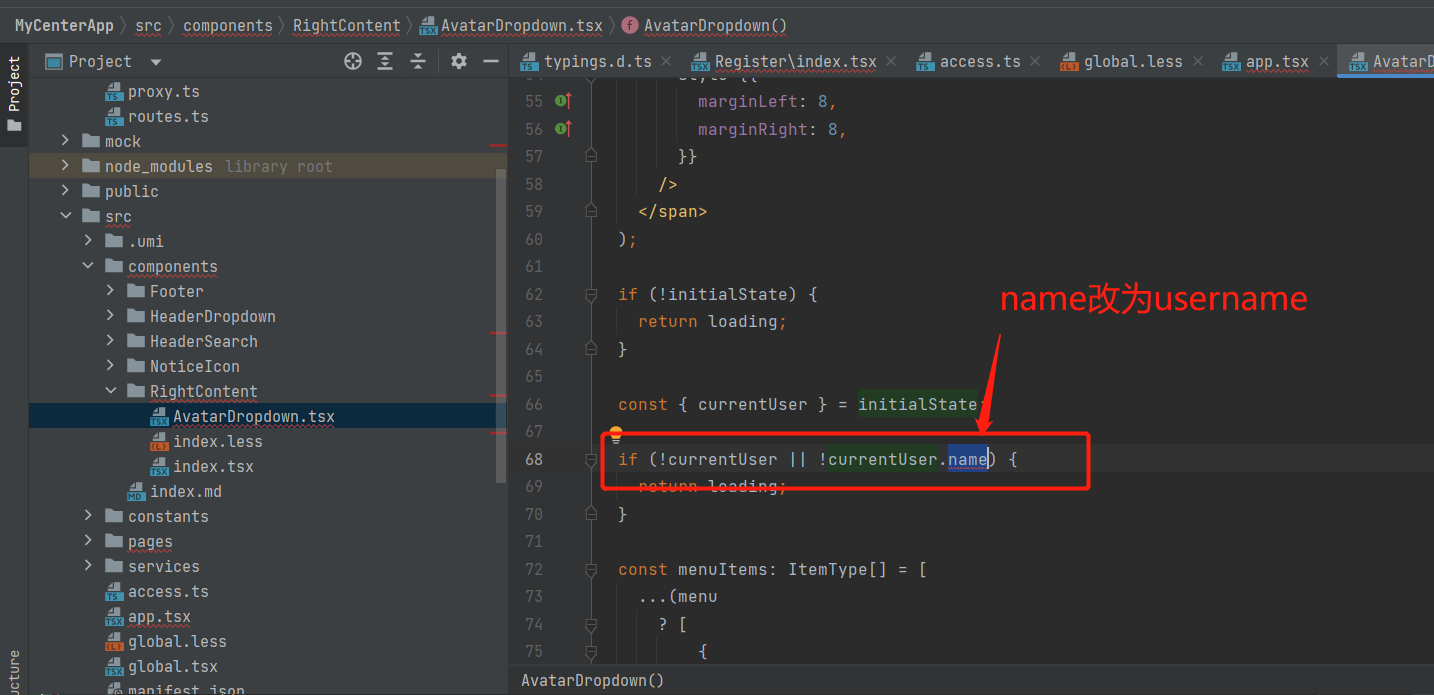
显示用户名和用户头像
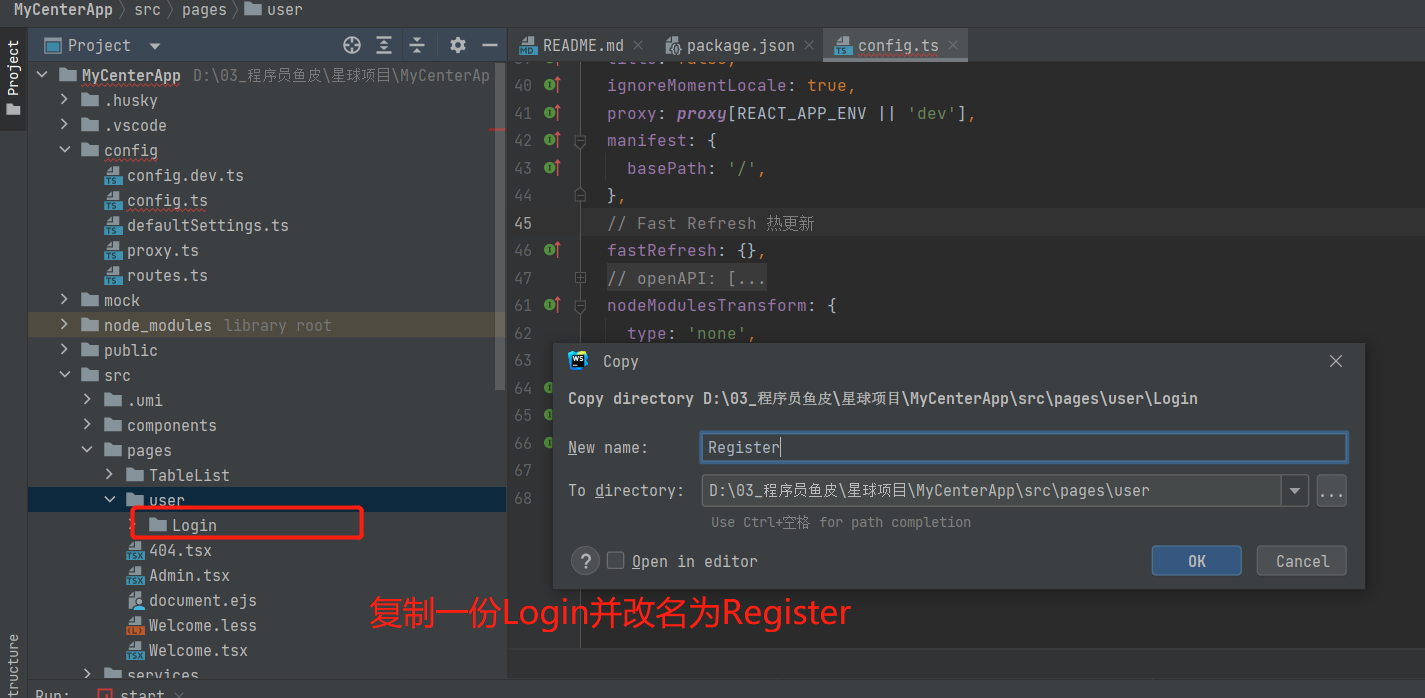
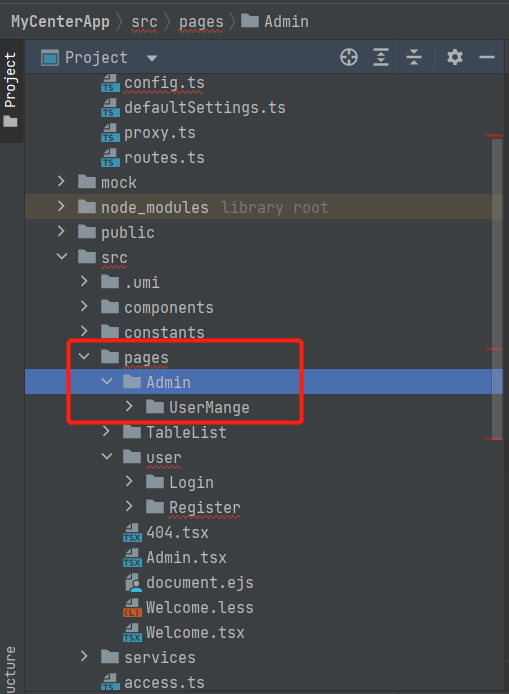
7.创建用户管理页面
在page⽂件夹下新建Admin⽂件夹,,把user⽂件
夹下的Register⽂件夹复制,粘贴到admin⽂件夹下,并改名为UserMange
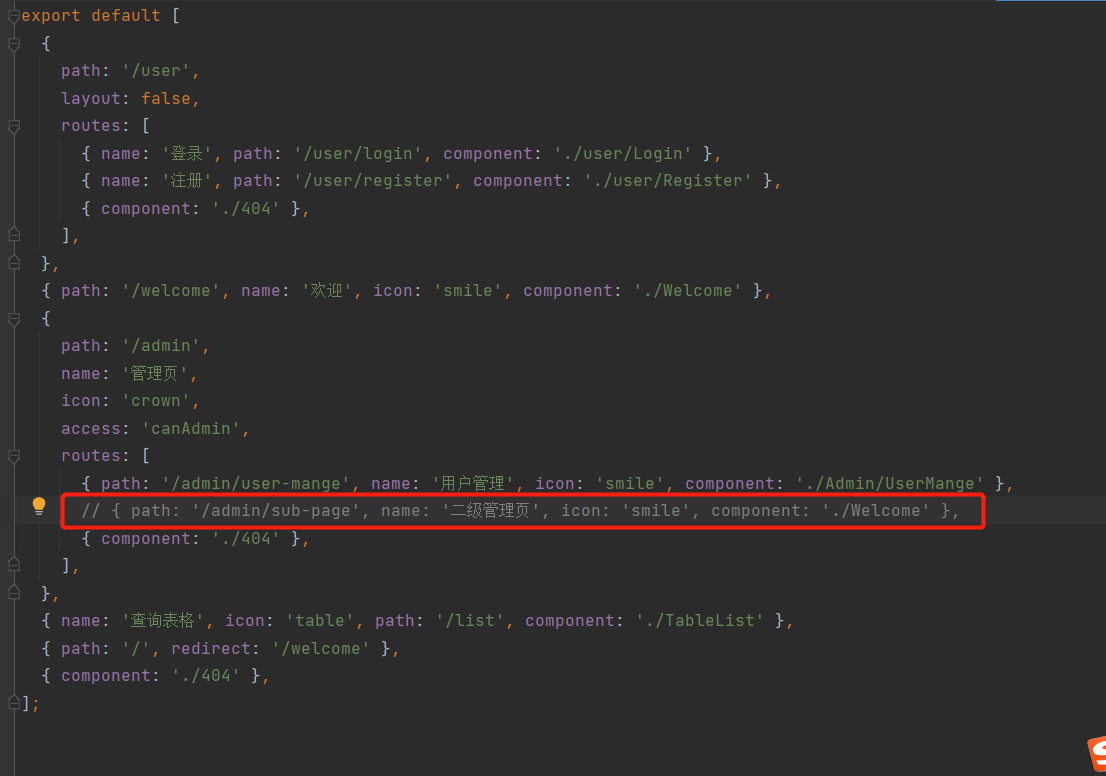
去route.ts添加⼀个路由
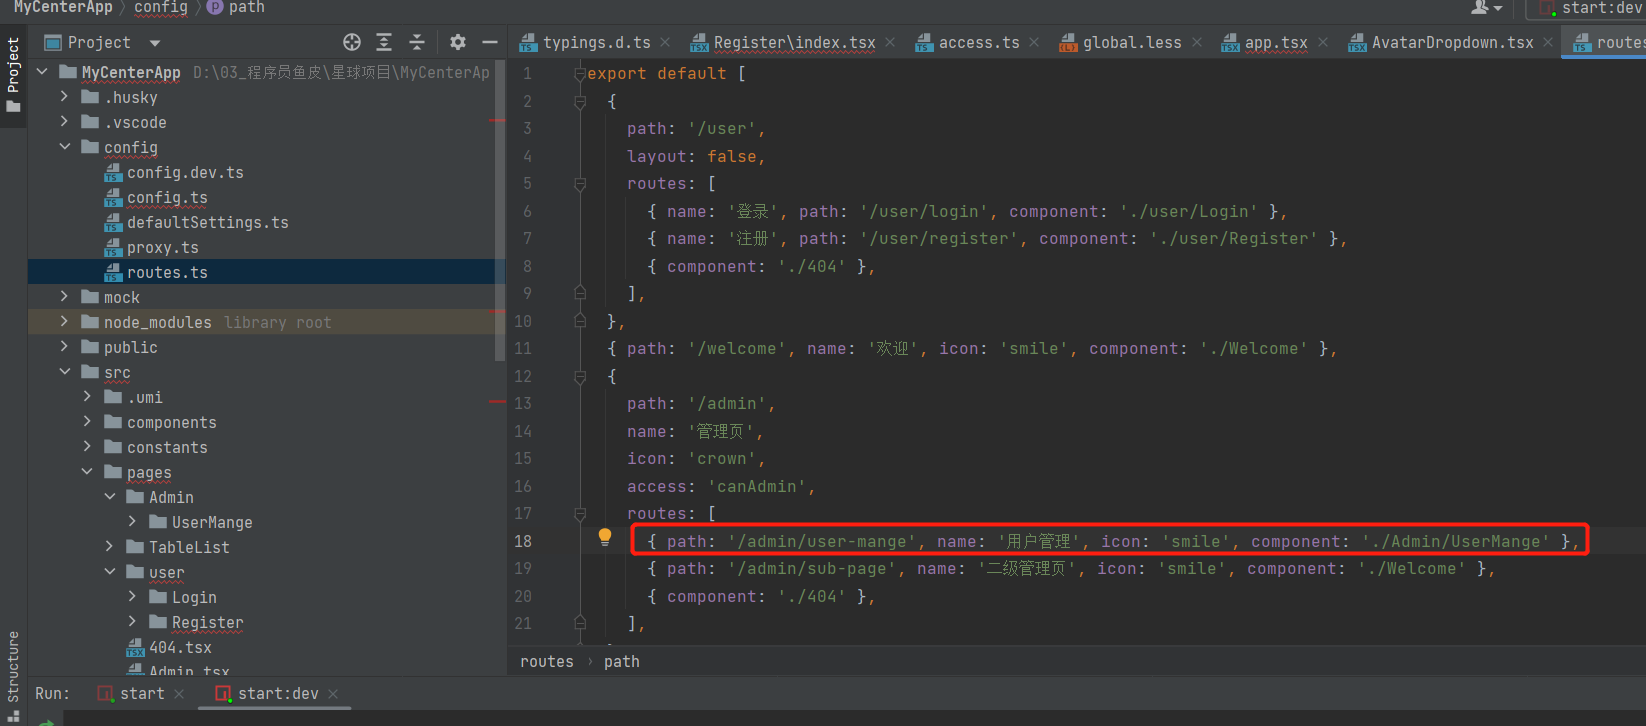
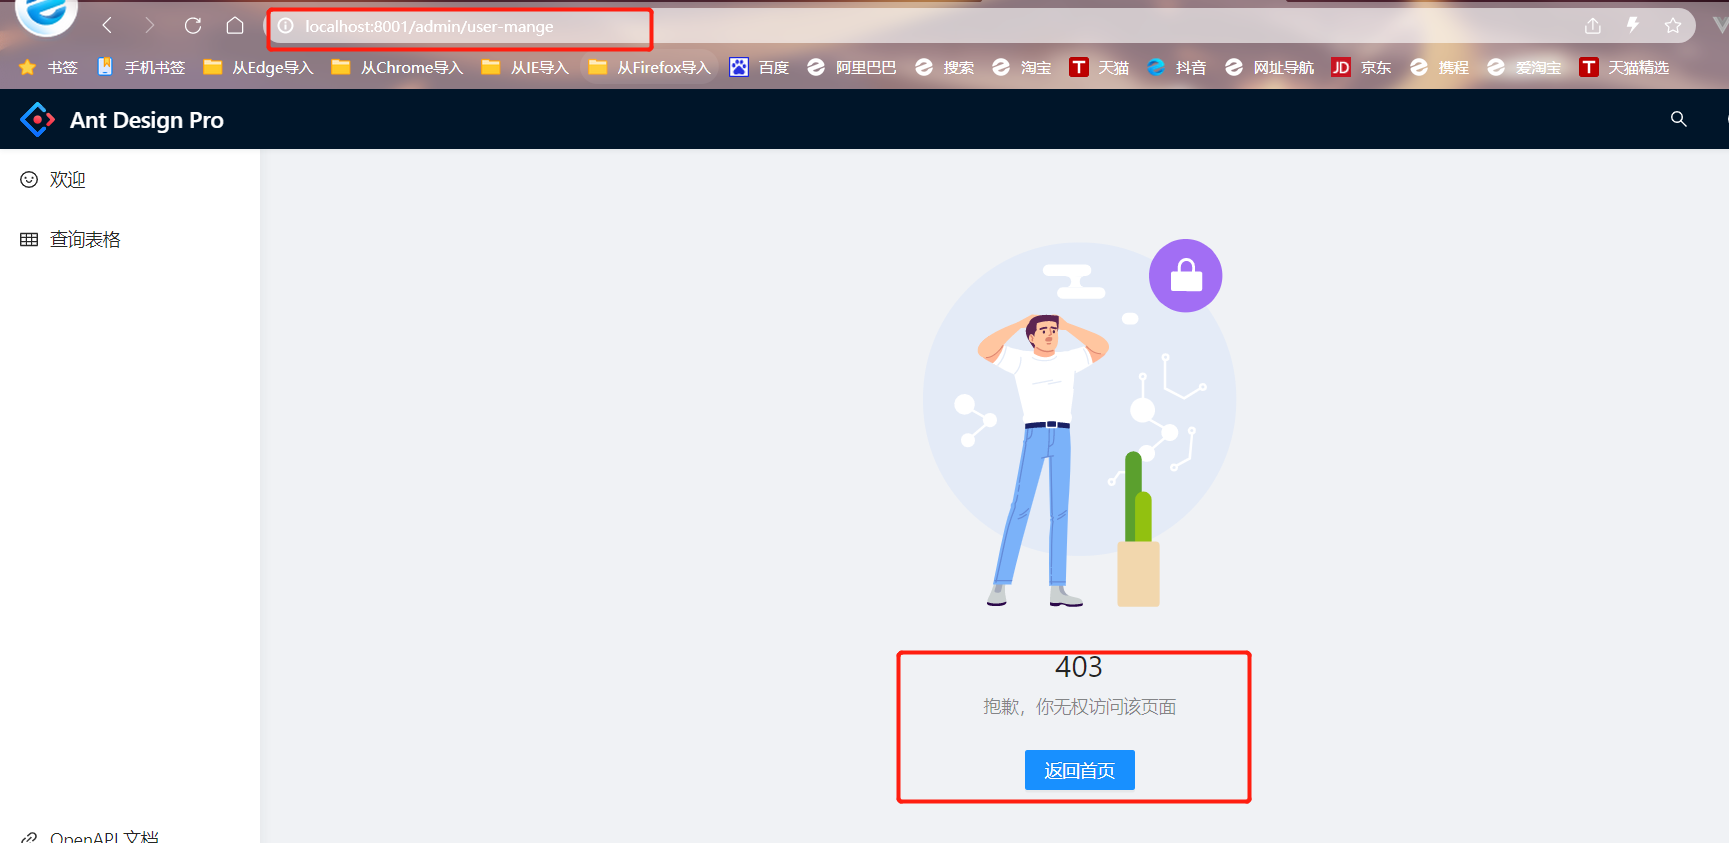
对⽐上⾯的/user ,发现/admin多了access: ‘canAdmin’ 也就是管理员才能访问
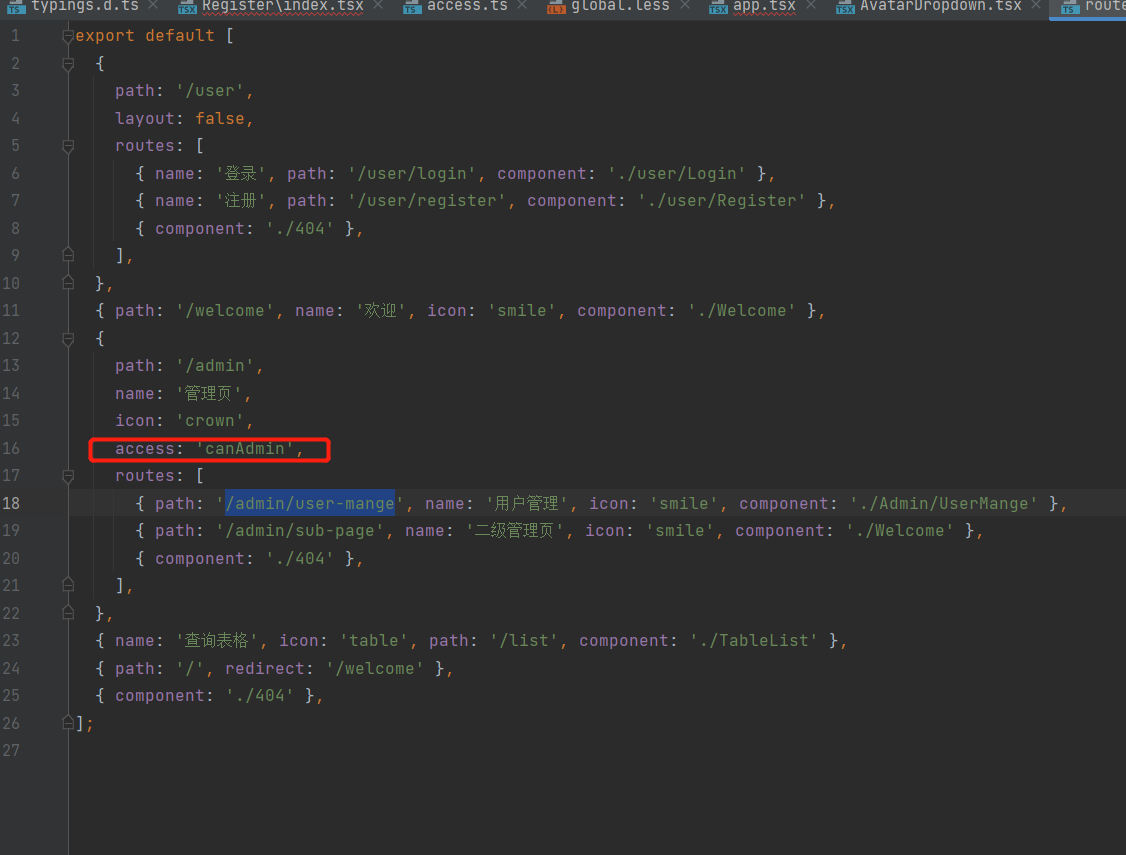
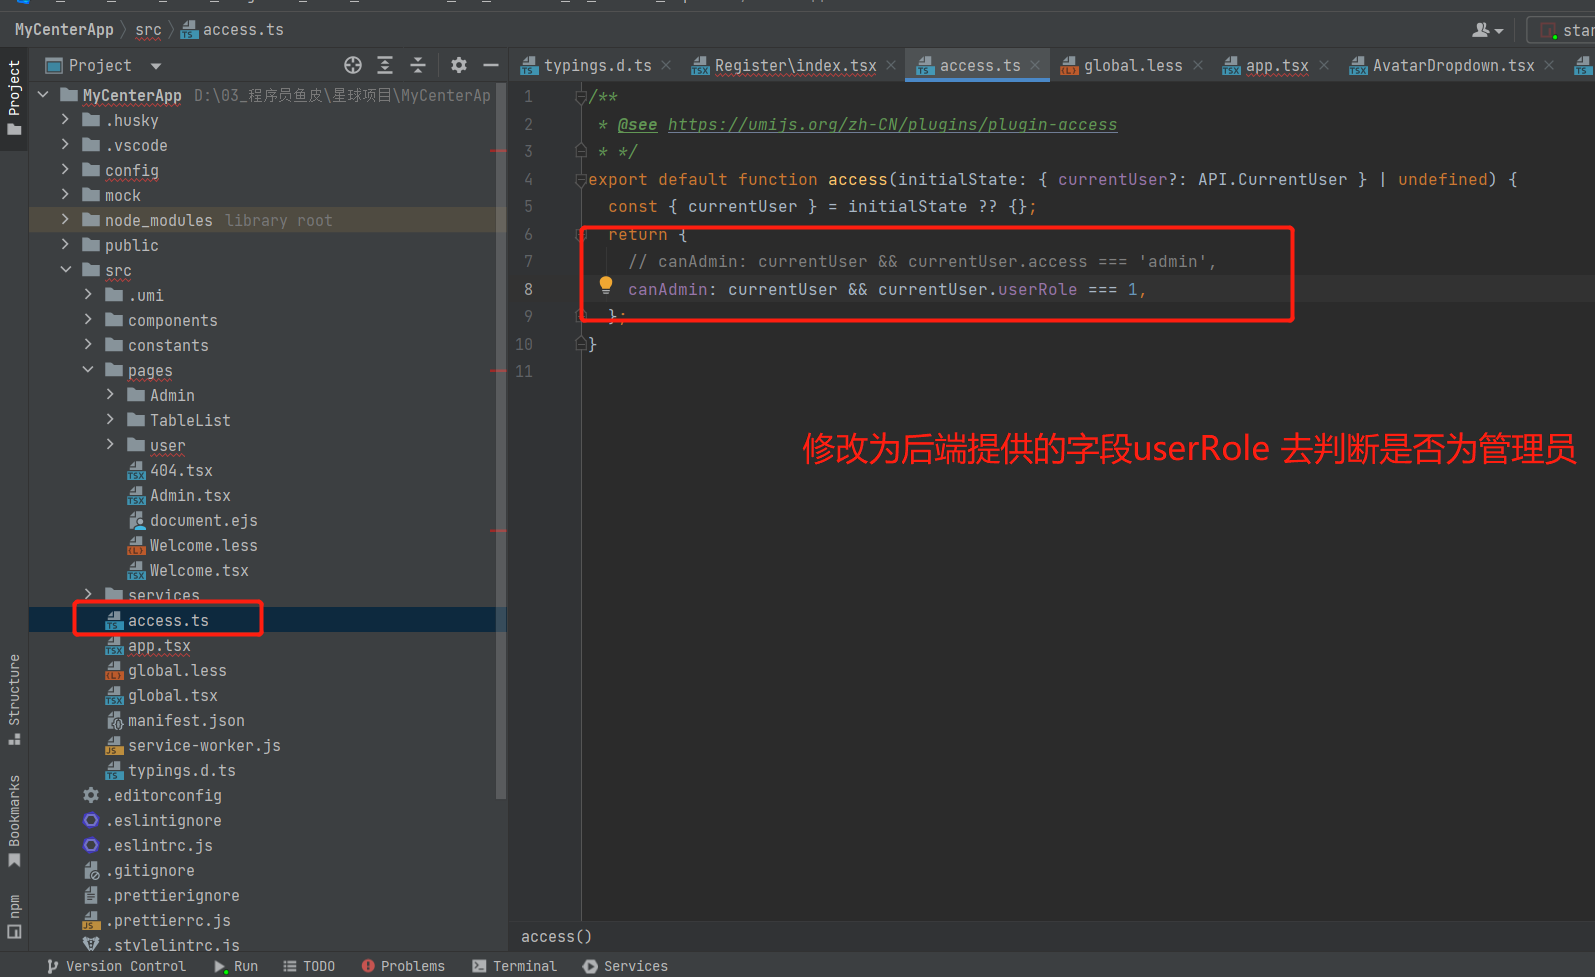
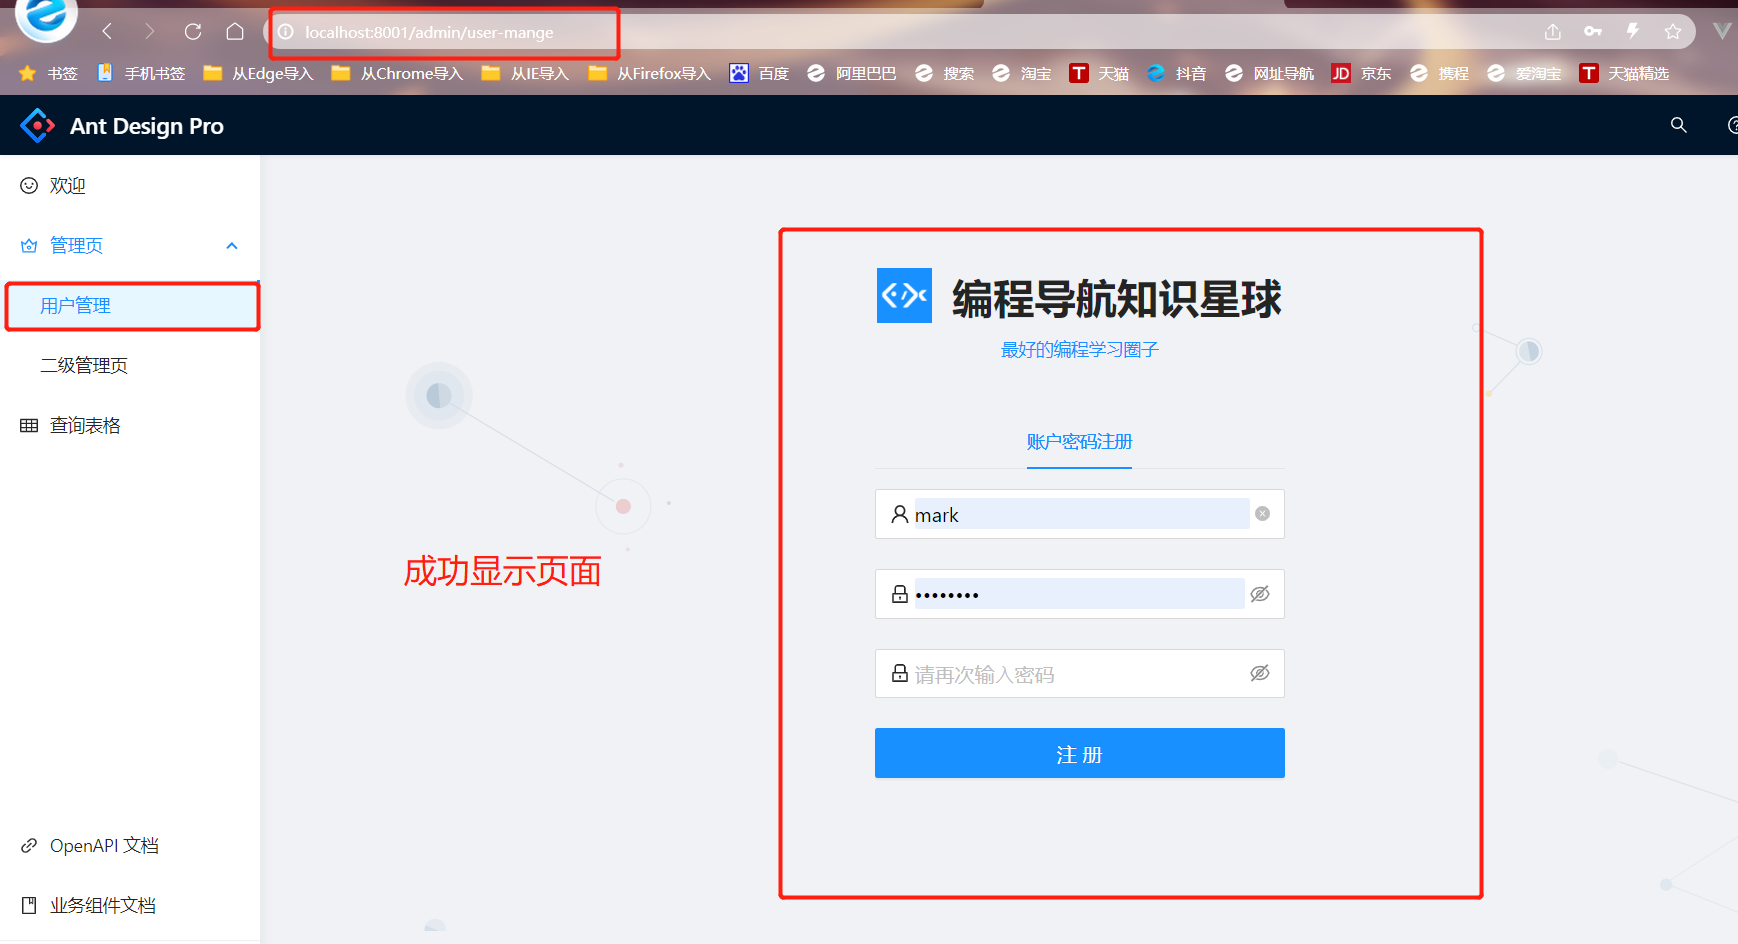
access来⾃access.ts⽂件
在Ant Design Pro(Umi 框架)中 access.ts 控制⽤户的访问权限
把⼆级管理页的路由删掉
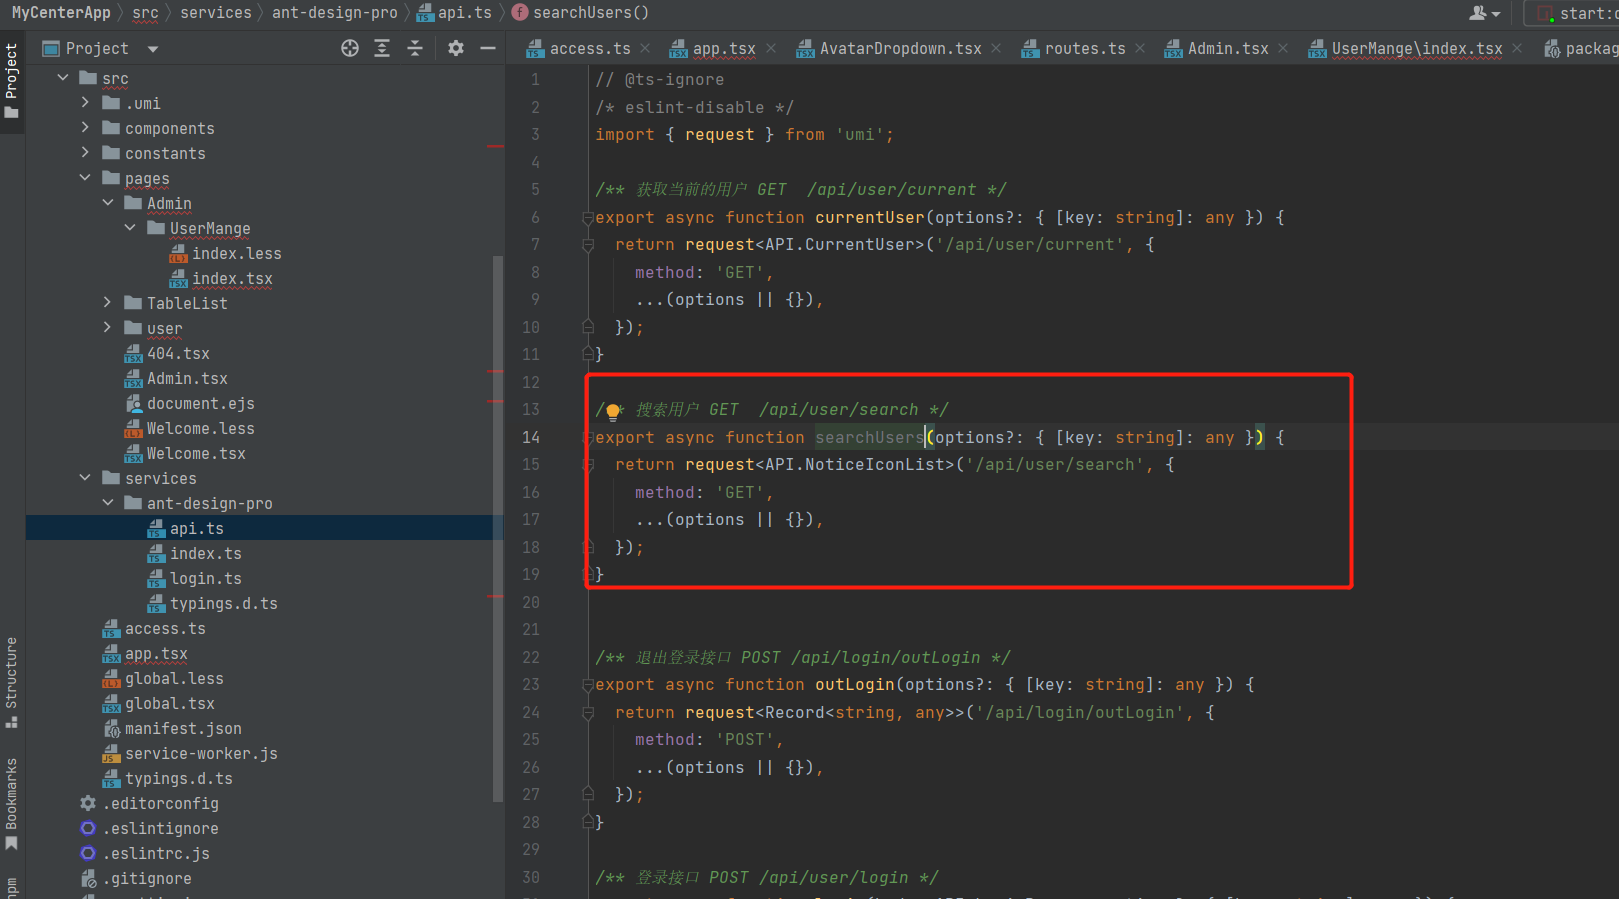
在api.ts 增加⼀个搜索⽤户的接⼝
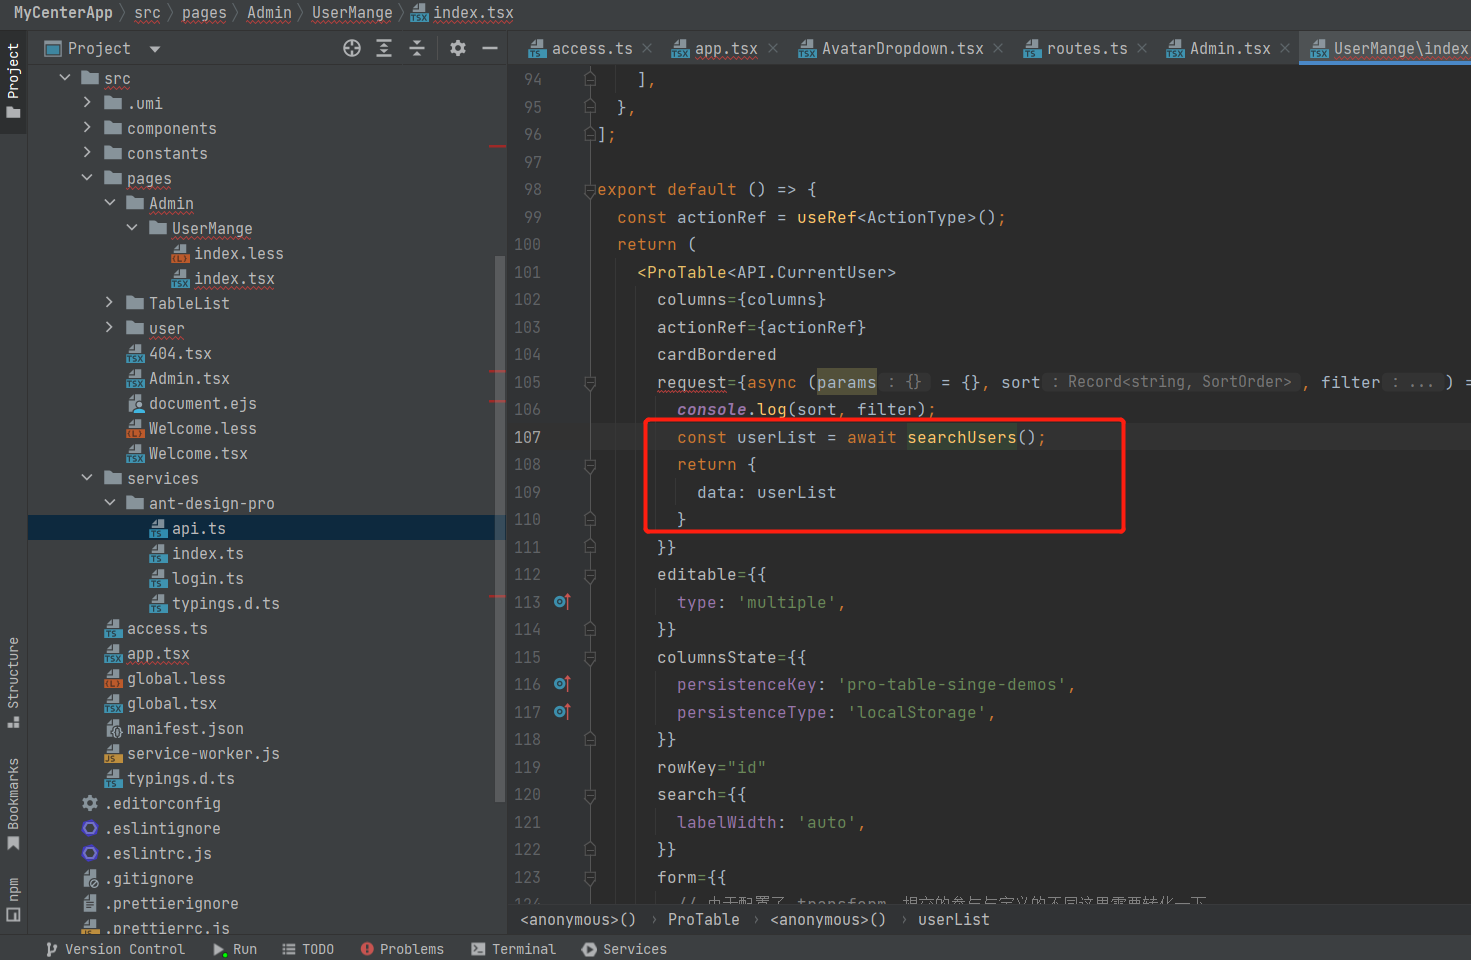
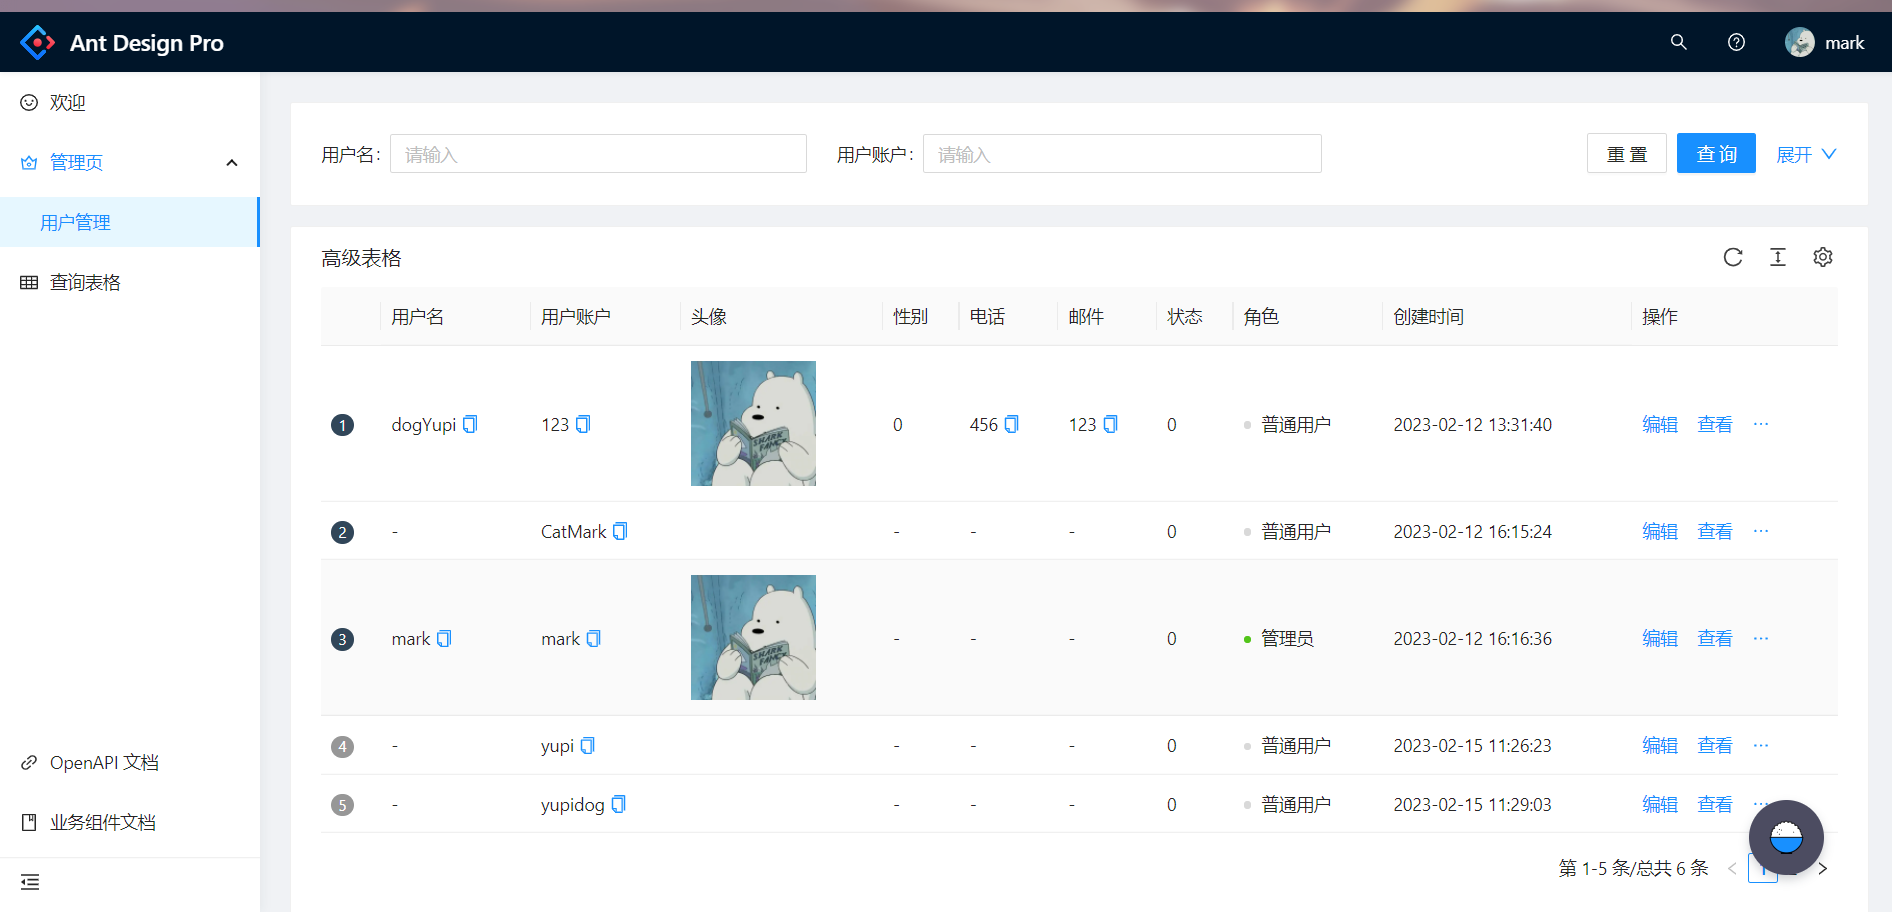
完整的用户管理页面如下:
import React, { useRef } from 'react';
import type { ProColumns, ActionType } from '@ant-design/pro-table';
import ProTable, { TableDropdown } from '@ant-design/pro-table';
import {Image} from "antd";
import {searchUsers} from "@/services/ant-design-pro/api";

const columns: ProColumns<API.CurrentUser>[] = [
  {
    dataIndex: 'id',
    valueType: 'indexBorder',
    width: 48,
  },
  {
    title: '用户名',
    dataIndex: 'username',
    copyable: true,
  },
  {
    title: '用户账户',
    dataIndex: 'userAccount',
    copyable: true,
  },
  {
    title: '头像',
    dataIndex: 'avatarUrl',
    render: (_, record) => (
      <div>
        <Image src={record.avatarUrl} width={100} />
      </div>
    ),
  },
  {
    title: '性别',
    dataIndex: 'gender',
  },
  {
    title: '电话',
    dataIndex: 'phone',
    copyable: true,
  },
  {
    title: '邮件',
    dataIndex: 'email',
    copyable: true,
  },
  {
    title: '状态',
    dataIndex: 'userStatus',
  },
  // {
  //   title: '星球编号',
  //   dataIndex: 'planetCode',
  // },
  {
    title: '角色',
    dataIndex: 'userRole',
    valueType: 'select',
    valueEnum: {
      0: { text: '普通用户', status: 'Default' },
      1: {
        text: '管理员',
        status: 'Success',
      },
    },
  },
  {
    title: '创建时间',
    dataIndex: 'createTime',
    valueType: 'dateTime',
  },
  {
    title: '操作',
    valueType: 'option',
    render: (text, record, _, action) => [
      <a
        key="editable"
        onClick={() => {
          action?.startEditable?.(record.id);
        }}
      >
        编辑
      </a>,
      <a href={record.url} target="_blank" rel="noopener noreferrer" key="view">
        查看
      </a>,
      <TableDropdown
        key="actionGroup"
        onSelect={() => action?.reload()}
        menus={[
          { key: 'copy', name: '复制' },
          { key: 'delete', name: '删除' },
        ]}
      />,
    ],
  },
];

export default () => {
  const actionRef = useRef<ActionType>();
  return (
    <ProTable<API.CurrentUser>
      columns={columns}
      actionRef={actionRef}
      cardBordered
      request={async (params = {}, sort, filter) => {
        console.log(sort, filter);
        const userList = await searchUsers();
        return {
          data: userList
        }
      }}
      editable={{
        type: 'multiple',
      }}
      columnsState={{
        persistenceKey: 'pro-table-singe-demos',
        persistenceType: 'localStorage',
      }}
      rowKey="id"
      search={{
        labelWidth: 'auto',
      }}
      form={{
        // 由于配置了 transform,提交的参与与定义的不同这里需要转化一下
        syncToUrl: (values, type) => {
          if (type === 'get') {
            return {
              ...values,
              created_at: [values.startTime, values.endTime],
            };
          }
          return values;
        },
      }}
      pagination={{
        pageSize: 5,
      }}
      dateFormatter="string"
      headerTitle="高级表格"
    />
  );
};
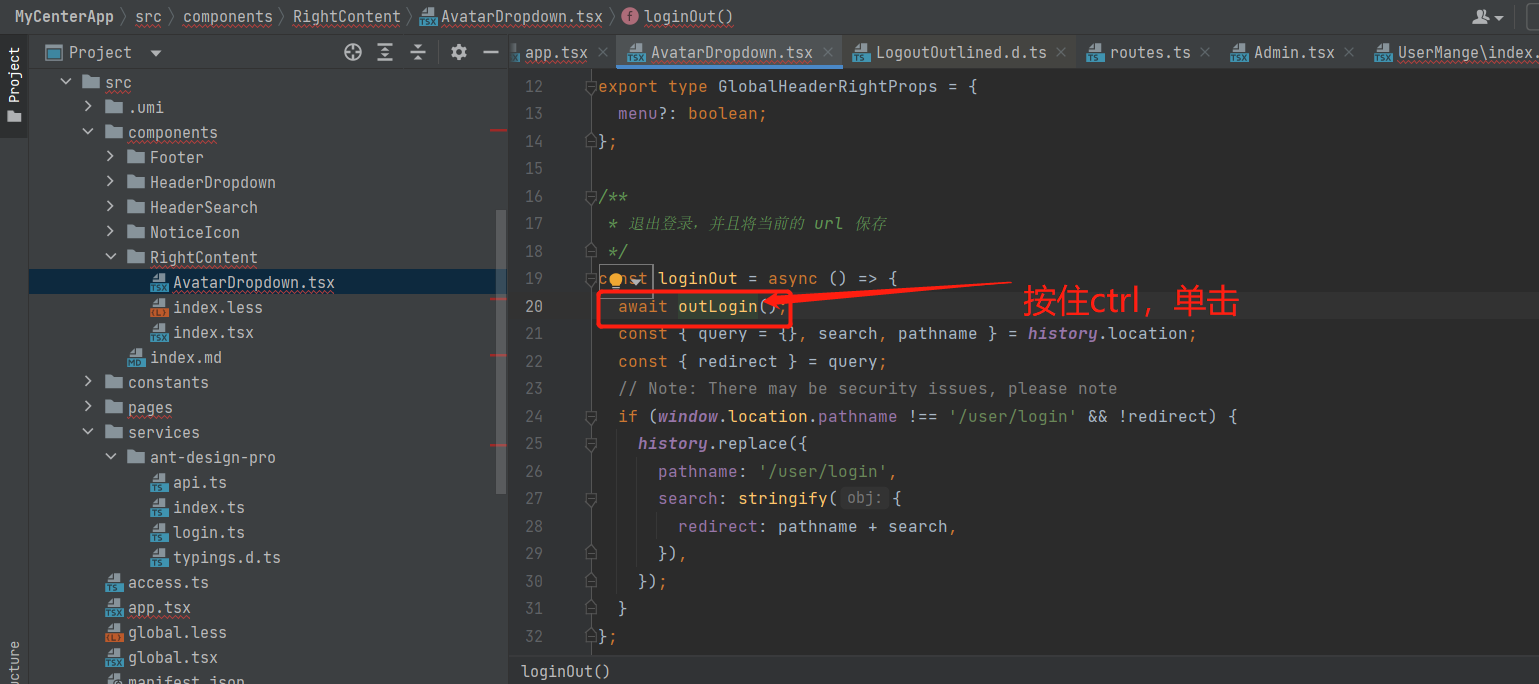
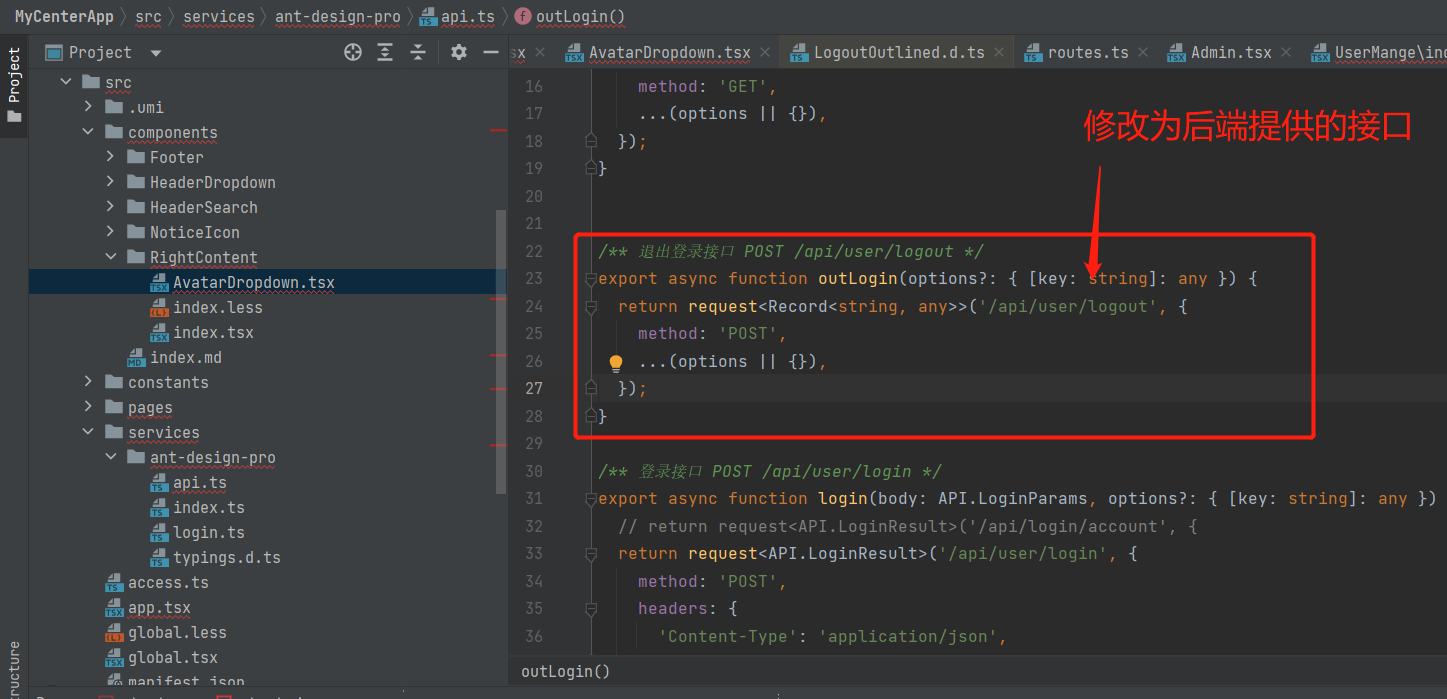
8.用户注销
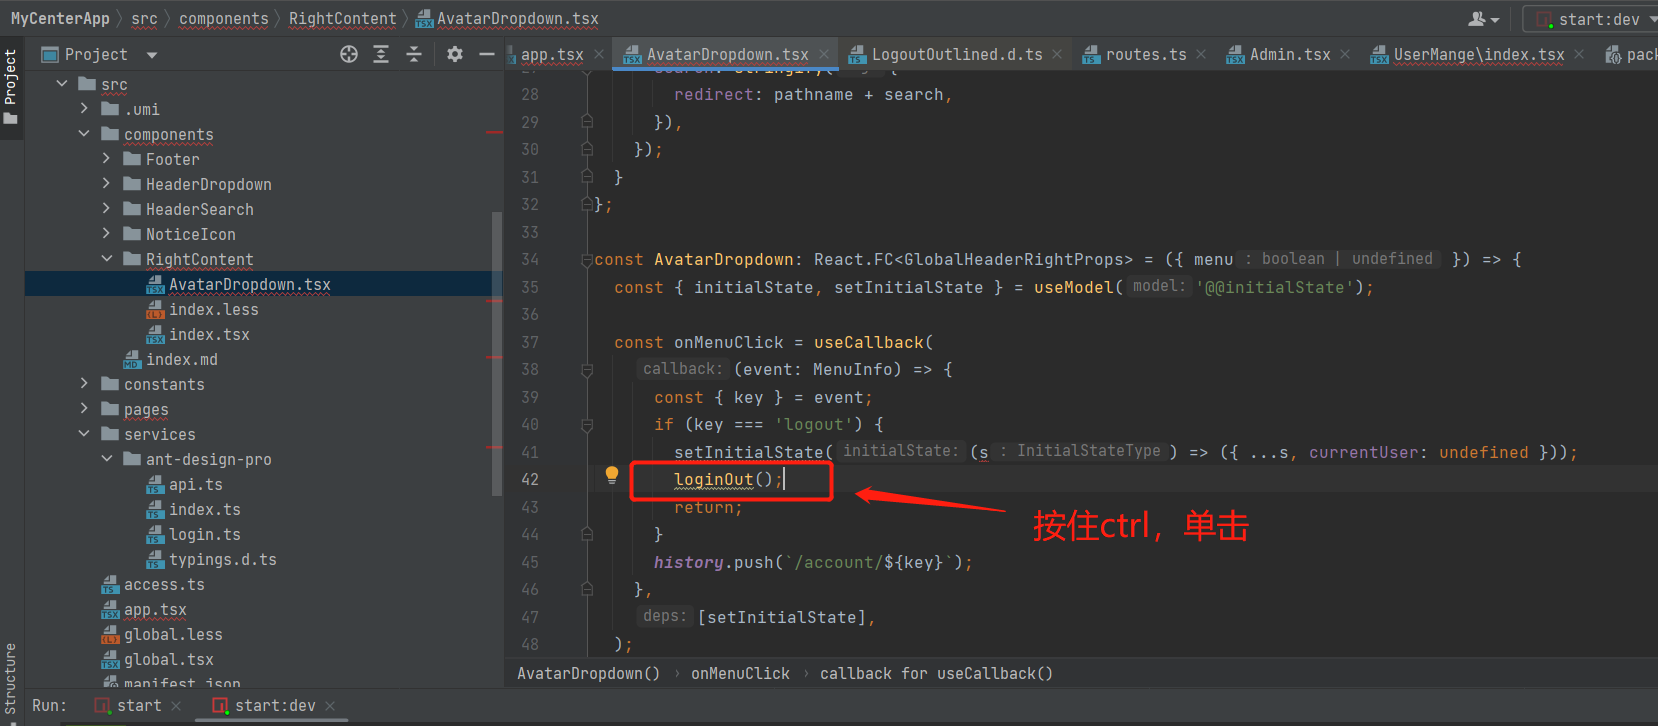
验证的话,只需注销后,点击网页的返回,看会不会返回后台页面,返回登录页面的话就是成功了。
这里前端的用户注销就做完了。
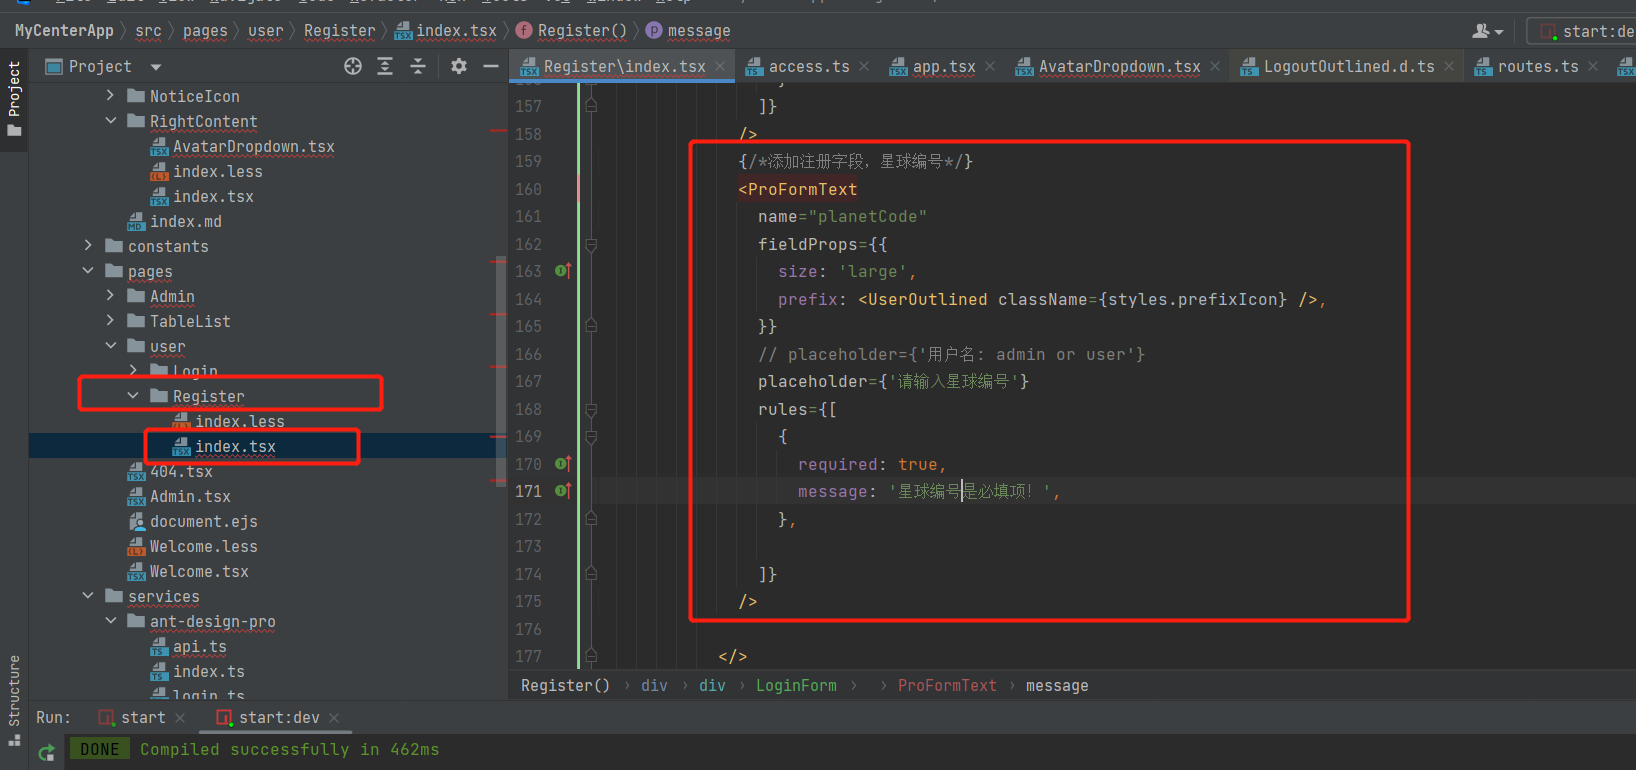
9.添加注册字段(星球编号)
前端添加planetCode的输入框,放到确认密码后面
复制一下账号输入框修改就行了
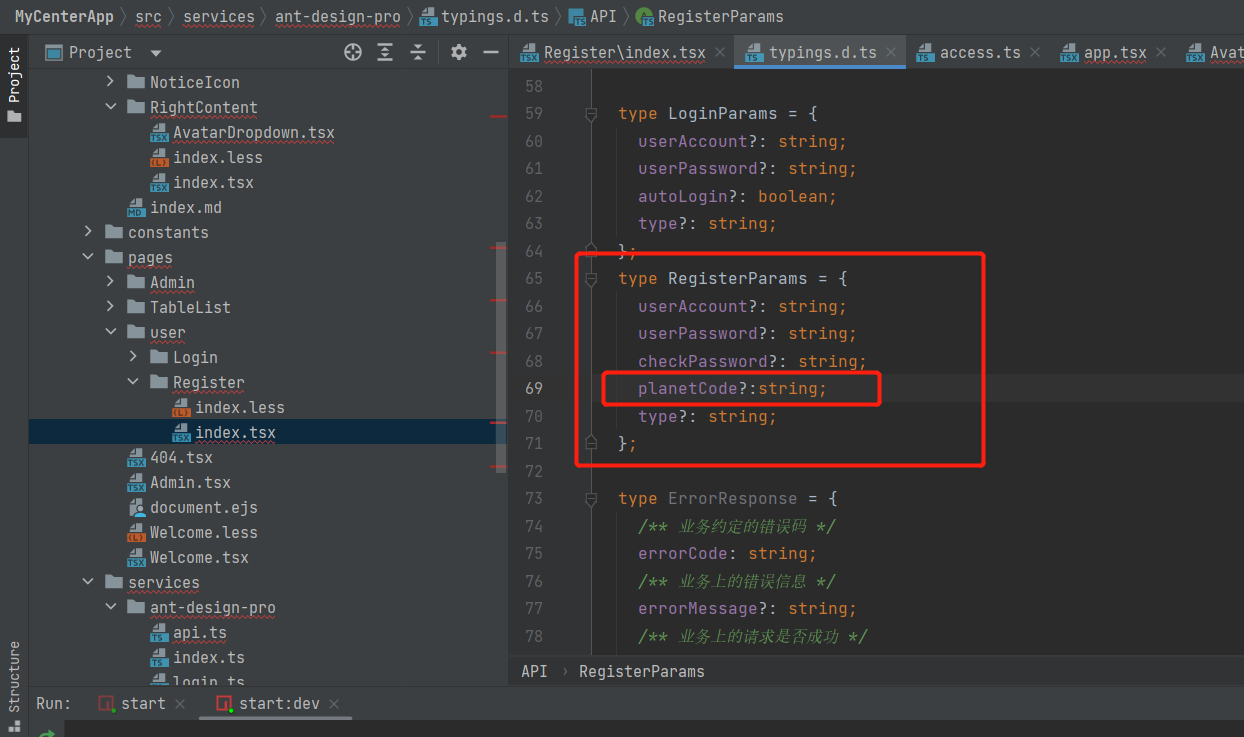
再去修改一下前端提交给后端的数据类型,需要找到RegisterParams 添加planetCode字段
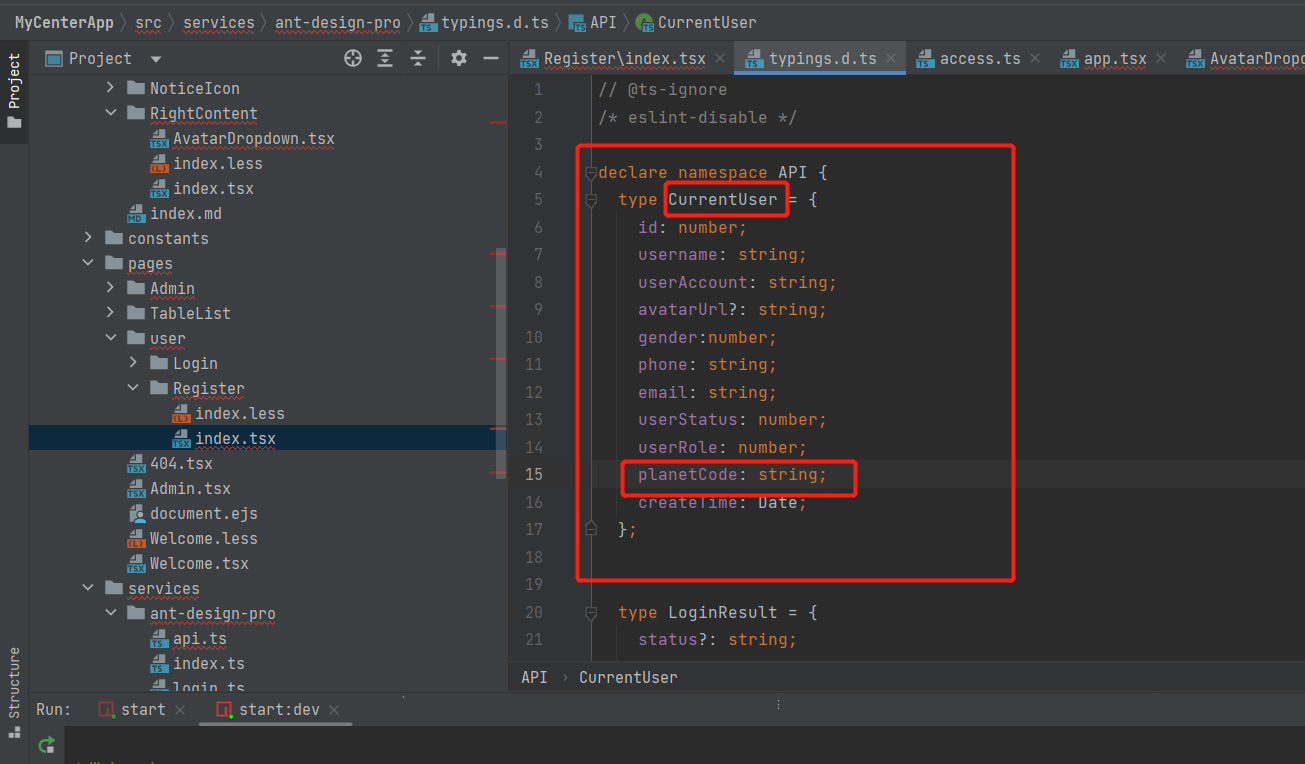
后端user新增了字段,前端的CurrentUser也是需要的
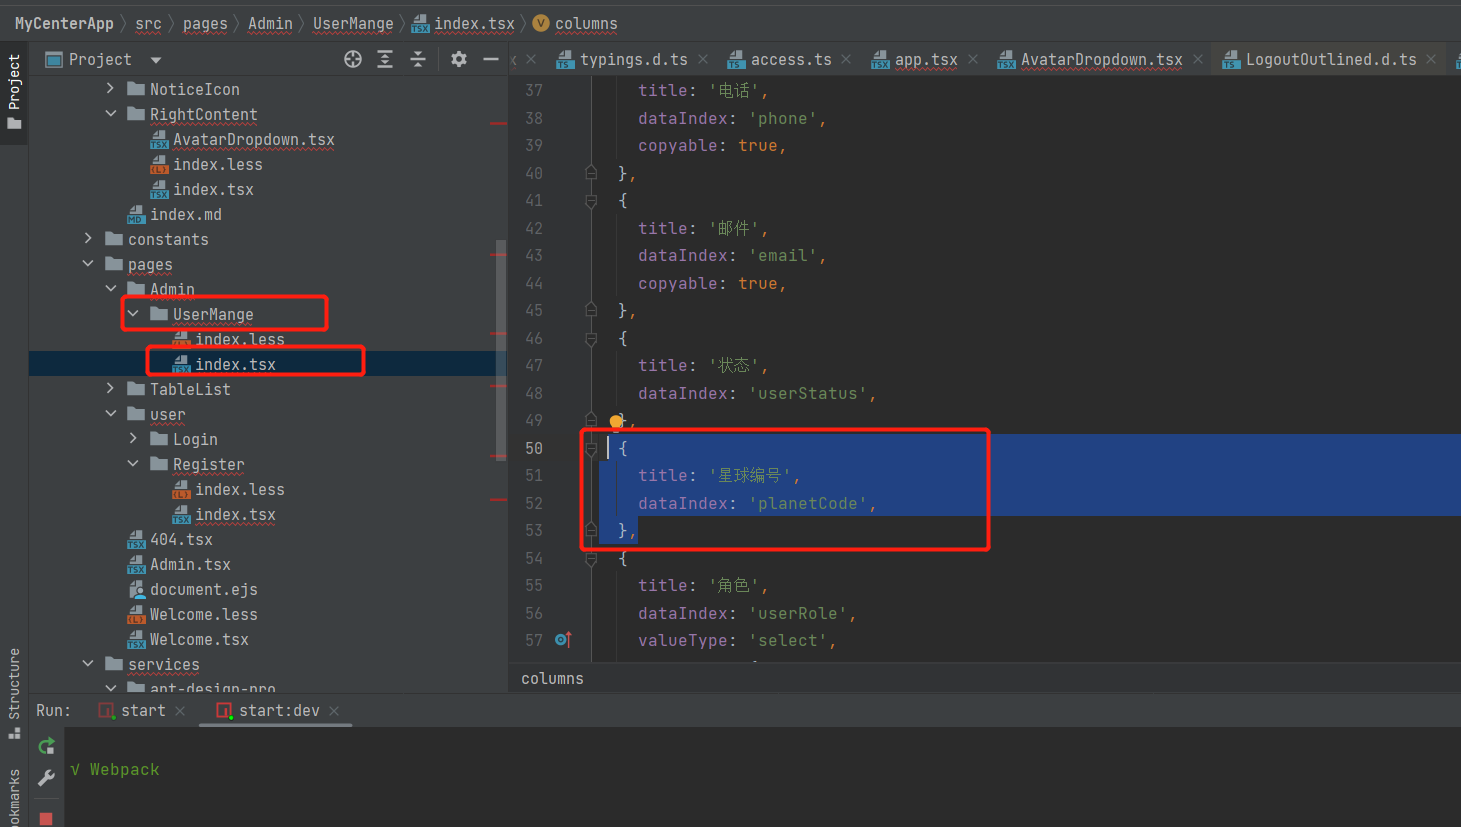
前端admin的用户查询也需要修改
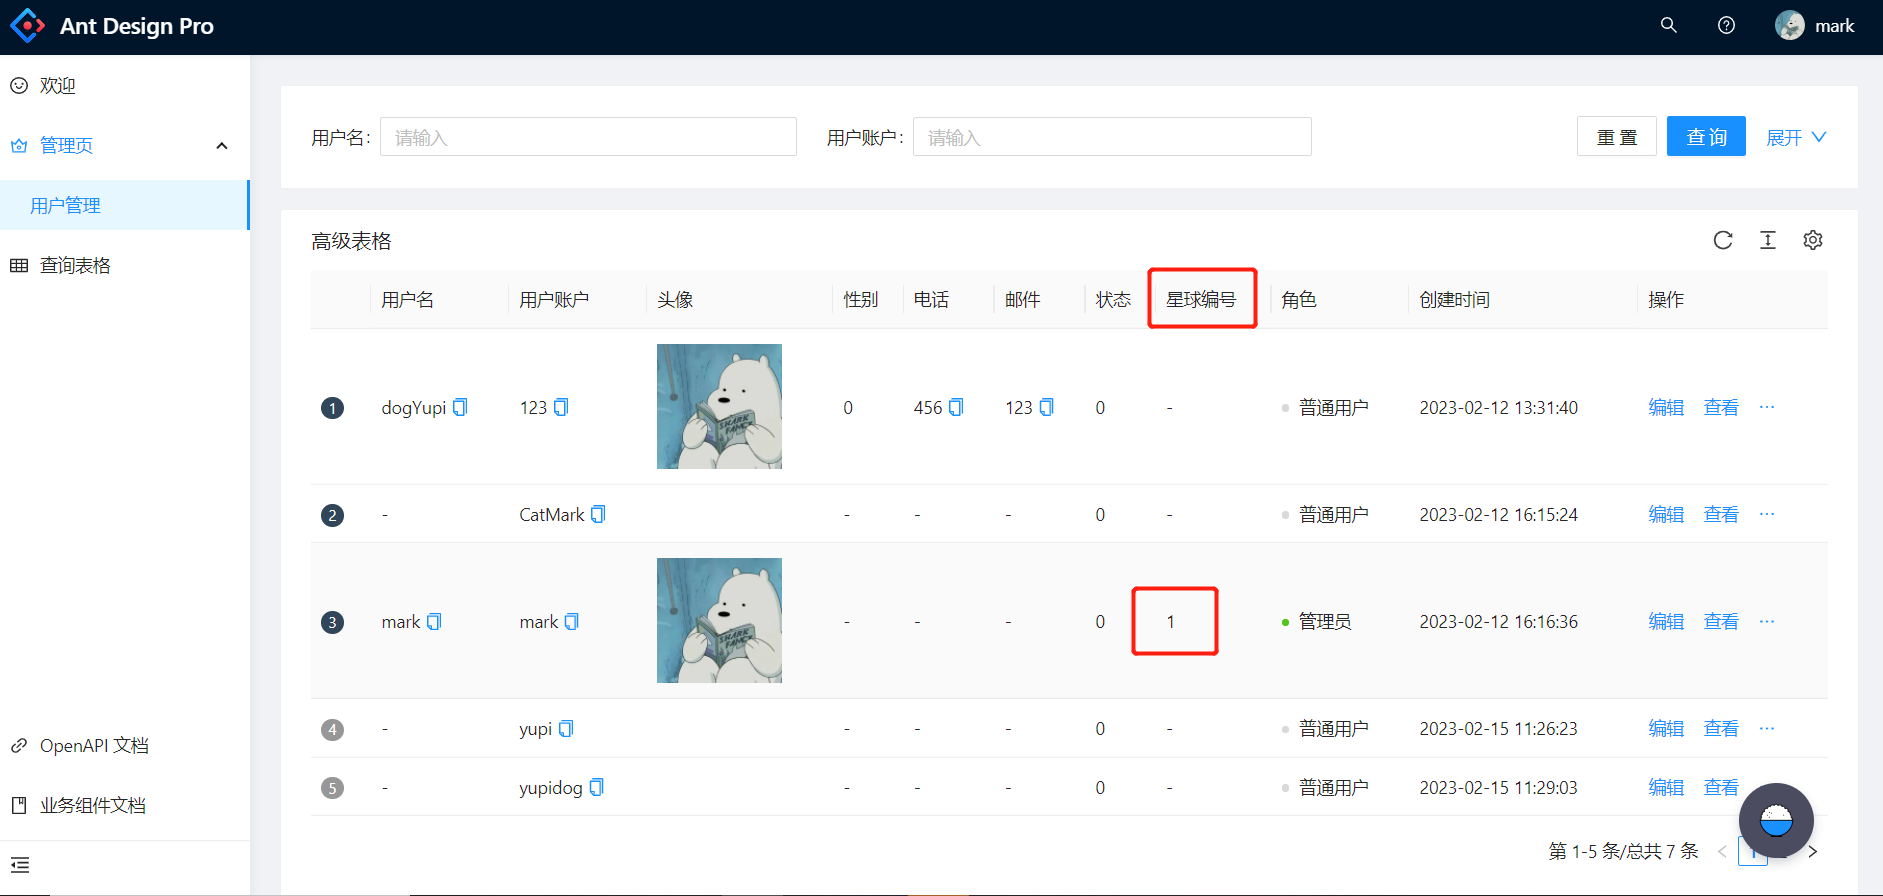
在前端展示页添加planetCode
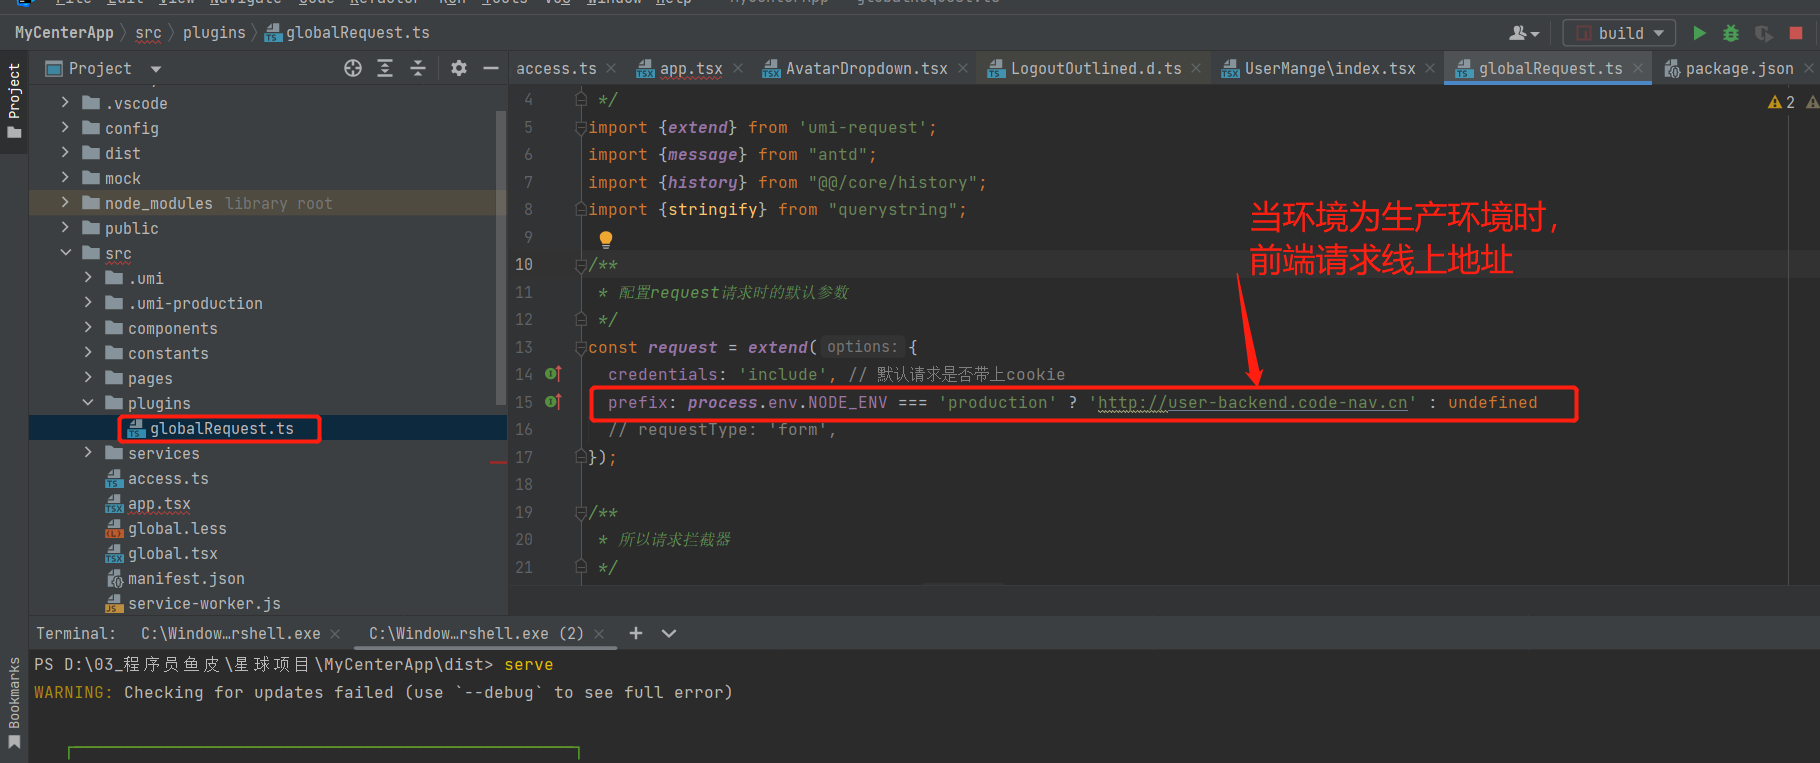
10.前端多环境实战(部署前的准备)
多环境
参考文章:https://blog.csdn.net/weixin_41701290/article/details/120173283
(这个链接里面鱼皮讲的非常的清楚!( ̄︶ ̄)↗ )
本地开发:localhost(127.0.0.1)
多环境:指同一套项目代码在不同的阶段需要根据实际情况来调整配置并且部署到不同的机器上。
为什么需要?
每个环境互不影响
区分不同的阶段:开发 / 测试 / 生产
对项目进行优化:
1. 本地日志级别
2. 精简依赖,节省项目体积
3. 项目的环境 / 参数可以调整,比如 JVM 参数
针对不同环境做不同的事情。
多环境分类:
- 本地环境(自己的电脑)
localhost - 开发环境(远程开发)大家连同一台机器,为了大家开发方便
- 测试环境(测试)开发 / 测试 / 产品,单元测试 / 性能测试 / 功能测试 / 系统集成测试,独立的数据库、独立的服务器
- 预发布环境(体验服):和正式环境一致,正式数据库,更严谨,查出更多问题
- 正式环境(线上,公开对外访问的项目):尽量不要改动,保证上线前的代码是 “完美” 运行
- 沙箱环境(实验环境):为了做实验
请求地址
- 开发环境:
localhost:8000 - 线上环境:
user-backend.code-nav.cn
- 开发环境:
用了 umi 框架,build 时会自动传入 NODE_ENV == production 参数,start NODE_ENV 参数为 development
启动方式
- 开发环境:
npm run start(本地启动,监听端口、自动更新) - 线上环境:
npm run build(项目构建打包),可以使用serve工具启动(npm i -g serve进行安装serve)
- 开发环境:
项目的配置
不同的项目(框架)都有不同的配置文件,umi的配置文件是config,可以在配置文件后添加对应的环境名称后缀来区分开发环境和生产环境。参考文档:https://umijs.org/zh-CN/docs/deployment- 开发环境:
config.dev.ts - 生产环境:
config.prod.ts - 公共配置:
config.ts不带后缀
- 开发环境:
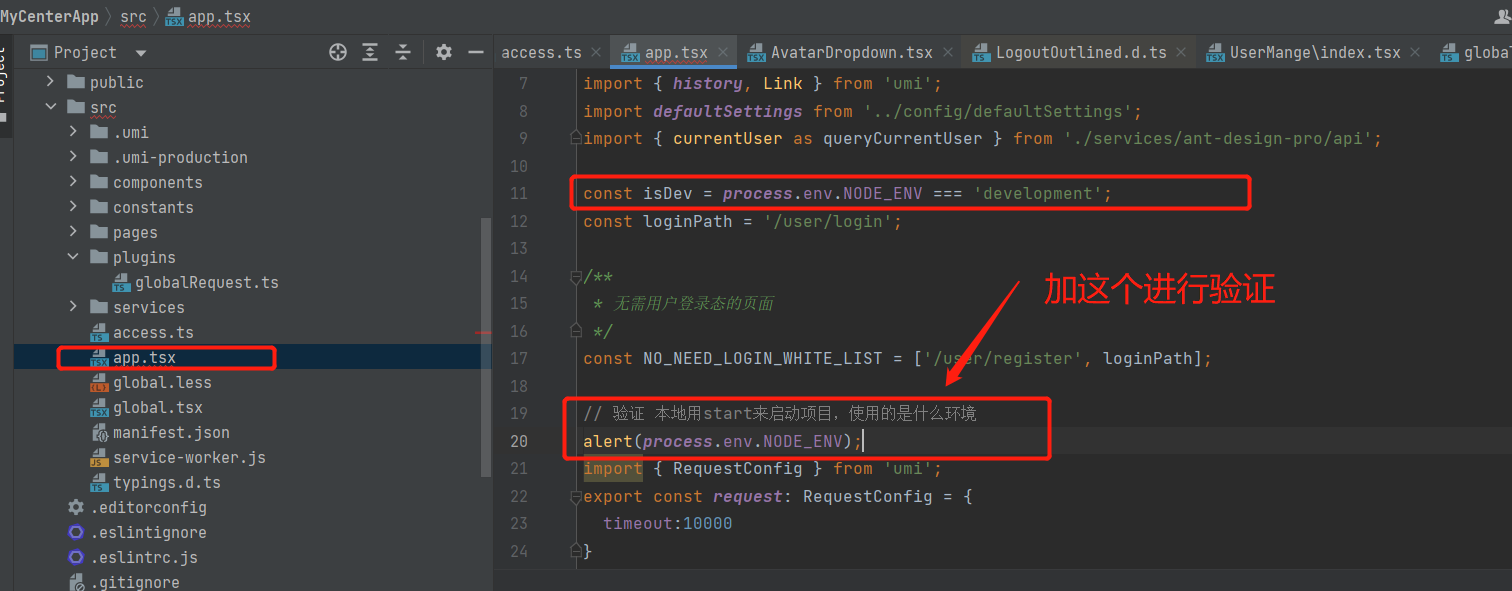
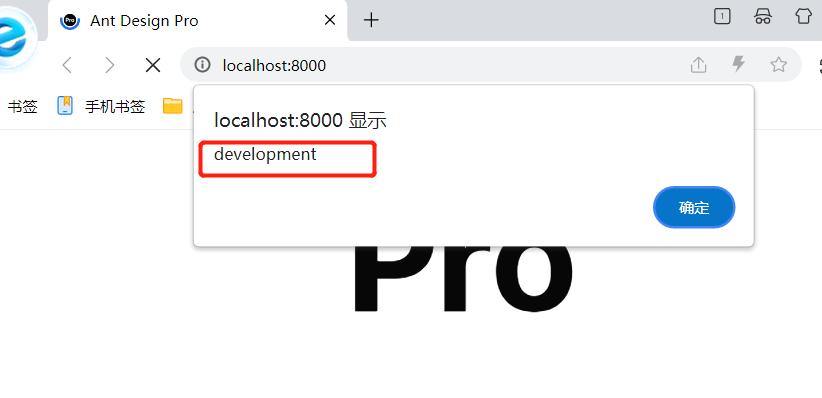
验证本地start启动的项目运行的环境
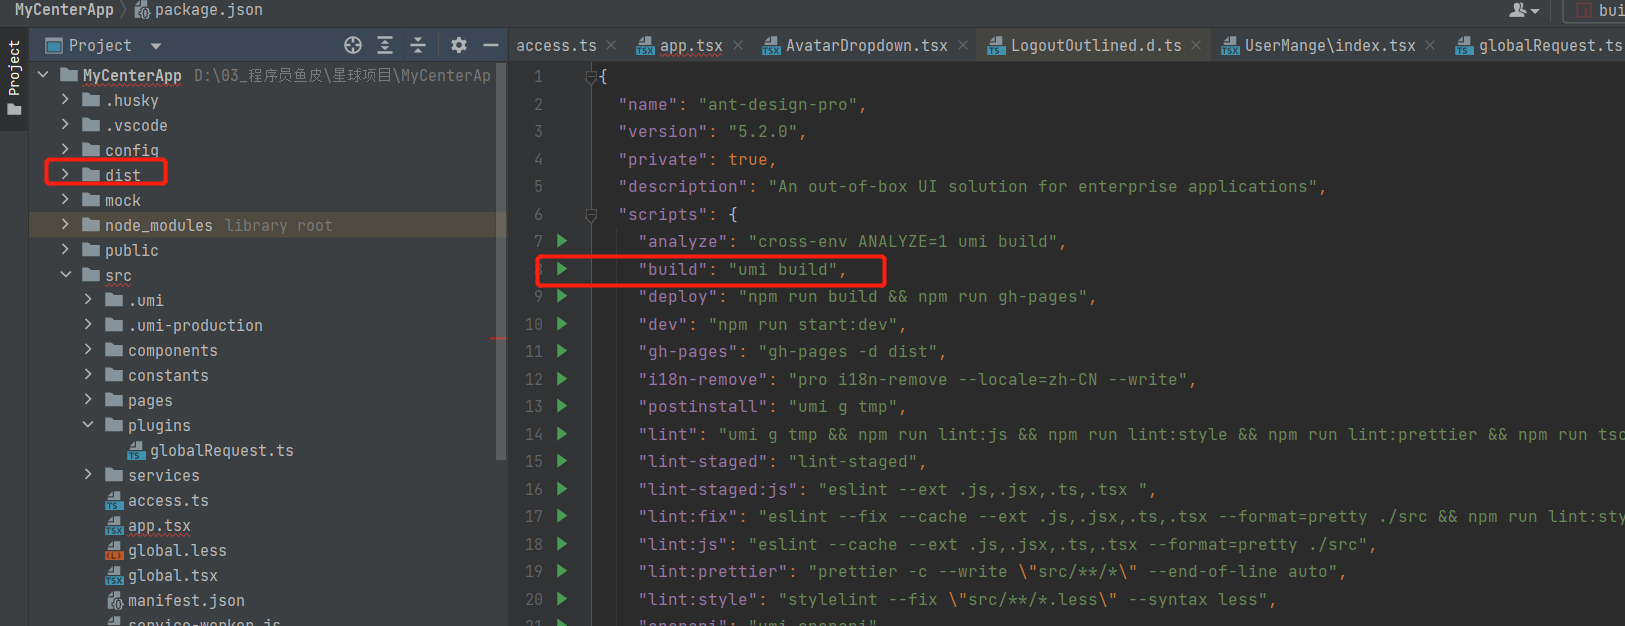
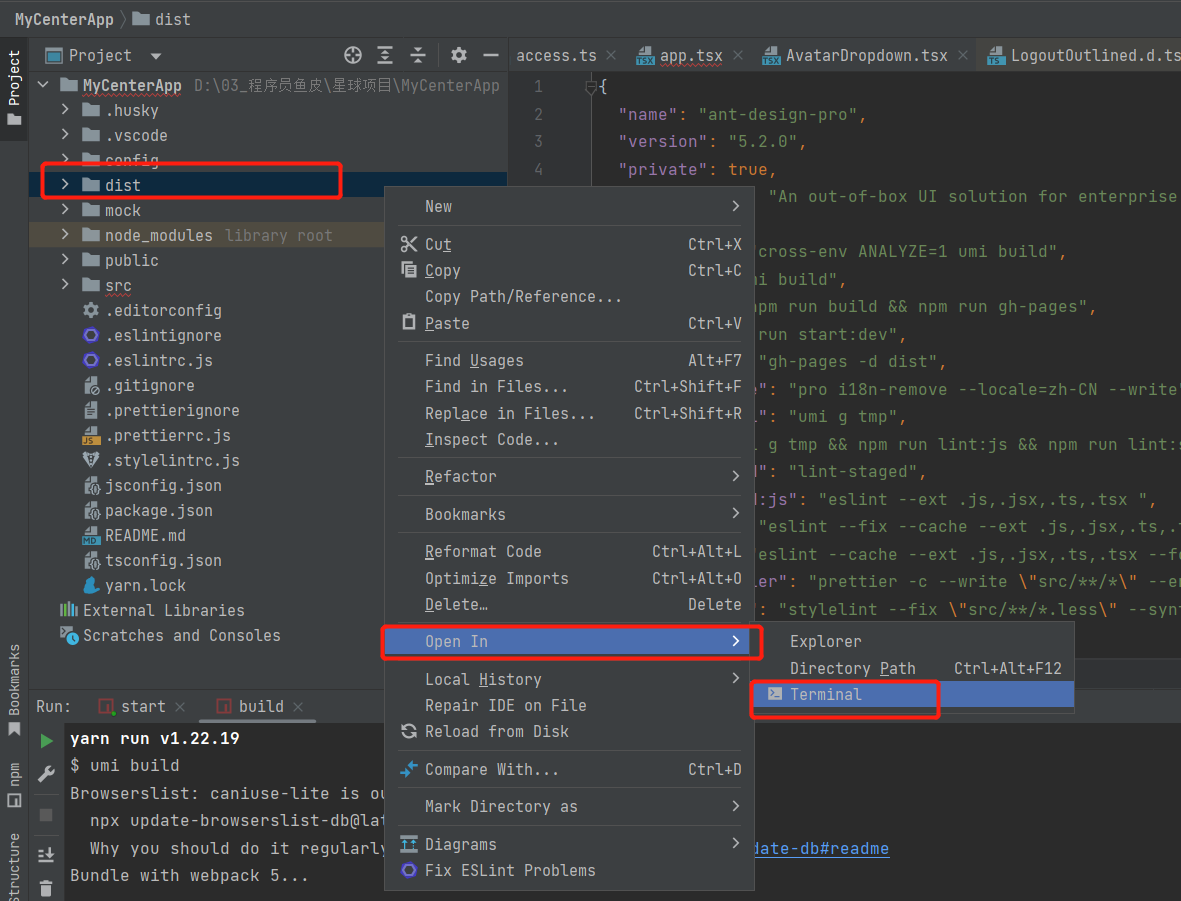
如果要进行项目上线的话,需要运行build 进行打包构建,然后生成一个dist文件
可以使用 serve 工具启动(npm i -g serve),浏览打包好了的文件
(在dist文件下运行是网页,在MyCenterApp文件下运行serve是浏览文件夹目录)
之前不是写过一个alert去看运行环境吗?这里的运行环境是production,是umi 在build之后自己修改的。

11.前端部署
需要 web 服务器:nginx 、apache、tomcat,推荐使用nginx Nginx 的三种安装方式:https://zhuanlan.zhihu.com/p/425790769
安装 nginx 服务器:
- 用系统自带的软件包管理器快速安装,比如 centos 的 yum (推荐使用)
- 自己到官网安装(参考本文章)(比较繁琐)
# 查看当前所在目录
pwd
# 创建services目录,用来存放所有项目的依赖和安装包
mkdir services
# 列出当前目录下所有的 文件和文件夹
ls
# 把之前的mysql的安装包移动到services目录中
mv mysql-community-release-el7-5.noarch.rpm /root/services
# 进入到services目录中
cd services/
ls
# 把nginx安装包下载下来,并改名为nginx-1.20.2.tar.gz
curl -o nginx-1.20.2.tar.gz http://nginx.org/download/nginx-1.20.2.tar.gz
# 解压nginx
tar -zxvf nginx-1.20.2.tar.gz
# 进入到nginx目录中
cd nginx-1.20.2

ls
# 安装相关依赖
yum install pcre pcre-devel -y
yum install openssl openssl-devel -y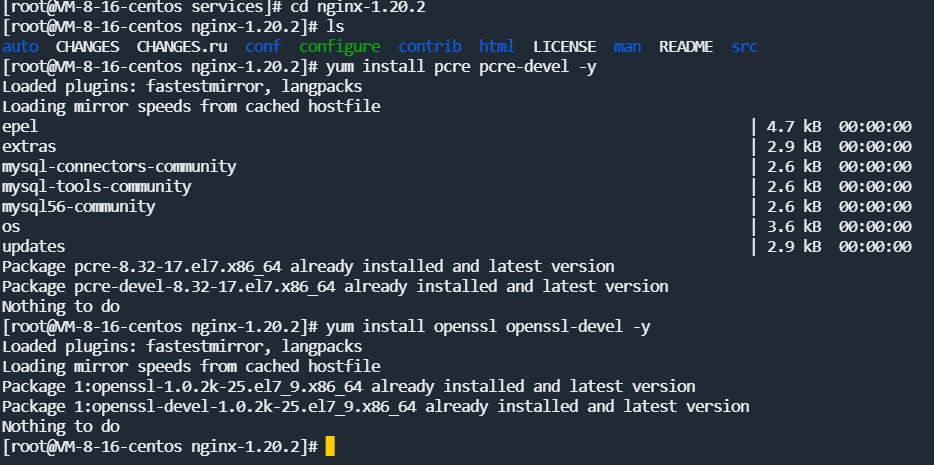
# 设置系统配置参数
./configure --with-http_ssl_module --with-http_v2_module --with-stream
# 开始编译
make
make install
# 输入nginx,会报错,说找不到命令,需要加入环境变量
nginx
vim /etc/profile
#  按下shift+g将光标定位到最后一行,新增以下内容:
export PATH=$PATH:/usr/local/nginx/sbin
# 使配置文件生效
source /etc/profile
nginx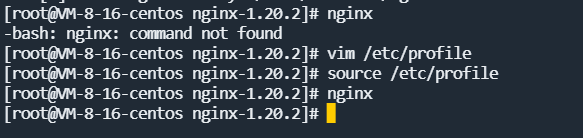
# 查看当前所有tcp端口/查看启动情况
netstat -ntlp
# 复制nginx.conf配置文件.并重命名为nginx.default.conf
cd /usr/local/nginx/conf
cp nginx.conf nginx.default.conf
# 查看nginx.conf整个文件内容
cat nginx.conf
# 上传dist文件到/root/services中
# 切换目录到/root/services
cd /root/services
# 解压 dist.zip
unzip dist.zip
# 重命名为 user-center-front
mv dist user-center-front
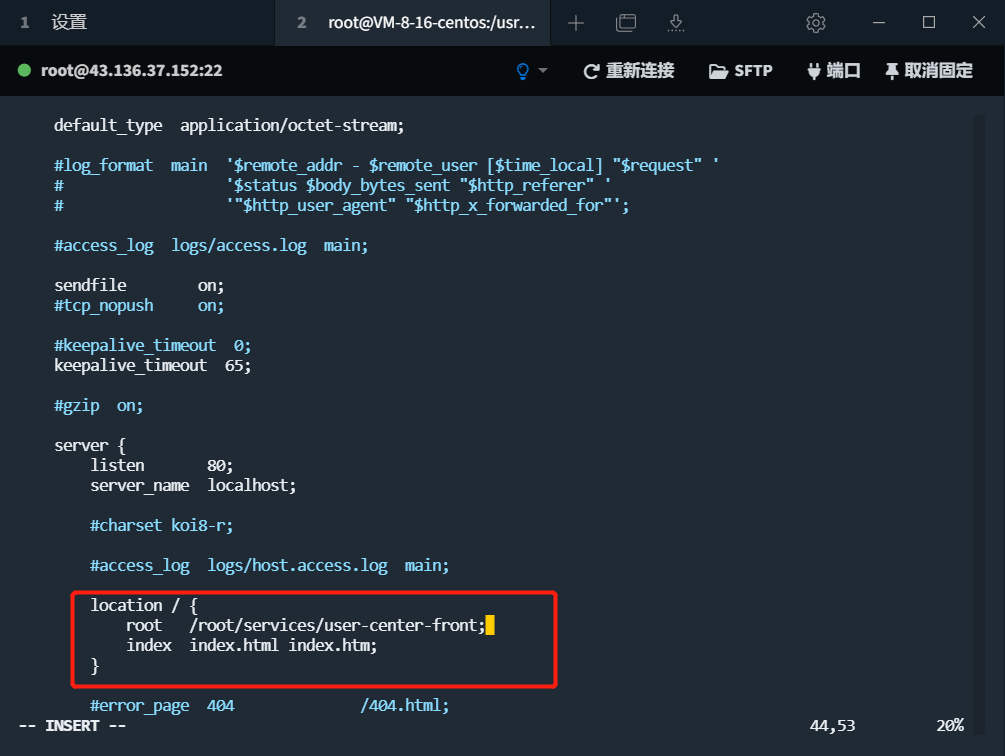
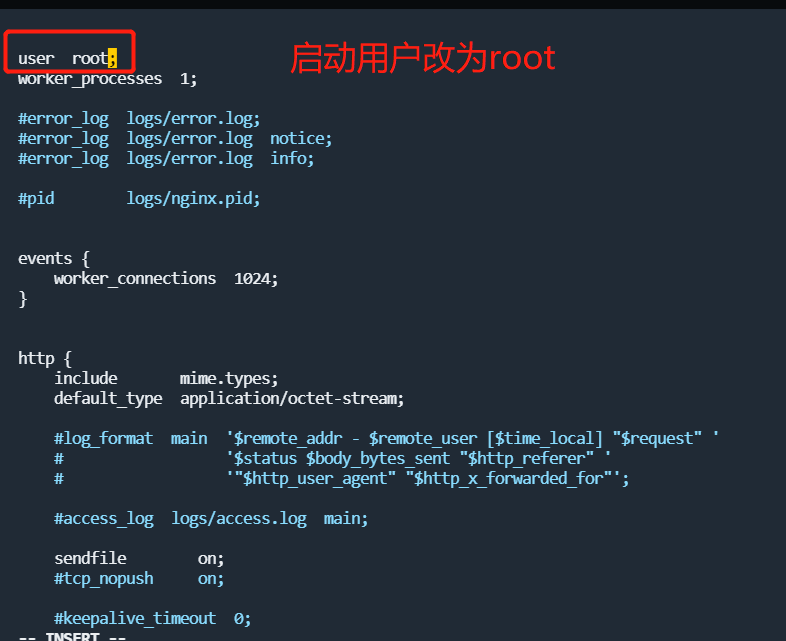
#修改配置文件,设置启动用户和前端项目所在路径
cd /usr/local/nginx/conf
vim nginx.conf
location / {
root html;
index index.html index.htm;
}
改为如下:
location / {
root /root/services/user-center-front;
index index.html index.htm;
}
# 更新配置
nginx -s reload
# 在云服务器网站开放80端口,还要在防火墙 手动增加80端口
firewall-cmd --zone=public --add-port=80/tcp --permanent
# 防火墙重新加载配置
firewall-cmd --reload
# 查看开放的端口
firewall-cmd --list-ports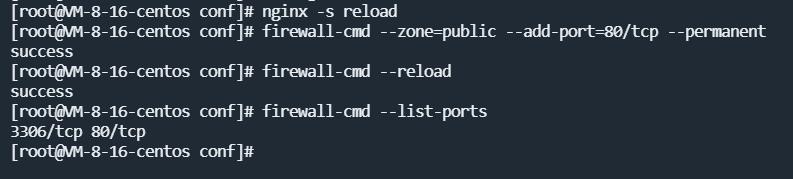
测试访问公网ip地址
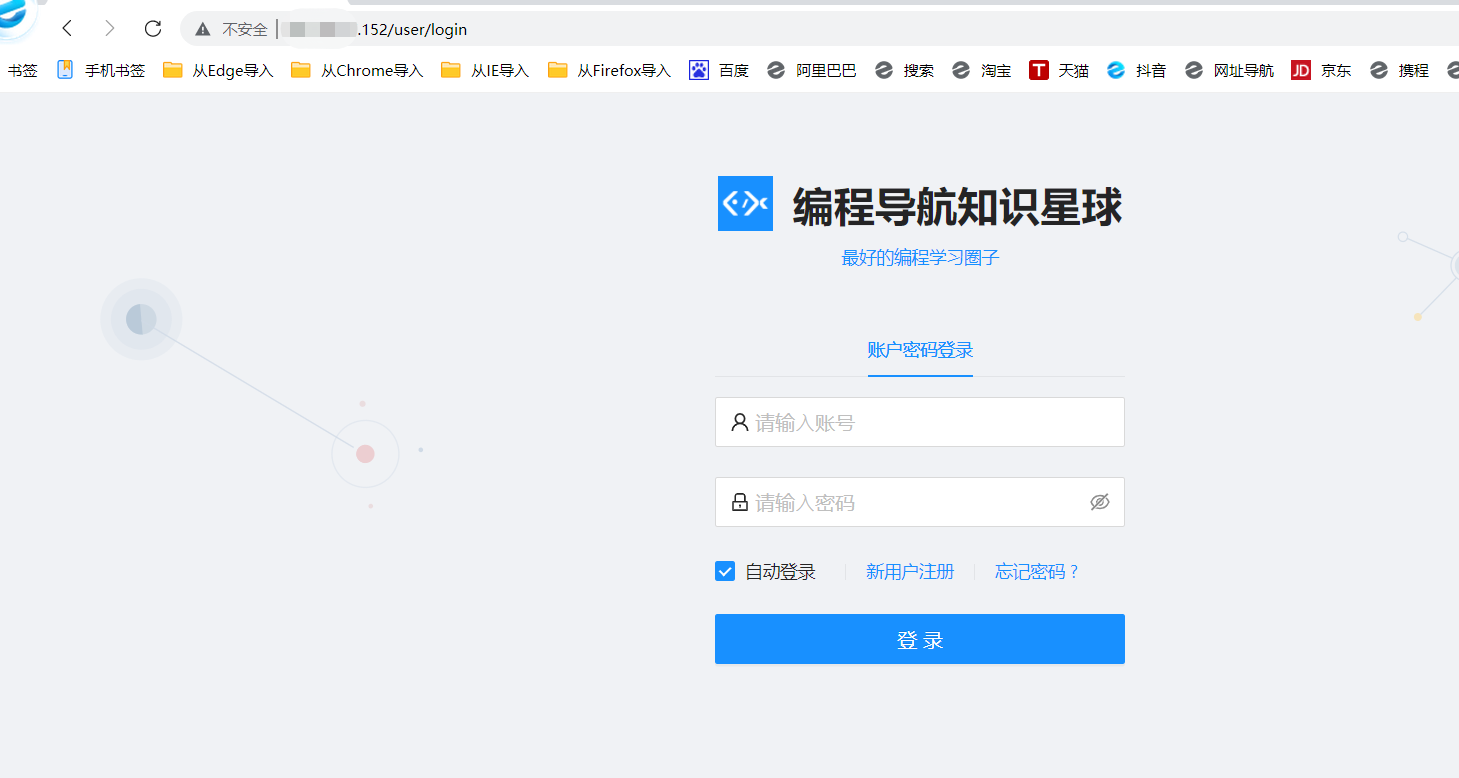
前端部署完毕!